About the Plugin
QMetry Test Management plugin for Jenkins has been designed to seamlessly integrate your CI/CD pipeline with QMetry.
Easily configure Jenkins to submit your test results to QMetry without needing to write any code or deal with REST API. Your Test Results could be from any automation framework like Cucumber, Test NG, JUnit, QAF and more.
For more info visit QMetry Test Management.
Read the following topics on this page:
- Pre-requisites
- How to install QMetry Test Management Plugin for Jenkins
- Configuring a standard Jenkins Job.
- Configuring QMetry Plugin job as a post build action.
- Triggering the job and publishing results in QMetry.
Pre-requisites
- QMetry Test Management installed on Server or Cloud
- Jenkins installation
How to install QMetry Test Management Plugin for Jenkins
-
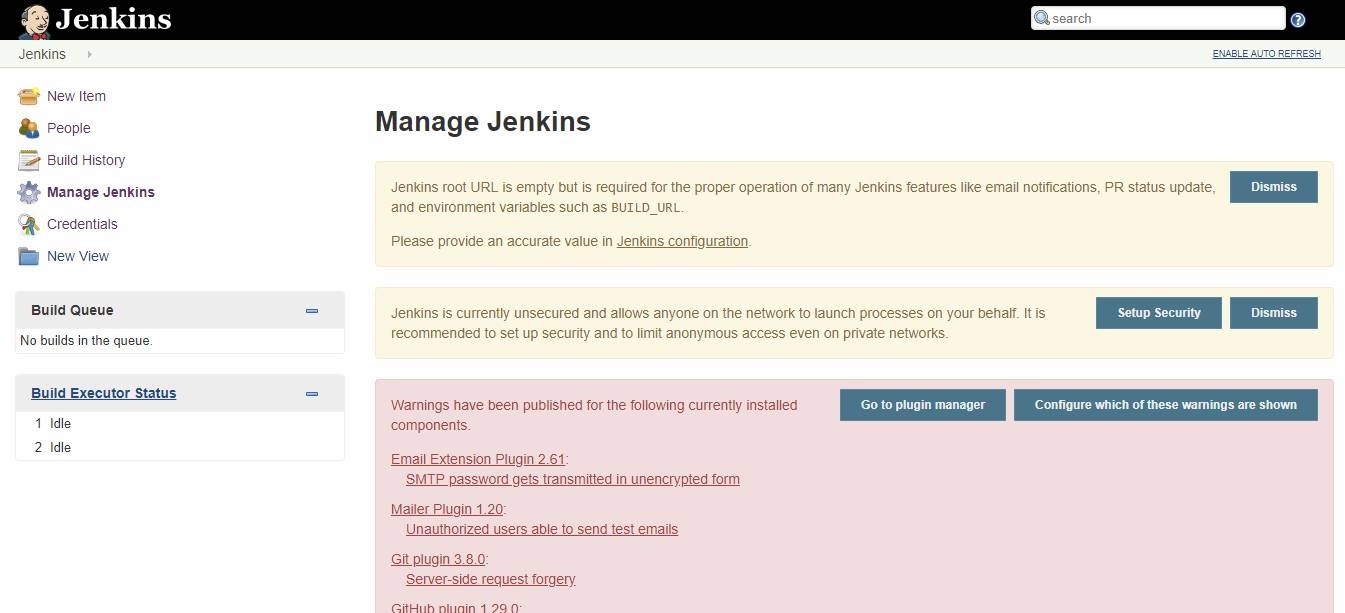
Login to Jenkins and go to Manage Jenkins.
 {height="250"}
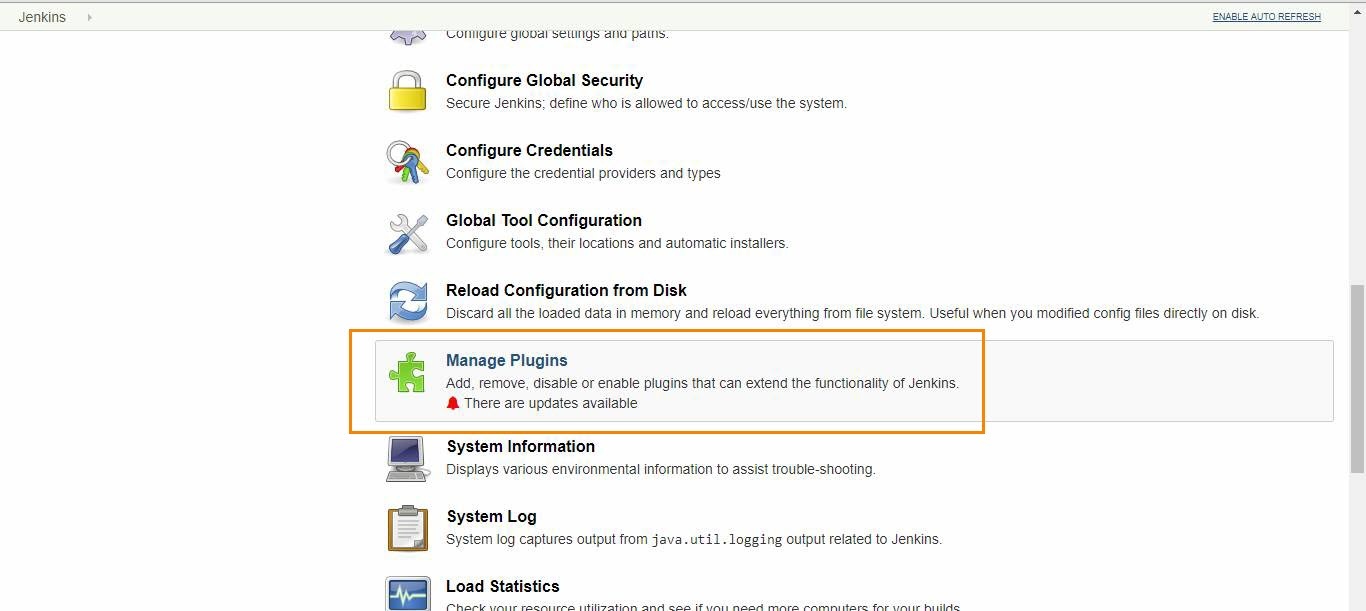
2. Locate the Manage Plugins section.
 {height="250"}
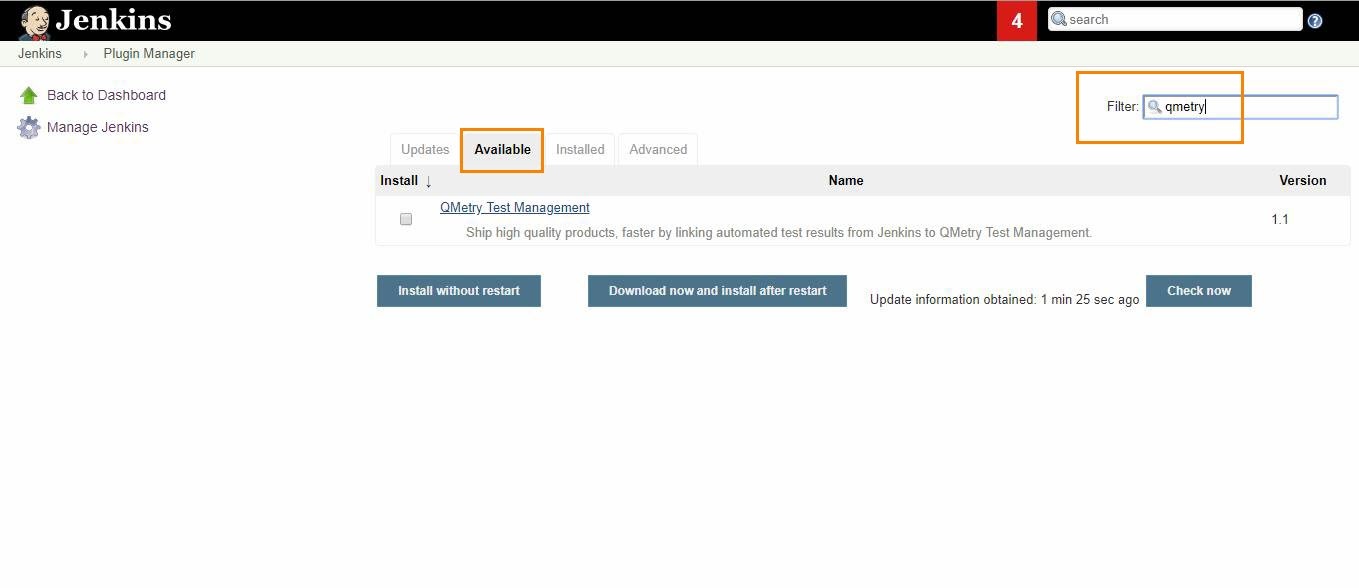
3. Open the Available tab and search for "QMetry Test Management".
 {height="250"}
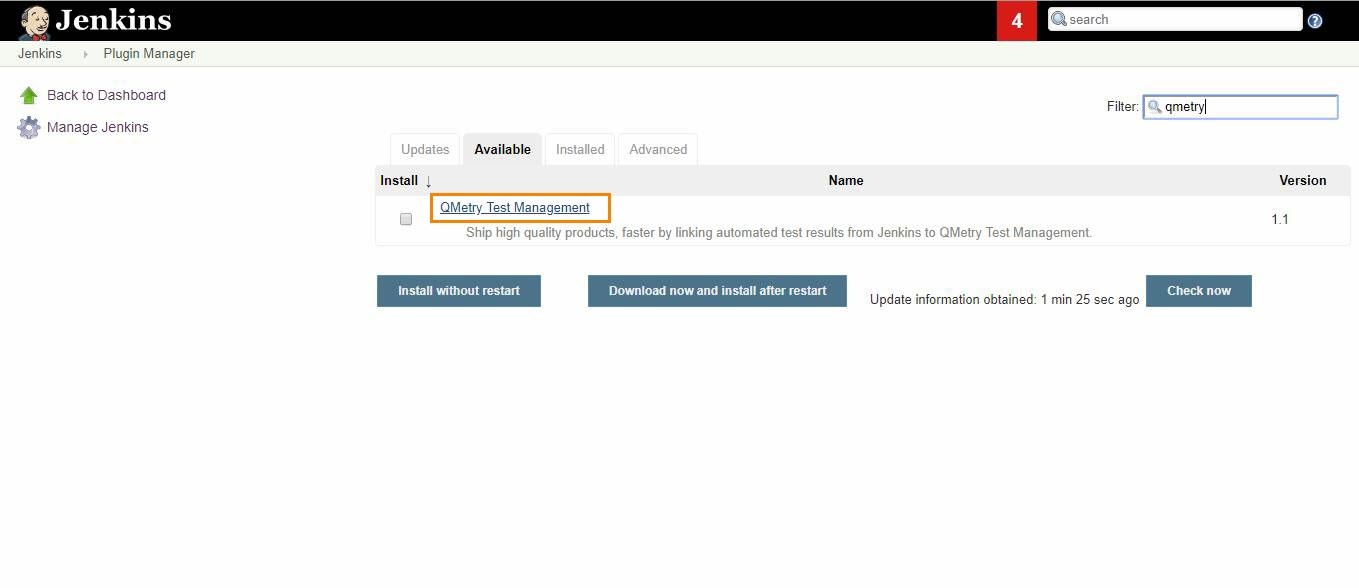
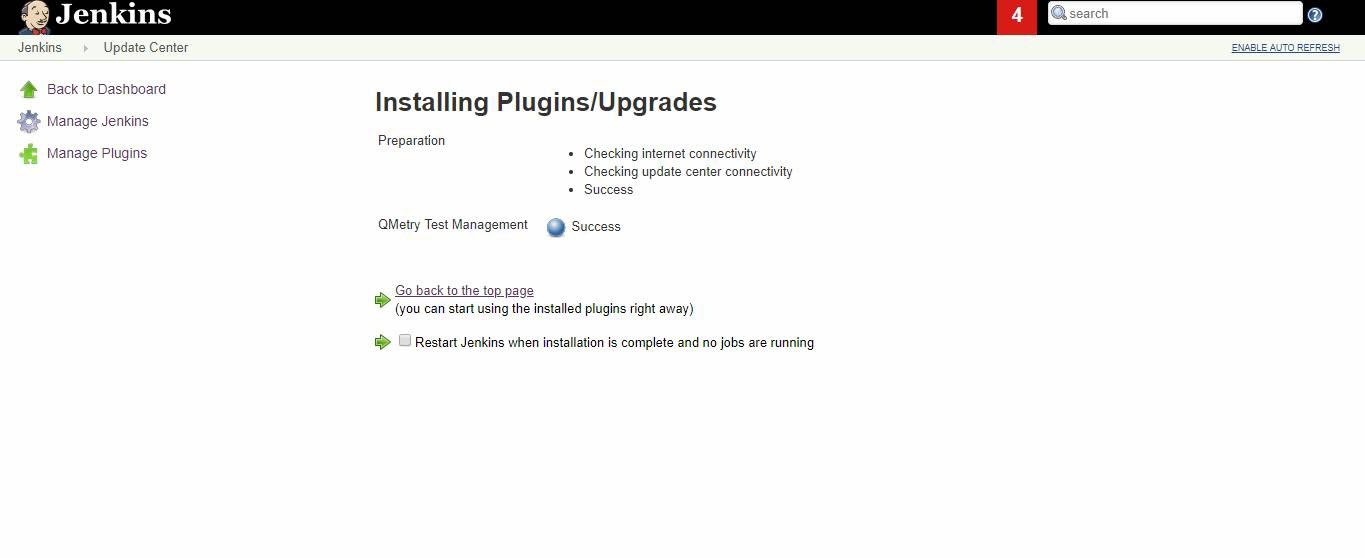
4. Locate and select the QMetry Test Management Plugin. Choose install option either Install without Restart OR Download Now and install after restart.
 {height="250"}
 {height="250"}
Configuring a Standard Jenkins job
You can configure Jenkins job through either of the following options:
- Freestyle Project
- Pipeline
Freestyle project
Let’s create a standard Freestyle job in Jenkins.
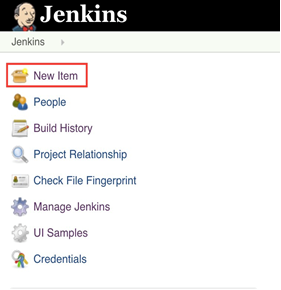
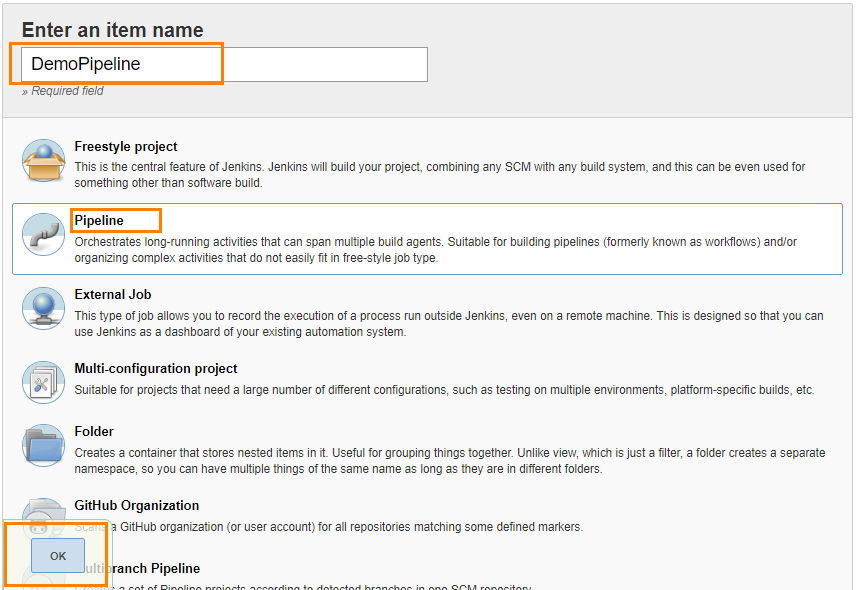
- To create a new Jenkins job, click on the New Item option on the Jenkins menu.
 {height="250"}
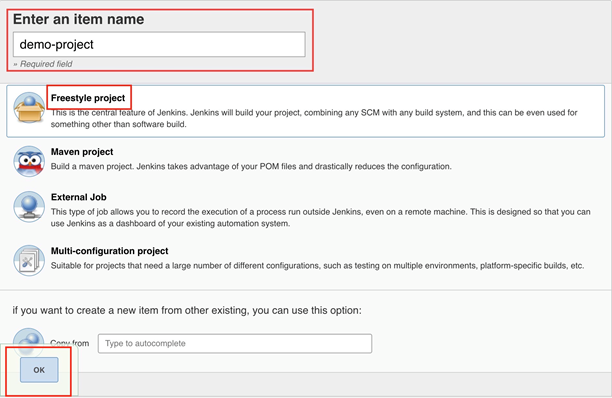
2. Provide a name for your job.
Select Freestyle project on the screen and then click OK.
 {height="250"}
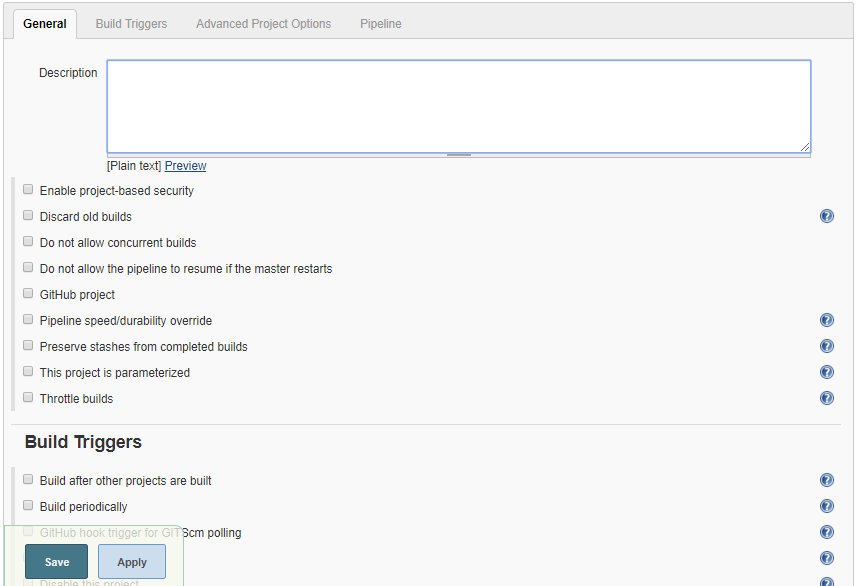
3. Next, the configuration page appears where you can configure your job by various categories: General, Source Code Management (SCM), Build Triggers, Build, and Post build actions.
 {height="250"}
4. On the Source Code Management tab, select the appropriate option in which you have your source code. For example, here it is “Git”. So, select “Git” and provide the necessary information. (Note: You need to configure GitHub plugin in global configuration).
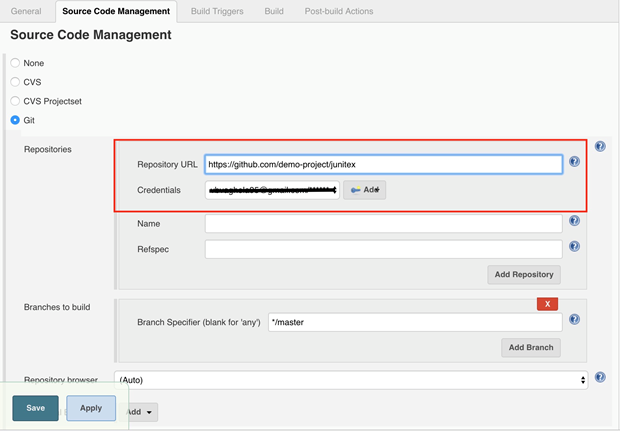 {height="250"}
5. Optionally, you can set Build Triggers.
Select the Build Triggers tab. Let’s just add a periodic trigger which triggers build every minute – every hour – every day (Schedule: * * * * *).
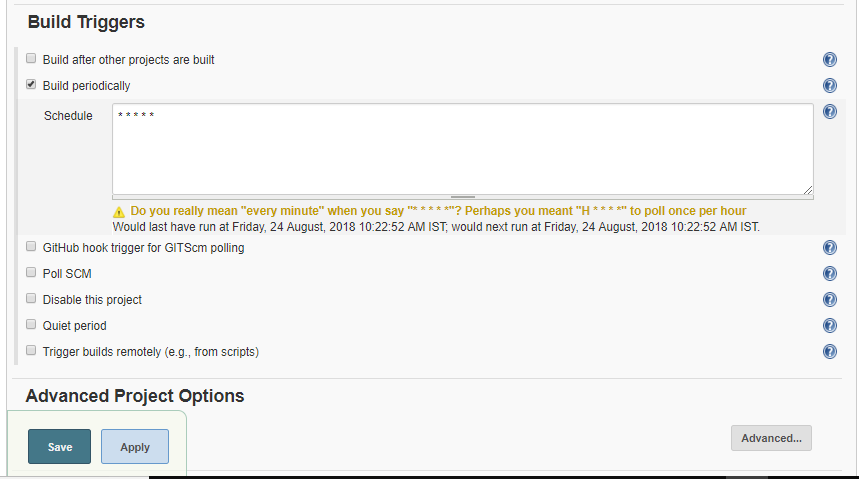 {height="250"}
6. Next, Select a build step. You can select from various options: Ant, Maven, Windows batch process, etc. For example, for a maven project, trigger a maven build and specify goals.
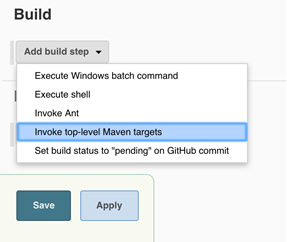
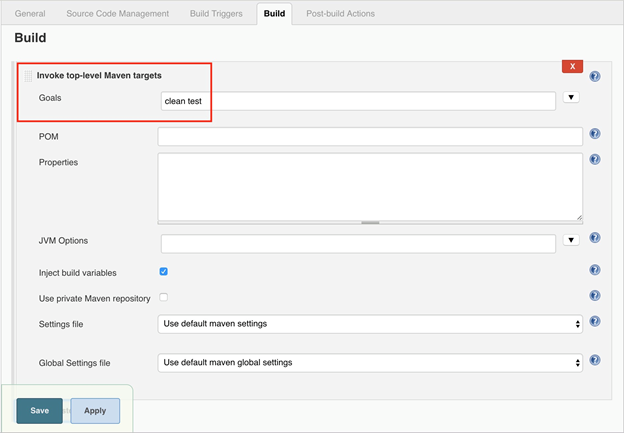 {height="250"}
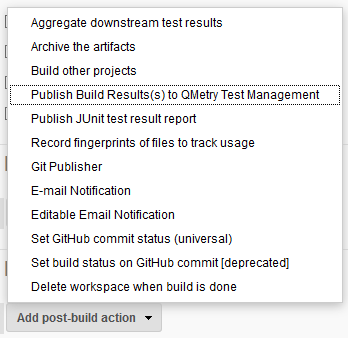
Next step is to add Post-build Actions. Here, add the plugin: “QMetry Test Management Plugin”.
Configuring QMetry Test Management Plugin as a Post-build Action
Jenkins works as a bridge between QMetry Test Management and automation frameworks. To publish results in QMetry, define another post-build action.
1. On the Add post-build Actions drop-down, select the "Publish test result to QMetry" option.
2. Fill in the required data. You can get more information regarding fields by clicking on the Help icon for respective fields. It explains what to enter in that particular field.

**Parameters **
[TABLE]
*** **Release is mandatory if Cycle is mentioned.
Supported Fields
- Field Name as mentioned in QMetry > Customization > Manage Fields > Field Name
- For Look up list and multi lookup list fields
-
If the value does not exist in Project and Auto Create value feature is on for Project, the value will get added in the list and it will be assigned to the test case.
-
If the value does not exist in Project and Auto Create value feature is off for Project, the value will not be added in the list and Test Case field will be blank or have default value in it.
-
If a new value is added to Multi Look Up List, the older value will remain unchanged and the new value will be added to the list.
-
List values are added to the same version of the test case.
-
Field
Example
Test Case
Test Suite
Notes
"component"
"component" : ["Label1, "Label2"]
Yes
No
Old values will persist and new value will get set e.g., L1 and L2 are set and L3 is assigned, then the updated values for component will be L1, L2 and L3.
"priority"
"priority" : "Minor"
Yes
No
As mentioned for Look Up and Multi Look Up lists above.
"testCaseState"
"testCaseState":"Open"
Yes
No
"testCaseType"
"testCaseType":"UI"
Yes
No
"testcaseOwner"
"testCaseType":"John"
Yes
No
userAlias should be passed in request. Owner will not be set if the requested user is not found or the user doesn't have right for the Test Case module.
"description"
"description":"Sample Description."
Yes
Yes
This will be set as requested.
"estimatedTime"
"estimatedTime":6
Yes
No
This will be set as requested.
"testSuiteState"
"testSuiteState":"Open"
No
Yes
A new Status value will be added if it does not exist in the project.
"testsuiteOwner"
"testsuiteOwner":"lizamathew"
No
Yes
userAlias should be passed in request. Owner will not be set if the requested user is not found or the user doesn't have right for the Test Suite module.
User Defined Fields
[TABLE]
Test Case Fields with UDFs in JSON format
{

"component":["com1", "com2"],
"priority":"High",
"testCaseState":"Open",
"testCaseType":"Manual",
"testcaseOwner":"lizamathew",
"estimatedTime":60,
"description":"Sample Description",

"userDefinedFields" : {

"reviewedDate": "08-30-2019",
"executionTime": 40,
"tagName": "Sample test asset.",
"additionalComment": "This is a sample test asset"
"country": ["United States"]
"langaugePreference": ["English",Portuguese"]

}

}
**Test Suite Fields with UDFs in JSON format
**
{

"testSuiteState":"Open",
"testsuiteOwner":"lizamathew",
"description":"Testing 8.5.4 API Changes",

"userDefinedFields" : {

"reviewedDate": "08-30-2019",
"executionTime": 40,
"tagName": "Sample test asset.",
"additionalComment": "this is a sample test asset"
"country": ["United States"]
"langaugePreference": ["English",Portuguese"]
}

}
The following table depicts probable import result according to the scenario.
| Is System Field/UDF Mandatory? | Is Auto-Create Enabled? | Does UDF Value exist? | Import Result |
|---|---|---|---|
| No | No | No | Fail |
| No | No | Yes | Success |
| No | Yes | No | Success |
| No | Yes | Yes | Success |
| Yes | No | No | Fail |
| Yes | No | Yes | Success |
| Yes | Yes | No | Success |
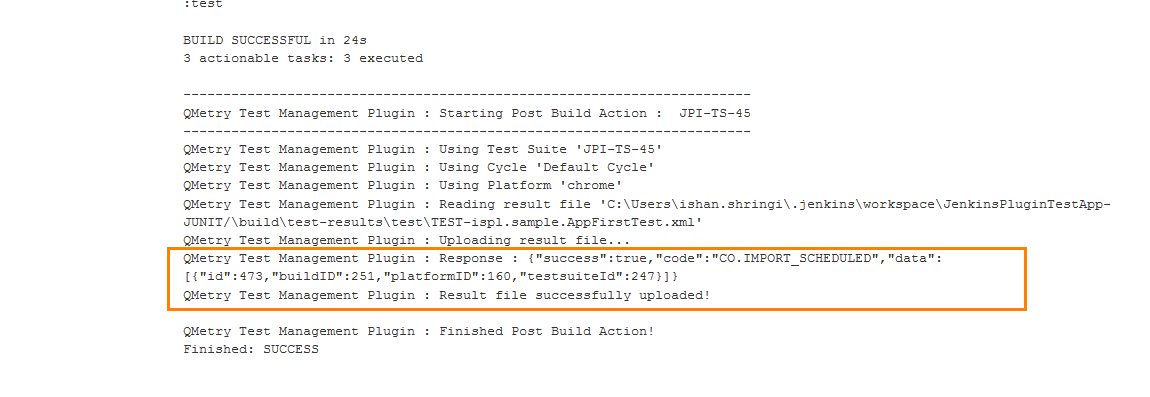
3. On successful completion of the process, you can see the console output. It displays success message for uploading the result file.
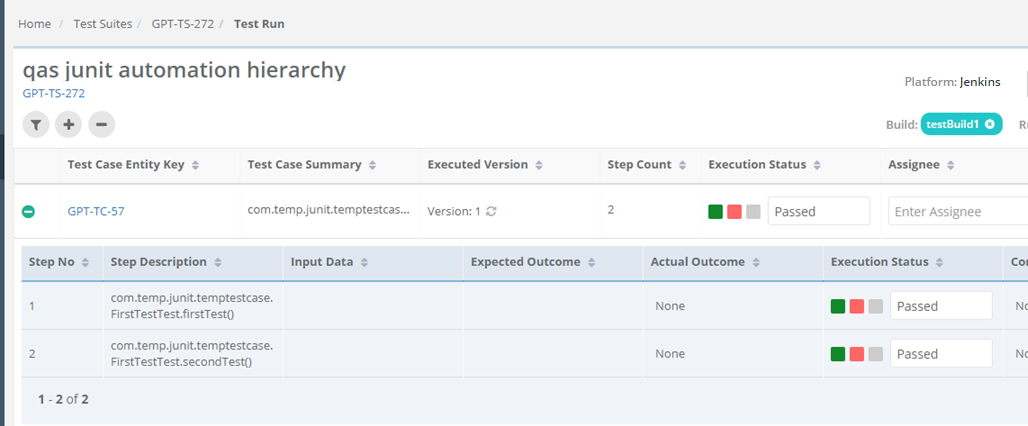
4. Finally check test execution page in QMetry and review your test run results.
 {height="250"}
Pipeline
QMetry Test Management supports Jenkins Pipeline for implementing and integrating continuous delivery pipelines into Jenkins.
Let’s create a standard Pipeline job in Jenkins.
1. To create a new Jenkins job, click on the New Item option on the Jenkins menu.
 {height="250"}
2. Provide a name for your job.
Select Pipeline on the screen and then click OK.
 {height="250"}
3. Next, the configuration page appears where you can configure your job by various categories: General, Build Triggers, Advanced Project Options, and Pipeline.
{height="250"}
4. Optionally, you can set Build Triggers.
Select the Build Triggers tab. Let’s just add a periodic trigger which triggers build every minute – every hour – every day (Schedule: * * * * *).
{height="250"}
5. Advanced Project Options: This is optional. You can give Display Name which will replace the name you gave earlier to the Pipeline project.
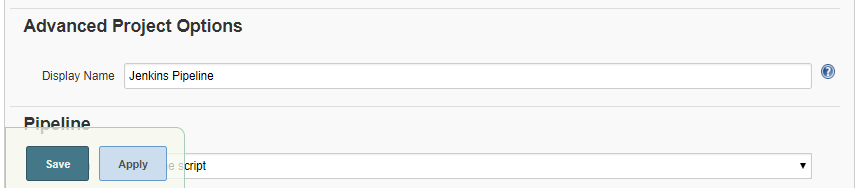
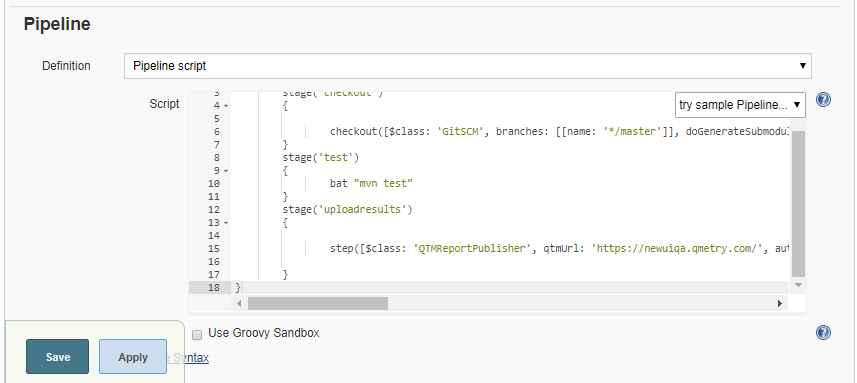
6. Jenkins works as a bridge between QMetry Test Management and automation frameworks. To publish results in QMetry, provide Pipeline script.
Enter Pipeline script to define your code repository, generate test result and upload test results into QMetry Test Management.
Code Snippet
Pipeline Script
stage('Upload Result to QTM'){
       step([$class: 'QTMReportPublisher', disableaction:false, qtmUrl: 'https://newuiqa.qmetry.com/', automationFramework: 'JUNIT', automationHierarchy: '2', testResultFilePath: '/cucumber', qtmAutomationApiKey: '4FR2Oo1g42vUnb5NtDgi3JIjzrFOvUUV8QJBk38D', project : '7242', release: 'Release 1', cycle: 'Cycle 1', buildName: 'testBuild1', platformName: 'Jenkins', testSName: 'junit pipeline', proxyUrl:'', testSuiteName: 'TC2-TS-116'
       testcaseFields: '{"description":"Automated Test case", "testCaseType":"Automated", "testCaseState":"Open", "component":["UI"], "priority":"Blocker", "testcaseOwner":"liza.mathew", "estimatedTime":"143", "userDefinedFields" : {"Integrate" : "Custom Field Testcase"}}',
       testsuiteFields: '{"description":"Automated Test suite", "testsuiteOwner": "liza.mathew", "testSuiteState": "New", "userDefinedFields": {"Integrate" : "Custom Field Testsuite"}}'
       ])
    }
Note: testSName is "Test Suite Name" and testSuiteName is "Test Suite ID" of the test suite.
Syntax of automationFramework:
-
CUCUMBER
-
TESTNG
-
JUNIT
-
QAS
-
HPUFT
 {height="250"}
**Parameters
**
Refer to the Parameters section for Freestyle Project above.
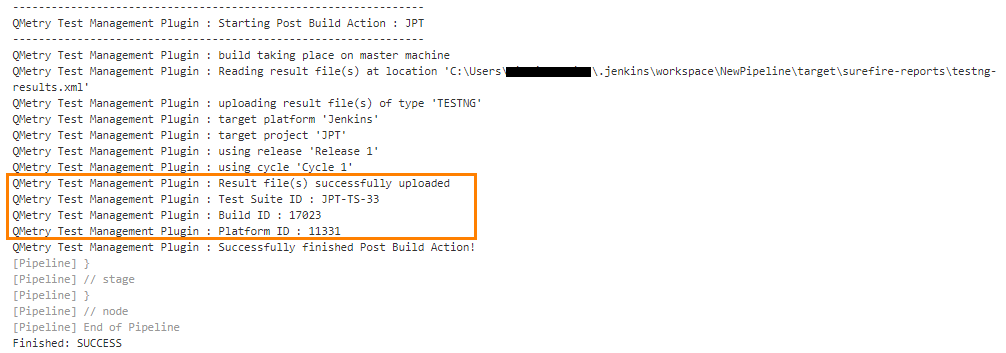
7. On successful completion of the process, you can see the console output. It displays success message for uploading the result file.
 {height="250"}
8. Finally check test execution page in QMetry and review your test run results.
{height="250"}
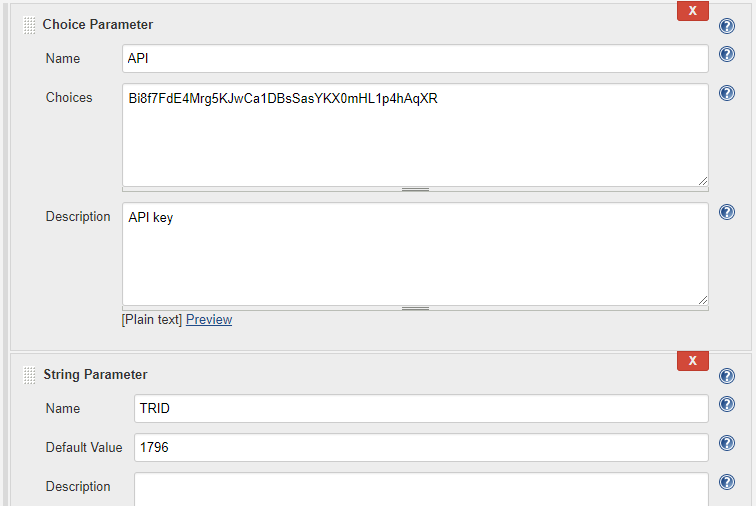
Define Parameters
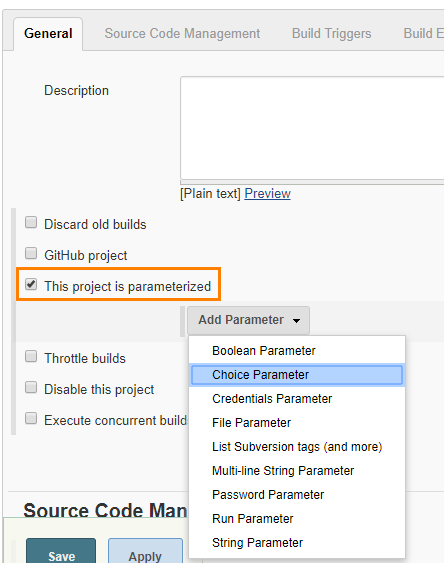
To define parameters for your job, select the This project is parameterized check box.
The Add Parameter drop-down is enabled with the list of parameter types. Use the drop-down button to add as many parameters as you need.
 {height="250"}
There are different parameter types available. The way parameters take effect according their respective parameter type.
For example,
Choice Parameter and String Parameter are selected, and corresponding parameters are added as shown below.
 {height="250"}
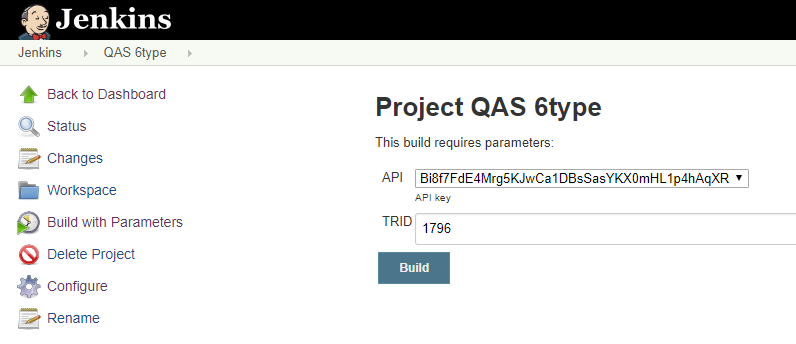
The above parameters will be parsed dynamically at the run time.
The field values should be entered in the following syntax:
${ParameterName}
For example,
For the parameters created above, the field value would be ${API} and ${TRID} respectively. The parameter values will be parsed accordingly for the corresponding fields.

The values can also be changed before triggering the Jenkins build.
 {height="250"}
QMetry Configuration for Specflow
Specflow by default generates the output results in Specflow JSON format. QMetry can consume it as Cucumber JSON format. The following solution will generate the output result in Cucumber JSON format in parallel and the result could imported to QMetry.
Part A : Make the following changes in your Specflow Project to generate result file format as Cucumber JSON
Step 1 : Add Dependencies
https://www.nuget.org/packages/SpecNuts/
https://www.nuget.org/packages/SpecNuts.Json/
Step 2 : Add the below code in .cs of feature file
[BeforeTestRun]
public static void BeforeTestRun() {
    SpecNuts.Reporters.Add(new JsonReporter());

    SpecNuts.Reporters.FinishedReport += (sender, args) => {

        String pathName = "specflow_cucumber.json";

        System.IO.File.WriteAllText(pathName, args.Reporter.WriteToString());

        Console.WriteLine("Result File: " + System.IO.Directory.GetCurrentDirectory().ToString() + System.IO.Path.DirectorySeparatorChar + pathName);

    };
}
Step 3 : Open Text Explorer in Visual Studio by Test > Windows > Test Explorer -> Choose Run All
Step 4 : In Visual Studio console, select show output from Test and open Report File as path given in Console
Part B : Make the following Configurations in Jenkins
Configuration Steps
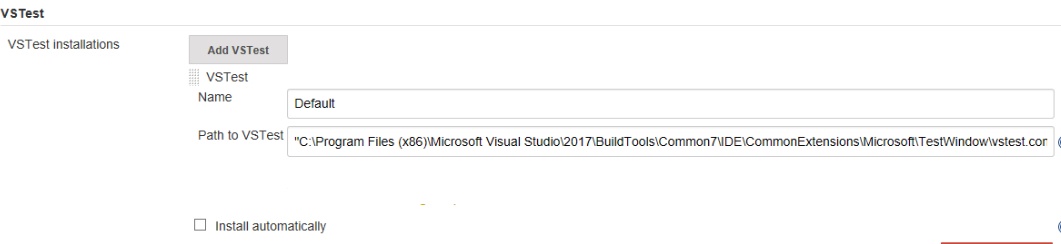
- Install "MSBuild Plugin" and "VSTest Runner Plugin"
- Install Visual tools and Set path for MSBuild.exe and vstest.console.exe files in Manage Jenkins > Global Tool Configuration
 {height="244"}
 {height="244"}
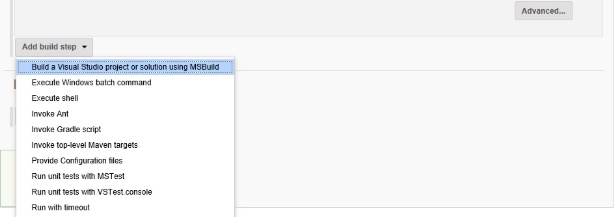
Configure the following parameters in the Jenkins Job
Step 1 : In the Build Step >> Choose - Build a Visual Studio project or solution using MSBuild
** {height="217"}
**
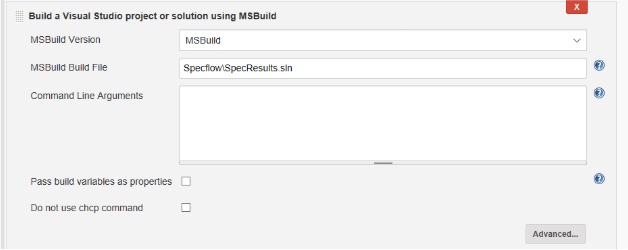
Step 2 : Provide the MsBuild Version and relative path to solution file
- Select "MSBuild Version" which is configured in Global Tool Configuration
- Specify the relative path for solution file in "MSBuild Build File"
 {height="250"}
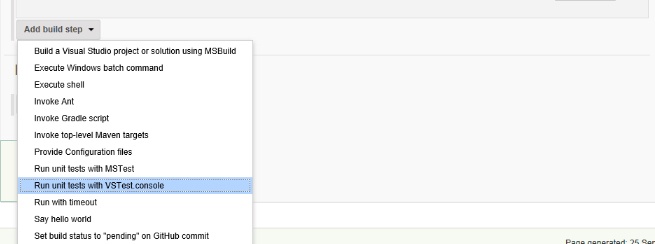
Step 3 : Select a build step for VSTest in Build Section - Run unit tests with VSTest console
 {height="244"}
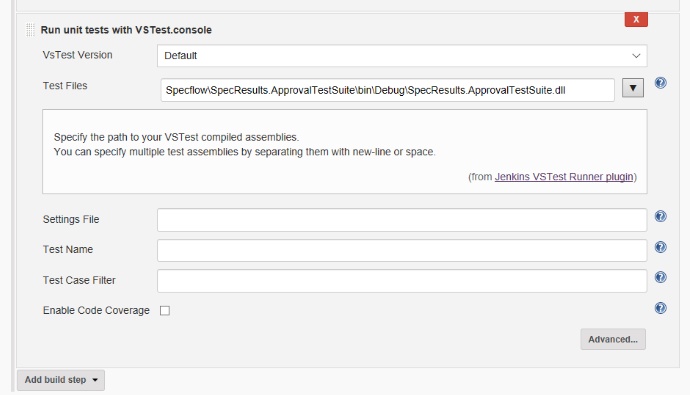
- Select "VSTest Version" which is configured in Global Tool Configuration
- Specify the relative path to your VSTest compiled assemblies in "Test Files"
 {height="400"}
Step 4 : In post build action setup QMetry Test Management plugin
-
Choose "Cucumber" format to upload
-
Relative Path to result file "specflow_cucumber.json"
-
Choose other relevant parameters
Automation API URL