OpenText Application Automation Tools
This OpenText Application Automation Tools plugin integrates OpenText™ products with Jenkins. Using the plugin, you can create and use virtual services, run LoadRunner Enterprise or LoadRunner Professional tests, run Functional Testing tests, run tests in your lab, and run tests on mobile devices. This plugin also lets you upload test results to Application Quality Management. In addition, Software Delivery Management users can track and trigger Jenkins pipelines from within the user interface.
Jenkins versions
This plugin requires one of the five latest LTS versions of Jenkins. This is a result of the Jenkins policy to no longer support older update centers. Jenkins now requires you to have Java 8 installed on the machine.
Submit issues and feedback through JIRA
This plugin is open source. If you identify any issues or want to submit enhancement requests, please use JIRA. The component for this plugin is the hp-application-automation-tools-plugin component. Your feedback and involvement will allow us to stabilize and enhance the capabilities of the plugin. The latest, early access, beta versions of this plugin are available here.
A list of known bugs is available here.
Table of Contents
Configuration for Java Web Start clients
Content Security Policy
Starting with version 1.641 (or 1.625.3), Jenkins introduced the Content-Security-Policy header. This causes some of the integration links, such as links to reports, to become inoperable. For details, see Configuring Content Security Policy and Jenkins Security Advisory . For suggested workarounds until the issue is resolved, see Content Security Policy Header.
New Features and Enhancements
Version 26.1 introduced the following fixes:
Software Delivery Management
- Bug fixes
For information about enhancements introduced in previous versions, see What's new in earlier versions.
Supported Integrations
This plugin supports the following OpenText product versions:
| OpenText™ tool | Supported versions | Find more information... |
|---|---|---|
| Application Quality Management (ALM) | 12.xx, 15.x, 16.x, 17.x, 24.x | ALM Integration page |
| ALM Lab Management | 12.xx, 15.x, 16.x, 17.x, 24.x | ALM Integration page |
| Software Delivery Management | 12.53.20 and higher (12.55.4 or later required for direct UFT One integration and for LoadRunner Enterprise integration using pipelines) | ALM Octane Help Center |
| OpenText Enterprise Performance Engineering | 12.xx (12.53 or higher required for trend reports), 2020 and higher | LoadRunner Enterprise Help Center |
| LoadRunner Professional | 12.xx, 2020 and higher | LoadRunner Professional Integration page |
| Model-based Testing | 16.0.300 and higher | Model-Based Testing Help Center |
| Service Virtualization | 3.80 and higher | Service Virtualization Help Center |
| Functional Testing for Developers | 14.03 and higher | UFT Developer Help CenterBlog: Integrate LeanFT with Jenkins in just a few simple steps |
| Functional Testing Lab (Digital Lab) | 2.0 and higher | Digital Lab Integration page |
| Functional Testing | 12.xx and 14.03 and higher | UFT One Help Center |
| ValueEdge | ValueEdge Help Center |
Prerequisites
-
Install one of the five latest LTS versions of Jenkins. For details, see the LTS Changelog. Note: The plugin may not operate properly with earlier versions of Jenkins.
-
Java version 8 or higher. Starting with the 24.3 release, Java 21 is required . To verify your Java version, go to http://www.java.com/en/download/installed.jsp.
-
Install the plugin:
a. Download the .hpi file for the Jenkins plugin from the plugin page.
b. Navigate to the Manage Jenkins > Manage Plugins > Advanced tab.
c. In the Upload Plugin section, upload the .hpi file.
-
For working with Application Quality Management, make sure the ALM/Quality Center client is installed on the machine that will run the tests. To check if the client installed, follow the instructions on: http://<your_server>:8080/qcbin/TDConnectivity_index.html
-
For running FT tests from OpenText Application Quality Management install the ALMClient in common registration mode by accessing the following link from an Internet Explorer browser on the OpenText™ Functional Testing machine: http://<your_server>:8080/qcbin/start_a.jsp?Common=true
-
For running file system scenarios with LoadRunner Professional or OpenText™ Functional Testing set up a node in Jenkins. For details, see Create an execution node.
-
For building and tracking pipelines on Software Delivery Management:
- JQuery Plugin 1.7.2-1 or later (Required to enable the integration)
- A plugin that enables publishing test results. For example, JUnit Plugin 1.10 or later, NUnit plugin, and so on (Required to enable Software Delivery Management/ValueEdge to collect your automated test results).
-
For OpenText Software Delivery Management/ValueEdge integration with OpenText Functional Testing, make sure you have version 2.4.4 or higher of the Git plugin.
User Guide
You can run client side-or server-side (Default or Functional) test sets and build verification suites from Application Quality Management (ALM) or functional tests from the file system. You can create and configure Software Delivery Management pipelines from the Software Delivery Management user interface, or on Jenkins.
Create an execution node
-
Creating an execution node is only required when running scenarios from LoadRunner Professional or OpenText Functional Testing, that are stored on the file system. You only need to set an execution node if the Jenkins master machine is not the executing machine. If you are running LoadRunner Professional or OpenText Functional Testing on the master machine, you do not need to set and select a node.
-
Go to the Jenkins Server home page.
-
Click the Manage Jenkins link in the left pane.
-
In the Manage Jenkins Page click Manage Nodes.
-
Click New Node.
-
Enter a Node name , select Permanent Agent , and then click OK.
-
In the next screen, enter information in the required fields. Enter the full path of the Remote Root directory , to which the tests results will be saved.
-
Provide one or more labels for the node. Separate the values with a space. Through these labels, you will be able to identify the nodes used in the job.
-
In the Usage area, select Only build jobs with label expressions matching this node.
-
Click Save.
-
Connect the execution node to the Jenkins server as described below.
Connect an execution node to the Jenkins server
To connect and execution node to the Jenkins machine:
-
On the computer that you defined as an execution node, open a browser and go to the Jenkins Server home page.
-
Open Manage Jenkins > Manage Nodes.
-
If there is a warning mark adjacent to the node you want to connect, click the node's link. You are prompted to connect the agent to Jenkins.
-
Click Launch to download the agent and then run the downloaded agent. Alternatively, use one of the other methods suggested on the screen.
Support for Pipelines
Generate pipeline code
To set up a pipeline test job for your OpenText testing tool:
-
From Jenkins Dashboard. click New Item or select an existing one.
-
On the page that opens, enter an item name (for a new job), click Build a Pipeline project , and click OK.
-
In the Project Configuration page, scroll down to the Pipeline section.
-
Enter the stage and node arguments into the Script area. For example,
stage('RunUFTTestFromFS'){ // The stage name node('Test'){// The name of the node in which to run the test. -
Prepare the code for your testing tool:
a. Click the **Pipeline Syntax** link. b. In the Snippet Generator drop down, select the desired step, for example, **uftScenarioLoad: Run UFT scenario**. c. Fill in the fields as required. Fields marked in red are mandatory. **Note:** For fields that take multiple values, such as in the **Tests** field, separate multiple entries with a line break. d. If relevant, select one of the [Report archive modes](#report-archive-modes). e. Click **Generate Pipeline Script**. Copy the code to the clipboard. -
Return to the Project Configuration page, and paste the generated Groovy script into the Script field in the Pipeline section.
-
Repeat the above steps to add other commands to your script.
-
Save the script and run or schedule the job as you would with any standard Jenkins job.
-
After the test run, click the Console link on the dashboard to see a link to your results. Copy the link to your browser (Internet Explorer required to view ALM test sets in ALM).
Supported Pipeline job types
The available Pipeline job types are: loadRunnerTest, uftScenarioLoad, runFromFSBuilder, runFromAlmBuilder, sseBuild, sseBuildAndPublish, pcBuild, svChangeModeStep, svDeployStep, svExportStep, svUndeployStep, and publishMFTestResults
| Product | Pipeline step name | Description |
|---|---|---|
| LoadRunner Professional | loadRunnerTest | Run LoadRunner Professional tests from a file system scenario file. |
| UFT One | uftScenarioLoad | Run a UFT scenario. Deprecated, but backwards compatibility exists. |
| OpenText™ Functional Testing | runFromFSBuilder | Execute OpenText Functional Testing Tests from the file system. |
| Application Quality Management | runFromAlmBuilder | Execute functional tests from ALM. |
| ALM Lab Management | sseBuild | Execute tests using ALM Lab Management. |
| ALM Lab Management | sseBuildAndPublish | Execute tests using ALM Lab Management and publish test results. |
| OpenText Enterprise Performance EngineeringOpenText Enterprise Performance Engineering. | ||
| Service Virtualization | svChangeModeStep | Change the mode of a virtual service. |
| Service Virtualization | svDeployStep | Deploy a virtual service. |
| Service Virtualization | svExportStep | Export a virtual service. |
| Service Virtualization | svUndeployStep | Undeploy a virtual service. |
| OpenText Functional Testing, ALM, ALM LM | publishMicroFocusTestResults | Publish Test Results for FS, ALM and ALM Lab Management executions. |
Pipeline jobs are not supported for Functional Testing Lab (Digital Lab) uploads, ALM test uploader, and ALM AUT job types.
Report archive modes
The available archive modes are:
-
Archive test report for failed tests
-
Always archive test reports
-
Always archive and publish test reports (LRP only)
-
Do not archive test reports
Enable Non-English Languages
In order to allow the add-in to support non-English languages, make the following changes to your Jenkins Master and nodes configuration:
Master configuration
-
Open the Jenkins.xml file in the Jenkins installation folder, for example: c:\Jenkins\Jenkins.xml.
-
Go to the <service> -> <arguments> section and add the -Dsun.jnu.encoding=UTF-8 -Dfile.encoding=UTF-8 flags after the -jar flag.
Slave configuration
-
Open the jenkins-slave.xml file on the Jenkins slave (node) machine in the folder that you designated.
-
Go to the <service> -> <arguments> section and add the -Dsun.jnu.encoding=UTF-8 -Dfile.encoding=UTF-8 flags after the -jar flag.
For example:
<service>
<id>jenkinsslave-c__jkns</id>
<name>jenkinsslave-c__jkns</name>
<description>This service runs a slave for Jenkins continuous integration system.</description>
<!--
This example assumes that you have java in your PATH.
To run Jenkins with a specific version of Java, specify a full path to the  desired java.exe.
-->
<executable>C:\Program Files (x86)\Java\jre1.8.0_91\bin\java.exe</executable>
<arguments>-Xrs -jar "%BASE%\slave.jar" -Dsun.jnu.encoding=UTF-8 -Dfile.encoding=UTF-8 -jnlpUrl http://xxx.xxx.xxx.xxx:8080/jenkins/computer/VM112233/slave-agent.jnlp -secret xyzabc</arguments>
<!--
The *interactive" flag causes the empty black Java window to be displayed.
<interactive />
-->
<logmode>rotate</logmode>
<onfailure action="restart" />
</service>
Configuration for Java Web Start clients
- On the Jenkins master machine, go to Manage Jenkins --> Manage Nodes. Click the relevant node or slave. and select Slave --> Configure --> Advanced.
- Add the following to the JVM options text box: "-Dsun.jnu.encoding=UTF-8 -Dfile.encoding=UTF-8".
- Restart your Jenkins master, node, and slave.
- Verify that your changes took effect: a. For the Master: Go to Manage Jenkins --> System information --> "file.encoding", "sun.jnu.encoding". The value should be "UTF-8". b. For the node/slave: On the master machine, go to Manage Jenkins --> Manage Nodes. c. Click on the relevant node or slave and select System information --> "file.encoding", "sun.jnu.encoding". The value should be "UTF-8".
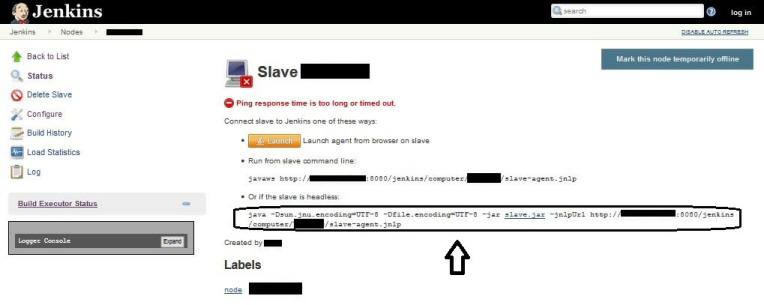
Workaround: If you find that the slave machine still does not support localized encoding, launch the slave from the command line as shown in the image below:
For example:
Tips and Troubleshooting
Best Practice-Use Slave Machine
For best performance, it is recommended to install the testing tools and ALM/QC as nodes on slave machines, and not directly on the Jenkins server. For instructions on configuring nodes, see the Step by step guide to set up master and agent machines in Windows.
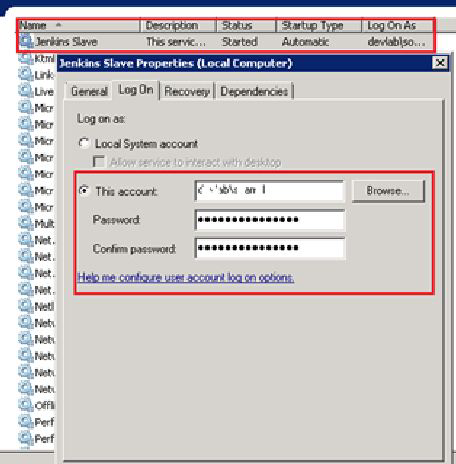
On the Jenkins slave machine, make sure the the Jenkins Slave service is not logged in with the Local System account. To function properly, it should log in with an account the has administrator privileges.
Content Security Policy Header
Starting with version 1.641 (or 1.625.3), Jenkins introduced the Content-Security-Policy header. This prevents some of the links that appear in the integration to become inoperable. For example, the links to the LoadRunner Performance and Functional Testing HTML reports will not work.
For workarounds to enable viewing Functional Testing HTML Reports, see the UFT One Help Center.
Integration Issues
-
If your job includes Functional Testing, QTP, or Service Test tests running on a remote OpenText Application Quality Management machine (run mode = Run Remotely), you should manually stop the test execution.
-
When OpenText Functional Testing is installed on the slave machine (node), the LoadRunner test job will fail in the Analyze Result stage. Workaround: Add the path of the LoadRunner bin folder ( %LR_PATH%/bin ) to the PATH environment variable.
Workarounds for viewing LoadRunner Performance reports
Follow these workarounds to enable the viewing LoadRunner Performance reports:
-
View the reports locally on the slave machine, in your Jenkins results folder under the relevant build ID, or on the master machine in the Jenkins builds folder. Go to the %jenkins% \jobs\<job_name>\builds<job_count>\PerformanceReport folder. For example, C:\Program Files (x86)\Jenkins\jobs\Plug_Debug\builds\5\PerformanceReport\index.html.
-
Click Manage Jenkins > Script Console , and run one of the following scripts from the console:
-
Type the following line and press Run.
System.setProperty("hudson.model.DirectoryBrowserSupport.CSP","") -
Alternatively, type the following line and press Run.
System.setProperty("hudson.model.DirectoryBrowserSupport.CSP", "sandbox; default-src 'none'; img-src 'self'; style-src 'self' 'unsafe-inline'; script-src 'self' 'unsafe-inline'; child-src 'self';") -
Another option that is more secure, but it disables the left pane menu and embedded Javascript:
System.setProperty("hudson.model.DirectoryBrowserSupport.CSP", "sandbox; default-src 'none'; img-src 'self'; style-src 'self'; script-src 'self'; child-src 'self';")
-
Limitations
Test Parameters syntax
The following limitations apply to the inline parameter specification feature of the Test Sets input field:
- The double quote and space character sequence (
") is used to separate the path and parameter list specification. As a result, if you specify the test set path with double quotes, the line won't parse correctly. Tip: never specify paths with double quotes when using inline parameters. Note: If the path contains whitespaces, the path will be parsed correctly without the quotes. - The parameter list's delimiter is a comma. Therefore, neither the path, nor the parameter names or values should contain commas. Tip: if you have a complex parameter value (e.g.
"param1"="value1,value2"), specify separate parameters for this within the respective Functional Testing test. - The parameter-value key-value pair is separated by a colon. Therefore, neither the parameter name, nor the value should contain a colon. Note: Currently, due to this limitation, links cannot be used in the inline parameter definitions.
Note: If any of the above limitations appears within your inline parameter definition, the line will not be parsed correctly, resulting in unexpected behavior in the job execution.