![]()
Aribot works with your DevOps teams and, thus, those working on the code base and the underlying infrastructure. It also provides deep security insights into Kubernetes clusters(AKS). It is available in Free and Paid usage and accessible on the GitHub Marketplace.
Below are the features summary and **onboarding links ** per lifecycle stage:
Streamlines security: automated reviews, CI/CD integration, Supply Chain standards, reporting, and language agnostic.
https://www.youtube.com/watch?v=RmRNerXjw4Q
Automates threat modeling: traceable requirements, NIST 800 53 compliance, and IaC templates for cloud threats.
https://www.youtube.com/watch?v=qilq_nKpR9k
Enhances cloud security: proactive detection, compliance measurement, continuous scanning, and seamless pipeline integration.
https://www.youtube.com/watch?v=3uHbNdtHrEA
- Prepare data for credentials
- Create credentials
- Install Plugin
- Configure plugin
- Run a Build
- Aribot Onboarding
Step 1 Sign in at Microsoft Azure
Step 2 Go to Azure App Registrations

Step 3
- Click new registration
- Set the Name nd choose “Accounts in any organizational directory (Any Azure AD directory - Multitenant)” asSupported account type
- Click
Register
Step 4
- Copy values of Application (Client) ID and Directory (Tenant) ID
- Click to
Add certificate or secret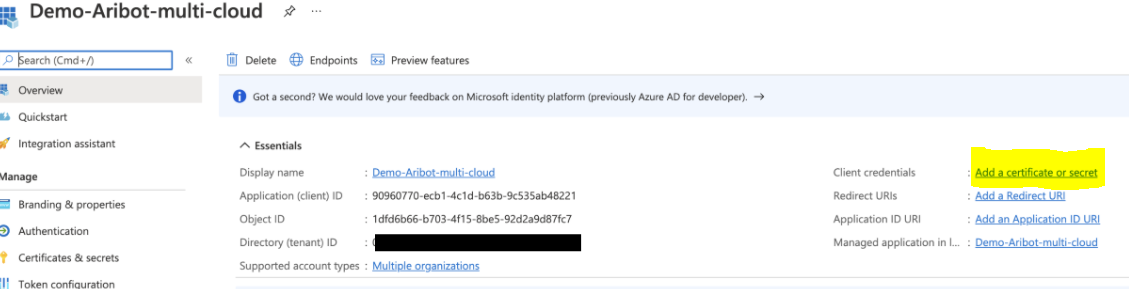
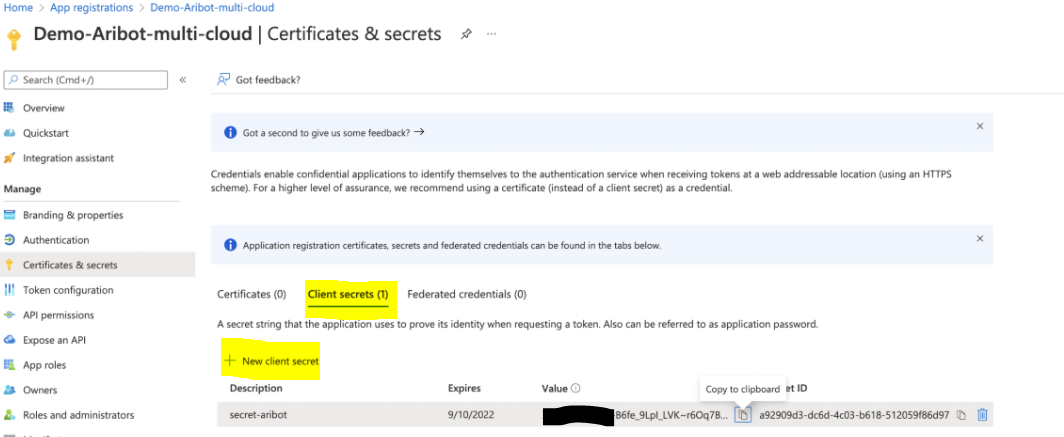
- In Client Secrets tab, click on
New Client Secret - Fill Description and Expires fields.
- Copy value of Value field


Step 5
-
Go to account home
-
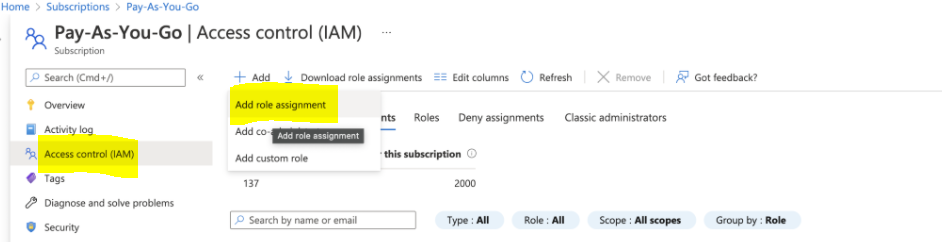
Navigate to your subscription
-
You need to assign 3 roles:
- Policy Insights Data Writer
- Resource Policy Contributor
- Security Assessment Contributor
-
Go to Access Control and click Add under Role assignments
-
Choose the role
Policy Insights Data Writerand click Next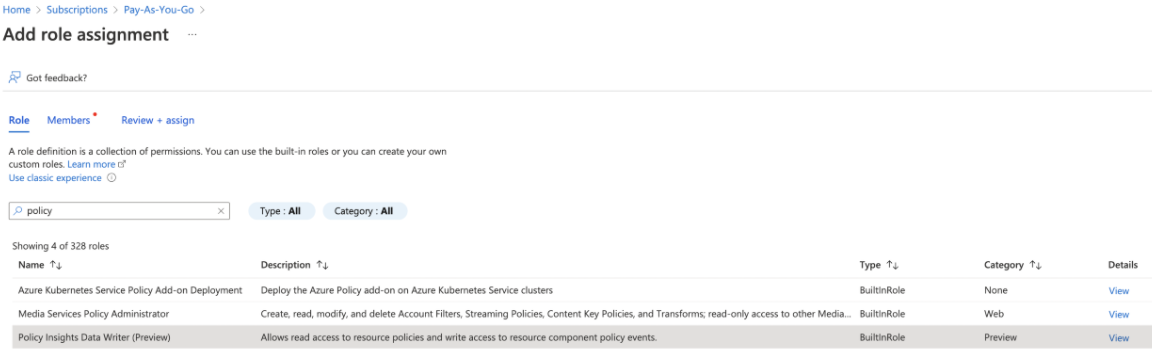
-
On
Memberstab, chooseUser, group, or service principleand thenSelect Membersfor choosing your application your registered earlier. -
Click
Next -
Review and assign the role
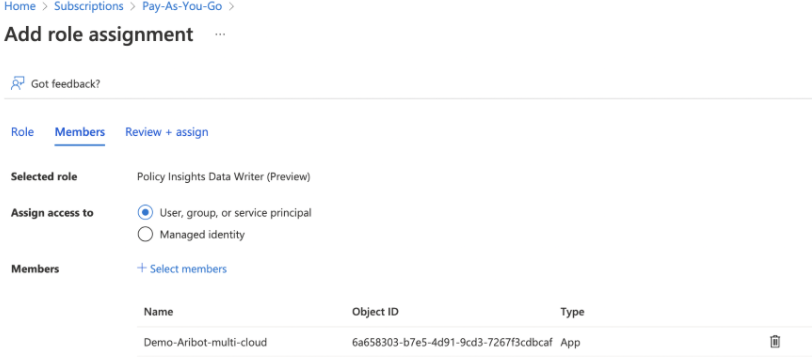
-
Repeat it for another two roles.


Step 6
- You can use the Application ID, Tenant ID, Client ID, Client Secret to create credentials below
- Subscription ID you can find on the
Subscriptionspage of the Azure portal - Resource group name should be target resource group from the
Resource groupspage
** Step 1** Go to AWS console -> Users
Step 2
- Add new user by press button
Add users - Set
User name(in the input field) Select AWS credential type, Set checkbox –
Access key Programmatic access- Press
Next: Permissions - At the permissions page choose tab

- Press button
Create policyOnCreate policypage chooseJSONand paste content:


{
    "Version": "2012-10-17",
    "Statement": [
        {
            "Sid": "VisualEditor0",
            "Effect": "Allow",
            "Action": [
               "lambda:CreateFunction",
               "config:GetAggregateConfigRuleComplianceSummary",
               "lambda:ListFunctions",
               "iam:PassRole",
               "config:PutConfigRule",
               "lambda:GetFunction",
               "lambda:PublishLayerVersion",
               "config:StartConfigRulesEvaluation",
               "config:GetComplianceDetailsByResource",
               "lambda:UpdateFunctionCode",
               "config:GetComplianceDetailsByConfigRule",
               "lambda:AddPermission",
               "config:DescribeConfigRules",
               "lambda:DeleteFunction",
               "lambda:PublishVersion",
               "config:DeleteConfigRule"
            ],
            "Resource": "*"
      }
   ]
}
- Press button
Next: Tags - Set policy
Name(in the input field) - Press button
Create policy - Go back to
Add Userscreen - Click refresh
 User filter to find created Policy
 - Choose it (set checkbox)
Policy name - Press button
Next: Tags - Skip two screens by click
Next - At the last screen, click
Show the access secret - Copy values
Access IDandAccess secret

- Go to
Dashboard -> Manage Jenkins -> Plugins -> Installed plugins - Search for
Azure Credentialsand install this plugin (https://plugins.jenkins.io/azure-credentials/) - Go to
Dashboard -> Manage Jenkins -> Manage Credentials -> System -> Global credentials - Click on
+ Add Credentials - Select
Azure Credentials (Aribot)in theKinddropdown - Enter credentials from the Prepare Azure credentials step above
- Go to
Dashboard -> Manage Jenkins -> Plugins -> Installed plugins - Search for
CloudBees AWS Credentialsand install this plugin (https://plugins.jenkins.io/aws-credentials/) - Go to
Dashboard -> Manage Jenkins -> Manage Credentials -> System -> Global credentials - Click on
+ Add Credentials - Select
AWS Credentialsin theKinddropdown - Enter credentials from the Prepare AWS credentials step above
- Go to
Dashboard -> Manage Jenkins -> Plugins -> Installed plugins - Search for
Aristiun Aribotand install
- Open you project
- Go to
Configuretab - In the
Build Stepssections click onAdd build stepand chooseAristiun Aribot - Enter step name (optional)
- Set previously created credentials for your target provider (AWS or Azure)
- Click
Save
- On the next build run go to the
Console output - You should get onboarding link. Click it to proceed with registration or log in if you already have account to create new account for your Jenkins project.

