

Sysdig Secure is a container security platform that brings together Docker image scanning and run-time protection to identify vulnerabilities, block threats, enforce compliance, and audit activity across your microservices. The Sysdig Secure Jenkins plugin can be used in a Pipeline job, or added as a build step to a Freestyle job to automate the process of running an image analysis, evaluating custom policies against images, and performing security scans.
Requires a valid Sysdig Secure API token
Jenkins workers need to have access to the image storage, either to the local storage where the image was created or to the registry where it is stored.
The Sysdig Secure plugin is published as a Jenkins plugin and is available for installation on any Jenkins server using the Plugin Manager in the web UI through the Manage Jenkins > Manage Plugins view, available to administrators of a Jenkins environment.
See https://www.jenkins.io/doc/book/managing/plugins/
To configure the Sysdig Secure plugin:
-
Complete these steps after installing the plugin.
-
From the main Jenkins menu, select
Manage Jenkins. -
Click the
Configure Systemlink. -
Scroll down to the
Sysdig Secure Pluginsection. -
In the
Sysdig Secure API Credentialsdrop-down, clickAddbutton to create a new credential containing the Sysdig Secure API Token that you can find in Sysdig Secure -> Settings -> User Profile. You only need to fill the password field and keep the user blank. Oncre created, select the new credential in theSysdig Secure API Credentialsdrop-down.


-
Enter the Sysdig Secure API endpoint in the
Sysdig Secure Engine URLfield. For On-Prem installations, this is the URL where your Secure API is exposed. For SaaS service:- Default region US East (North Virginia):
https://secure.sysdig.com - US West (Oregon):
https://us2.app.sysdig.com - European Union:
https://eu1.app.sysdig.com
Check SaaS Regions and IP Ranges for a complete list of regions
- Default region US East (North Virginia):

-
If you are connecting to an On-Prem instance using an invalid TLS certificate, then you need to either configure Jenkins to trust the certificate, or uncheck the
Verify SSLcheckbox. -
Click
Save.
In order to use the plugin you need to include the Sysdig Image Scanning build step either on your freestyle projects or your pipelines.
-
Using the Jenkins Docker plugin for this example, you could start by building the image and writing the image name to the
sysdig_secure_imagesfile
-
Open the
Add build stepdrop-down menu, and selectSysdig Image Scanning. This creates a new build step labeledSysdig Image Scanning Build Options.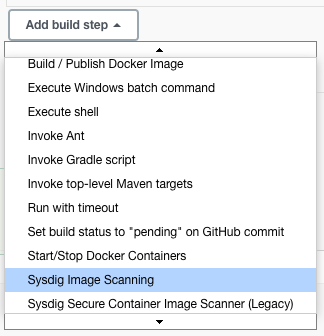
-
Configure the available options, and click
Save.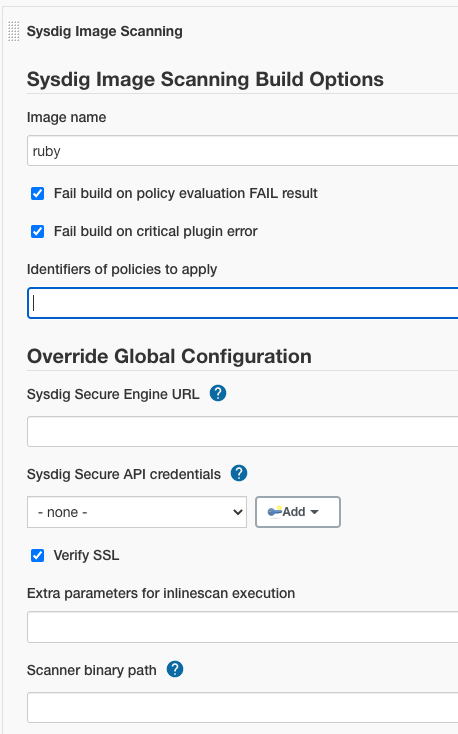


The following is a simplified example executing the Sysdig plugin as a stage inside a pipeline
stages {
    stage('Checkout') {
        steps {
            checkout scm
        }
    }
    stage('Build Image') {
        steps {
            sh "docker build -f Dockerfile -t ${params.DOCKER_REPOSITORY} ."
        }
    }
    stage('Scanning Image') {
        steps {
            sysdigImageScan engineCredentialsId: 'sysdig-secure-api-credentials', imageName: "${params.DOCKER_REPOSITORY}"
        }
    }
}
The table below describes the available configuration options.
| Option | Parameter | Description | Default |
|---|---|---|---|
| Image name | imageName | The name of the image to scan. This parameter is now mandatory, and there is no default value (null). | null |
| Fail build on policy check STOP result | bailOnFail | If the Sysdig Secure policy evaluate returns a fail (STOP), then the Jenkins job should be failed. If this is not selected then a failed policy evaluation will allow the build to continue. | true |
| Fail build on critical plugin error | bailOnPluginFail | If selected, and the Sysdig Secure Plugin experiences a critical error, the build will be failed. This is typically used to ensure that a fault with Sysdig Secure (eg. service not available) does not permit a failing image to be promoted to production. | true |
| Previous image to compare with | imageToCompare | Optional name of a previous image to compare against. When set, the plugin will scan both images and generate a diff report showing added and fixed vulnerabilities. | |
| Identifiers of policies to apply | policiesToApply | List of policies to apply to the image in addition to those marked as always apply in the sysdig ui | |
| Sysdig Secure URL | engineURL | Override the Sysdig Secure URL from the global options | |
| Sysdig Secure API Credentials | engineCredentialsId | Override the Sysdig Secure API Credentials from the global options | |
| Verify SSL | engineVerify | Override the Verify SSL option from the global options | |
| CLI Scanner extra parameters | inlineScanExtraParams | Override the additional parameters for the Sysdig CLI Scanner execution from the global options | |
| Scanner Binary Path | scannerBinaryPath | Override the default path for the CLI scanner binary from the global options |
The plugin pins a default sysdig-cli-scanner version and is tested end-to-end against both the default and the oldest still-maintained version:
- Default pinned version: 1.27.2
- Oldest maintained version tested: 1.22.5
Both values are kept in sync by just update-cli-scanner and just update-oldest-cli-scanner.
The following is simple example of executing the Sysdig Secure plugin as a Jenkinsfile step:
sysdigImageScan imageName: 'ruby'
You can override any of the default parameters:
sysdigImageScan bailOnFail: false, bailOnPluginFail: false, engineCredentialsId: 'sysdig-secure-api-credentials', engineURL: 'https://secure.sysdig.com', engineVerify: false, imageName: 'ruby', policiesToApply: 'foo', scannerBinaryPath: '/bin/sysdig-cli-scanner'
You can use the inlineScanExtraParams option to enable the debug logging when executing the CLI, useful for troubleshooting:
sysdigImageScan imageName: ' ruby:latest', inlineScanExtraParams: '--console-log --loglevel=debug'
The plugin supports comparing two images to identify security changes between them. This is useful for tracking vulnerability improvements or regressions when updating base images or dependencies.
When you provide the imageToCompare parameter, the plugin will:
- Scan the primary image (specified in
imageName) - Scan the comparison image (specified in
imageToCompare) - Generate a diff report showing:
- Vulnerabilities Added: New vulnerabilities present in the primary image but not in the comparison image
- Vulnerabilities Fixed: Vulnerabilities that were in the comparison image but are resolved in the primary image
Important: If the comparison image scan fails, the build will continue with just the primary image scan. A warning will be logged, but the build won't be aborted due to comparison failures.
In the "Advanced Image Scanning Options" section of the Sysdig Image Scanning build step:

Enter the image name to compare against in the "Previous image to compare with" field.
Add the imageToCompare parameter to your sysdigImageScan step:
sysdigImageScan imageName: 'myapp:v2.0', imageToCompare: 'myapp:v1.9'
Comparing base image updates:
stage('Test New Base Image') {
    steps {
        sh "docker build -f Dockerfile.new -t myapp:alpine-3.19 ."
        sysdigImageScan imageName: 'myapp:alpine-3.19', imageToCompare: 'myapp:alpine-3.18'
    }
}
The CLI scanner will try to use locally available credentials, i.e. from the docker daemon configuration, when available. Additionally, it supports registry user and password credentials via REGISTRY_USER and REGISTRY_PASSWORD environmental variables as described in https://docs.sysdig.com/en/sysdig-secure/cli-scanner-vm-mode/#registry-credentials
You can use the Credentials Binding Plugin to map Jenkins credentials to the corresponding variables, for example:
withCredentials([usernamePassword(credentialsId: 'my-registry-credentials', passwordVariable: 'REGISTRY_PASSWORD', usernameVariable: 'REGISTRY_USER')]) {
    sysdigImageScan sysdigImageScan imageName: 'myregistry.com/repo/my-private-image:latest'
}
In case of dynamic credentials (i.e. a temporary ECR token), you can fetch the token and then bind to the corresponding variables like in the following example:
 stages {
        stage('Get ECR Registry Token') {
            steps {
                script {
                    REGISTRY_PASSWORD = sh(script: 'aws ecr get-login-password --region us-east-1', returnStdout: true).trim()
                }
            }
        }
        stage('Sysdig Vulnerability Scanning') {
            steps {
                script {
                    env.REGISTRY_USER = "AWS";
                    env.REGISTRY_PASSWORD = REGISTRY_PASSWORD;
                }
                sysdigImageScan imageName: "123456789012.dkr.ecr.us-east-1.amazonaws.com/myrepo/myprivate-image:latest"
            }
        }
    }
Once the scanning and evaluation is complete, you will have the following build artifacts and reports in the workspace

sysdig_secure_gates.json Scanning results for the Sysdig policy evaluation.
sysdig_secure_security.json Detected vulnerability data
sysdig_secure_raw-vulns_report-.json Raw vulnerability data
When using the image comparison feature (by specifying imageToCompare), an additional artifact is generated:
sysdig_secure_diff-<hash>.json Image comparison results showing vulnerabilities added and fixed between the two images

The diff report is accessible through the Sysdig Secure Report action and displays:
- Vulnerabilities Added: Security issues newly introduced in the scanned image
- Vulnerabilities Fixed: Security issues that were resolved compared to the previous image

This allows teams to:
- Track security improvements when updating dependencies or base images
- Identify new vulnerabilities introduced by code changes
- Make informed decisions about deploying new image versions
Additionally, the plugin offers you an HTML formatted table output that you can directly display from the interface (Sysdig Secure Report (FAIL) in the image above)

Note: The
Flashpoint KEVandCVSS Temporal Scorecolumns are populated from fields (fpkevandprovidersMetadata.vulndb.cvssScore.temporal_score) emitted bysysdig-cli-scanner1.27.0 and later. When scanning with an older CLI scanner version (for example, when pinning a custom version below 1.27.0), these columns will showNoandNonerespectively.
In addition to image scanning, the plugin can scan Infrastructure as Code manifests (Kubernetes, Terraform, CloudFormation, Helm, etc.) using the sysdig-cli-scanner in IaC mode. This is exposed as the Sysdig Secure Code Scan build step.
Note: IaC scanning is currently only supported in Freestyle projects. Pipeline usage is not supported yet.
- Open the
Add build stepdrop-down menu, and selectSysdig Secure Code Scan. - Configure the available options, and click
Save.
| Option | Description | Default |
|---|---|---|
| Sysdig Secure API Credentials | Jenkins credential holding the Sysdig Secure API token. Mandatory. | |
| Path to scan | Directory or file containing the IaC manifests to scan. | . (workspace) |
| Recursive | Scan the given path recursively. | true |
| List unsupported resources | Include unsupported resources in the scan output. | false |
| Severity threshold | Minimum severity that fails the build (high, medium, low, never). |
high |
| Sysdig Secure URL | Sysdig Secure API endpoint. When empty, the CLI default is used. | |
| CLI scanner version | sysdig-cli-scanner version to download and run. latest resolves to the pinned default. |
pinned default |
The build result reflects the scan outcome: exit code 0 succeeds, while a policy failure, bad parameters, or an invalid token fail the build.
We now use Nix to ensure consistent development environments across different developers.
You can run:
nix develop # opens a new shell with all the dependencies in the path
mvn package
This provides a preconfigured environment with the required JDK and Maven version.
Alternatively, if you prefer not to use Nix, you can use your own setup, just make sure you have Java 17 or higher and Maven 3.9.9 installed.
You can also build the plugin using Docker:
docker run -it --rm -v "$(pwd)":/usr/src/app -w /usr/src/app maven:3.9.9-eclipse-temurin-17 mvn package
Once built, install the sysdig-secure.hpi plugin via the Jenkins UI or by copying it into $JENKINS_HOME/plugins.