- Intro
- Usage
- API Docs
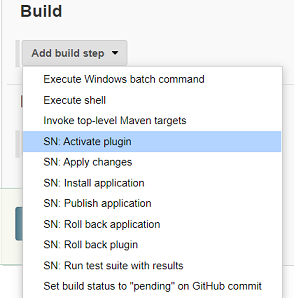
- List of Build Steps
- Integration Tests
- Troubleshooting
- Support Model
- Governance Model
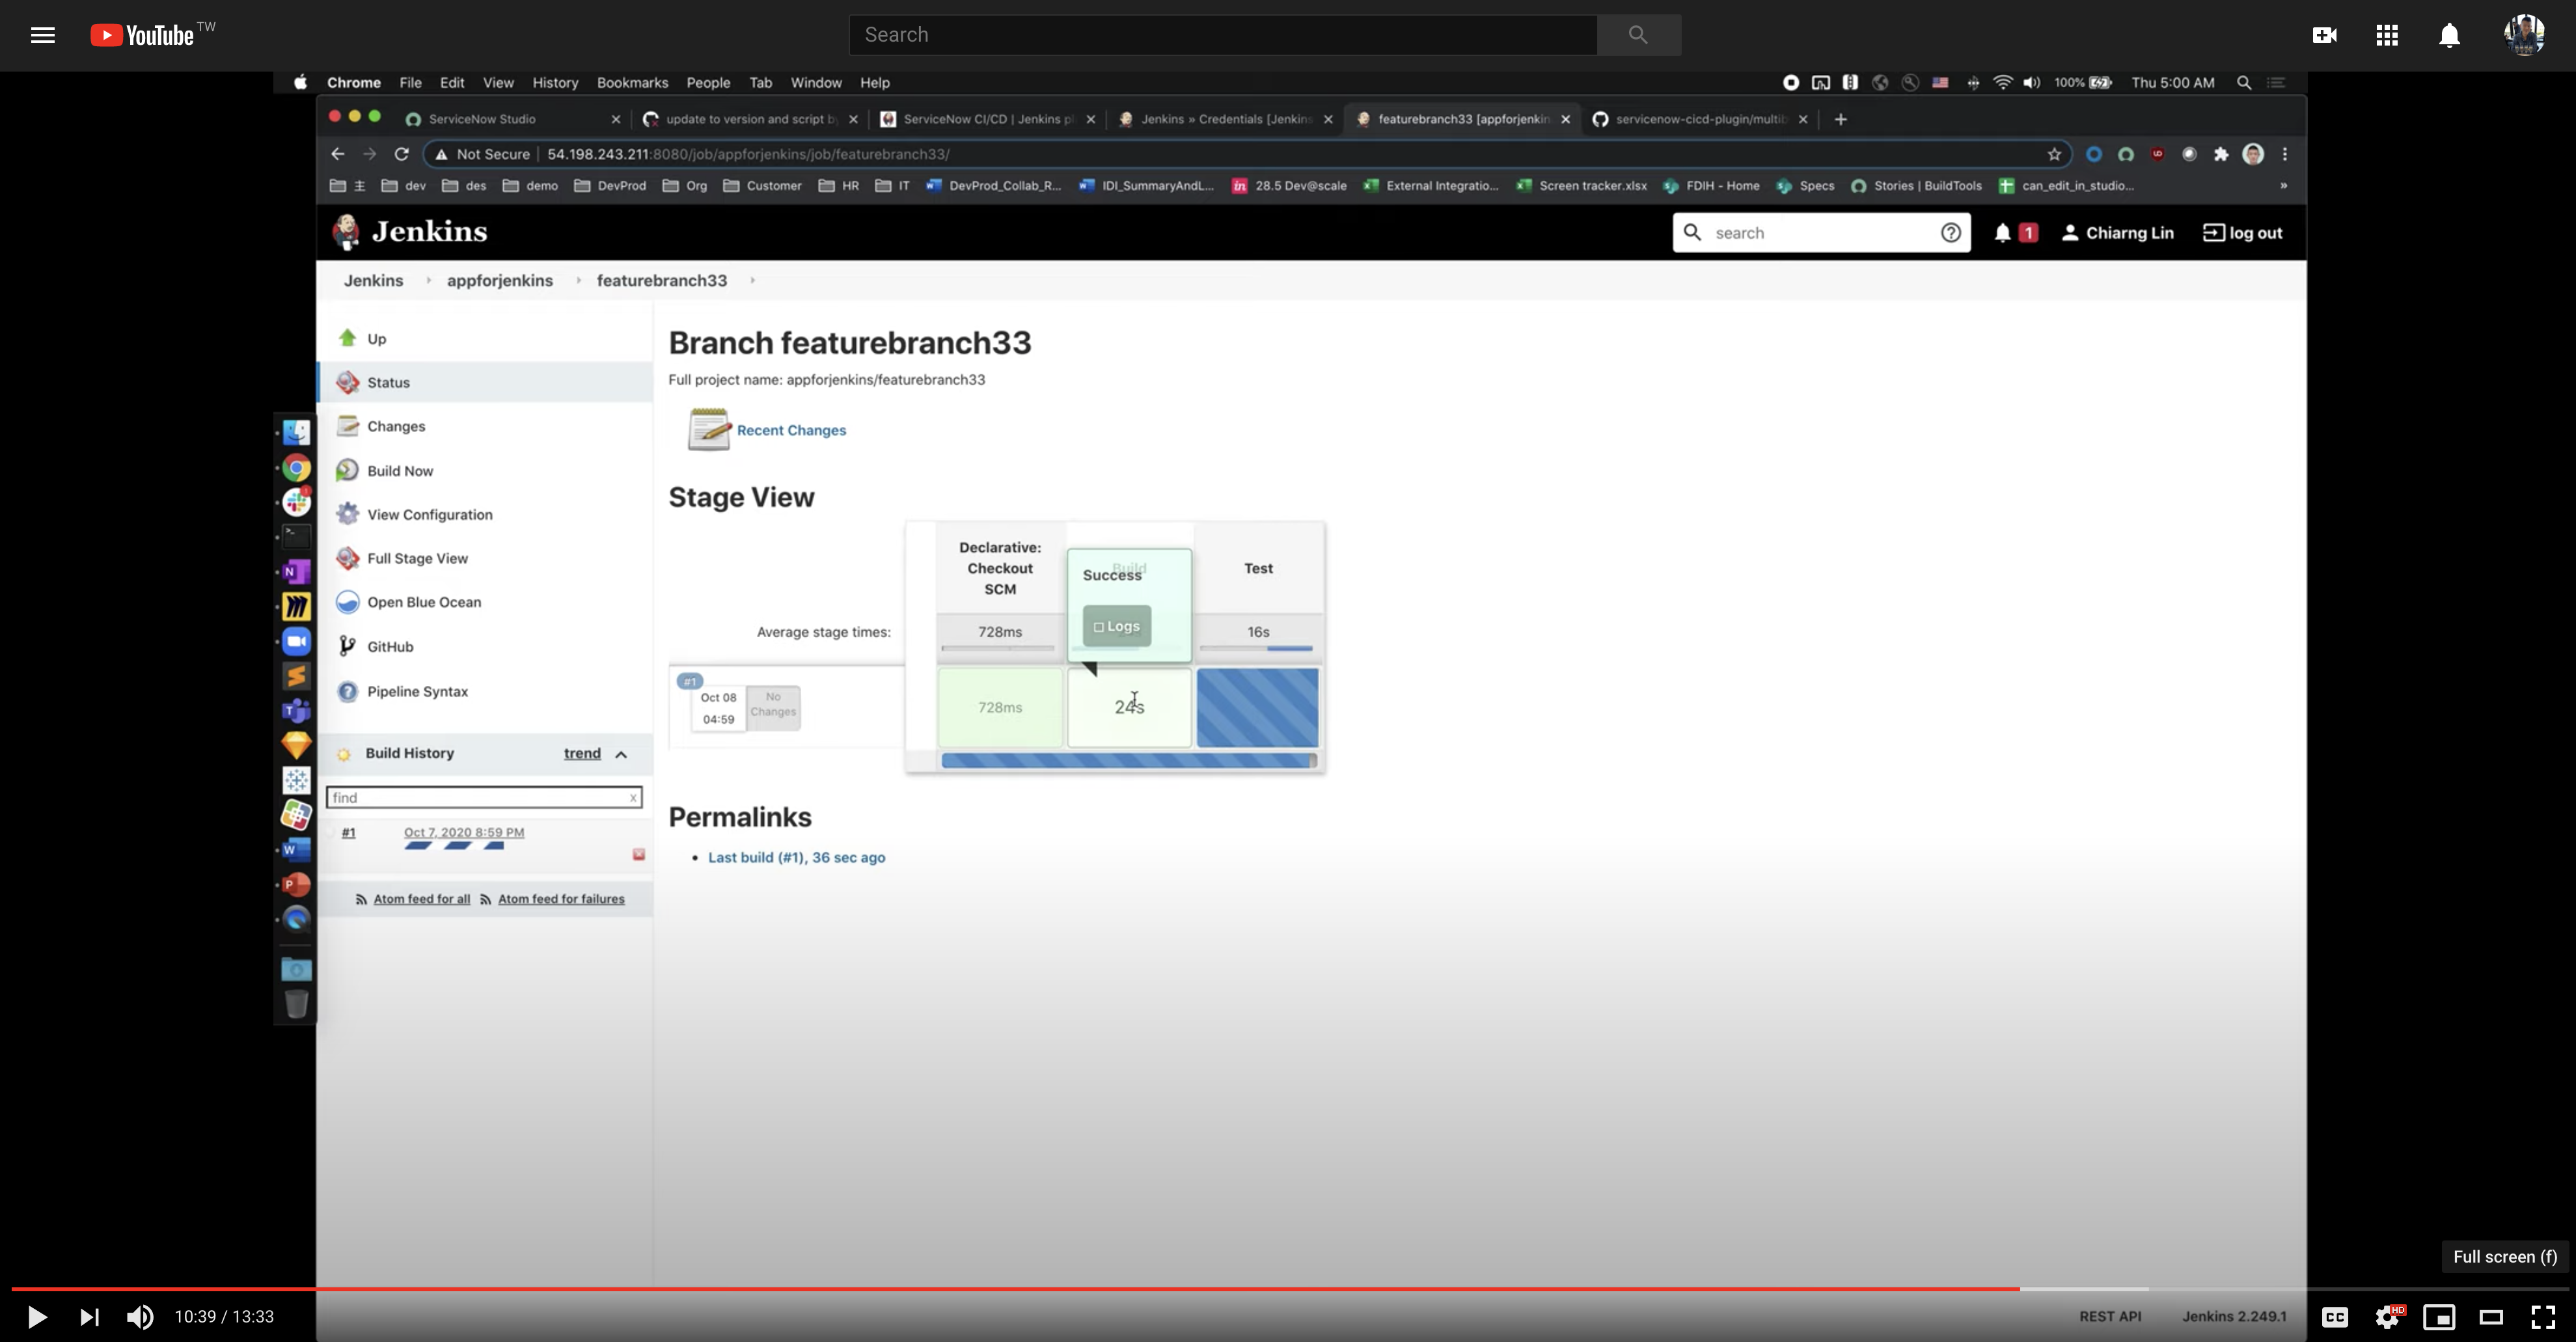
This extension provides Build Steps for setting up Continuous Integration (CI) or Continuous Delivery (CD) workflows using Jenkins for developing applications on the Now Platform from ServiceNow. Click on the below screenshot to see a video for how you can use this extension to get started faster.
The Build Steps are API wrappers for the CI/CD APIs first released with Orlando, and do not cover other ServiceNow APIs. They will currently work with the Orlando and Paris releases.
Please reference our open-source GitHub repo for the implementation, as well as to submit any Issues or Pull Requests. For bug reports, see bugs or all open issues. For documentation, see official plugin site. For an example pipeline yml file, please copy from one of the existing templates.
You will need a GitHub account and a Jenkins box at a minimum.
- If you have a github.com account already, you're good to go. You should be able to create a new GitHub repository to get a Git repo URL for using Source Control with an app on your instance. Alternatively, you may need to request an account from your IT or engineering team if you have a GitHub Enterprise instance hosted internally.
- To set up your own Jenkins box, you can follow the Docker image setup instructions at the Jenkins site, running on compute such as AWS EC2. To create a new Jenkins project, just click on New Item on the main page.
- Link to Source Control for an application that has been created on your instance. You'll find the link on the main page for your GitHub repository if you're starting fresh. Recommend to link to "master" or "main" branch initially.
- At the root of your Git repo directory, create a new file called "Jenkinsfile". Copy paste this pipeline template into it. Feel free to make modifications to fit your needs and workflows. Remember to change your environment variables to match your application's
sys_id, ATF Test Suitesys_id, etc. On the first time, you can commit and save to the master branch without running the pipeline yet. - To set up Credentials for authenticating into your instances with a service account, go to your Jenkins homepage, "Manage Jenkins" in the left navigation panel, "Manage Credentials" under Security, "(global)" domain, add a new "Username with Password" credential. Plug in the ID you name the credential with into the Jenkinsfile variable.
- To set up Credentials for connecting to GitHub, do the same workflow for the above, but use your GitHub username and a Personal Access Token. At a minimum, you'll need the following list of scopes: admin:org_hook, admin:repo_hook, repo, user:email, workflow.
- To set up your first Jenkins pipeline, go to your Jenkins homepage, click on "New Item" in the left navigation panel, "Multibranch Pipeline". Select "GitHub" for Branch Sources, select the Credentials you generated for GitHub, fill in the repository URL from GitHub, and validate the connection. For Discover Branches, select "All Branches" for Strategy. You can leave everything else at default. You can validate things are working if the Scan Repository Log actually picks up your branches from GitHub.
- You should now be able to create a new feature branch off master branch on your instance, develop features/fixes, commit to Source Control, create a PR, and your CI build will run automatically. Once our CI build passes and your PR is completed and feature branch merged to master, your CD build to deploy the application to production should trigger as well.
Tasks are all named starting with the ServiceNow CI/CD substring for easier organization and search filtering, and can be added via both the classic editor as well as the YAML editor in Azure DevOps.
Some Tasks can produce output variables that are consumed as input for other Tasks. For example, the Publish Application Task generates a variable publishVersion that contains the version number for a recently published app. The Install Application Task can then consume this variable and produce a rollbackVersion variable that indicates the previous version of that app on the target instance, providing a mechanism for rolling back the application in Rollback Application.
The extension's Azure Pipelines Tasks are wrappers for the CI/CD APIs released as a part of Orlando, and will currently work through the Paris release. For more information, please see the ServiceNow REST API documentation. Tasks and APIs are not necessarily 1:1 matches; for example, the ServiceNow CI/CD Start Test Suite Task will trigger an ATF Test Suite run, get the progress, and when progress reaches 100%, will return the Test Suite result.
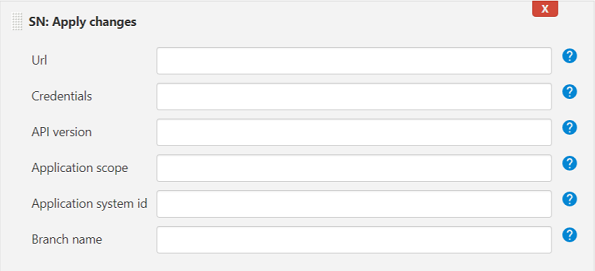
Starts applying changes from a remote source control to a specified local application. The source control must be configured on the platform. There is available a bunch of configuration together with the build step:
| Description | |
|---|---|
| Url | ServiceNow instance url, where an application will be published |
| Credentials | User name and password defined in global credentials and configured in Jenkins (credentials ID is required here) |
| API version | Optional. Version of the endpoint to access. For example, v1 or v2. Only specify this value to use an endpoint version other than the latest. |
| Application scope | Required if Application system id is not specified. The scope name of the application for which to apply the changes, such as x_aah_custom_app. You can locate this value in the scope field in the Custom Application [sys_app] table. |
| Application system id | Required if Application scope is not specified. The system id of the application for which to apply the changes. You can locate this value in the Sys ID field in the Custom Application [sys_app] table. |
| Branch name | Name of the branch in the source control system from which to acquire the application. |
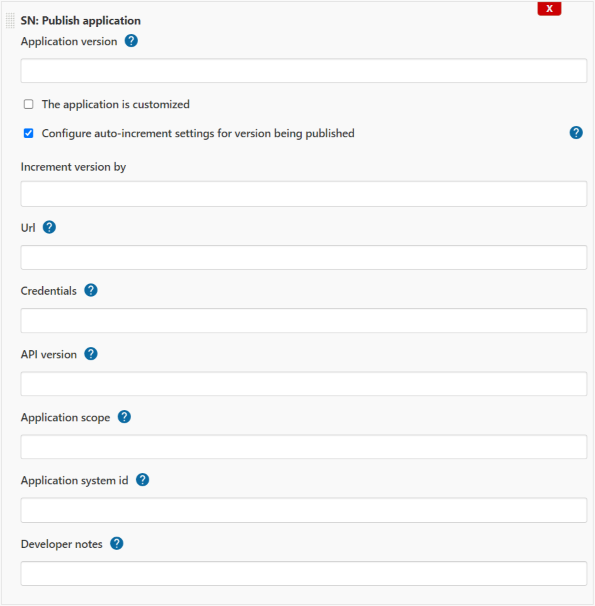
Publishes the specified application and all of its artifacts to the application repository.
| Description | |
|---|---|
| Application version | Version under which to store the application. Provide 2 significant numbers separated by '.' eg. 1.0 (the third number will be automatically added with build number, what gives eg. 1.0.106). If the version number is passed, the publish process uses that version and updates the local application version if different. If the version number is not passed, the publish process uses the current version of the local application. |
| Calculate next application version | Calculate next application version that will be published. Retrieve it in smart way using API or source control (if SCM is configured for the build). API has the highest priority, then SCM will be used. The value from 'Application version' will be ignored. |
| The application is customized | The option should be checked if user works with application customization. Application system id is required in this case. |
| Configure auto-increment settings... | Application version can be incremented automatically during publishing using increment by factor. |
| Increment version by | Defines how the application version should be incremented (by what constant integer) in publishing step. 0 means do not increment automatically. |
| Url | ServiceNow instance url, where an application will be published |
| Credentials | User name and password defined in global credentials and configured in Jenkins (credentials ID is required here) |
| API version | Optional. Version of the endpoint to access. For example, v1 or v2. Only specify this value to use an endpoint version other than the latest. |
| Application scope | Required if Application system id is not specified. The scope name of the application for which to apply the changes, such as x_aah_custom_app. You can locate this value in the scope field in the Custom Application [sys_app] table. |
| Application system id | Required if Application scope is not specified. The system id of the application for which to apply the changes. You can locate this value in the Sys ID field in the Custom Application [sys_app] table. |
| Developer notes | Developer notes to store with the application. |
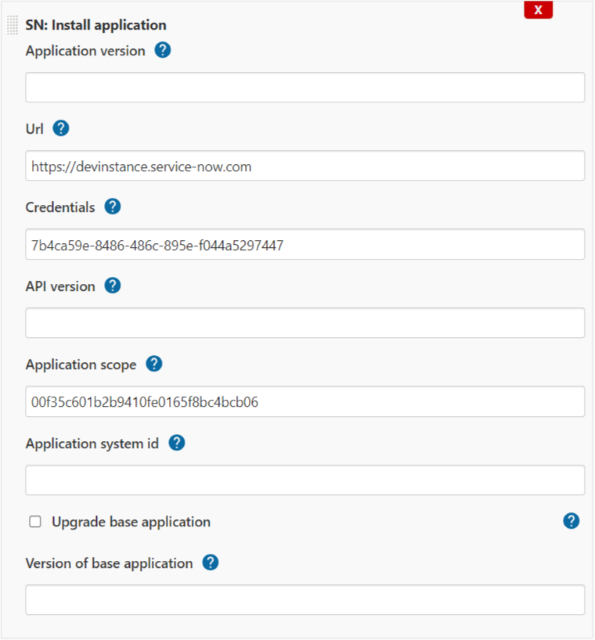
Installs the specified application from the application repository onto the local instance, the instance defined in the field Url. The application must have been previously published, using the build step SN: Publish application.
| Description | |
|---|---|
| Application version | Version of the application to install. If empty, the published version will be used. |
| Url | ServiceNow instance url, where an application will be published. |
| Credentials | User name and password defined in global credentials and configured in Jenkins (credentials ID is required here). |
| API version | Optional. Version of the endpoint to access. For example, v1 or v2. Only specify this value to use an endpoint version other than the latest. |
| Application scope | Required if Application system id is not specified. The scope name of the application for which to apply the changes, such as x_aah_custom_app. You can locate this value in the scope field in the Custom Application [sys_app] table. |
| Application system id | Required if Application scope is not specified. The system id of the application for which to apply the changes. You can locate this value in the Sys ID field in the Custom Application [sys_app] table. |
| Upgrade base application | Only applicable if Application Customization is active and the associated application is a higher version than the currently installed version. Flag that indicates whether the associated base application should be automatically upgraded to a newer version. |
| Version of base application | Only applicable if Application Customization is active. Version of the base application on which to apply the customizations. |
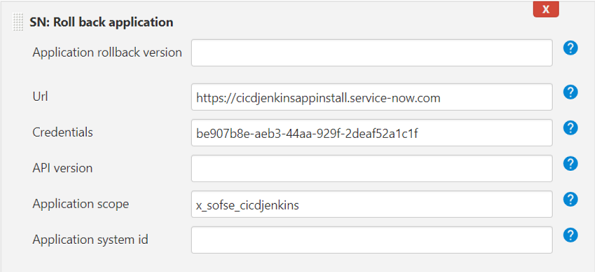
Initiates a rollback of a specified application to a specified version, according to the configuration done in the build step. If the field Application rollback version is empty and one of the previous steps was SN: Install application, then the downgrade version will be the one before the installation of the application.
| Description | |
|---|---|
| Application rollback version | Expected rollback version. This version is compared to the version that is included in the last rollback context, if they don't match, the build step fails. If empty, last installed version from previous step will be taken. |
| Other parameters like described above. |
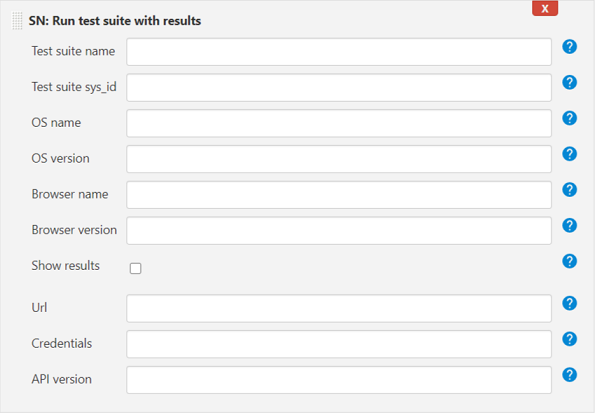
Starts a specified automated test suite. The test suite runs on the instance pointed in Url or configured via ServiceNow Parameters in Installation instance.
| Description | |
|---|---|
| Test suite name | Required if Test suite sys_id is not specified. The name of the test suite to run. This value is located in the Test [sys_atf_test_suite] table. |
| Test suite sys_id | Required if Test suite name is not specified. The sys_id of the test suite to run. This value is located in the Test [sys_atf_test_suite] table. |
| OS name | Name of the operating system under which to run the test suite. This value must match what is specified in the scheduled client test runner. |
| OS version | Starting value of the version of the operating system under which to run the test suite. For example, if you enter "8", that would enable all 8.x.x.x versions. This value must match what is specified in the scheduled client test. runner. |
| Browser name | Name of the browser to use to run the client test. This value must match what is specified in the scheduled clienttest runner. For additional information on scheduled client test runners, see Scheduled Client Test Runners. Valid values:
|
| Browser version | Starting value of the version of the browser specified in browser_name to use to run the test. For example, if you enter "9", that would enable all 9.x.x.x versions. This value must match what is specified in the scheduled client test runner. |
| Show results | If the checkbox is checked, then results from ServiceNow will be visible in Output Console, together with the link to the visualization on the NOW platform. |
| Other parameters like described above. |
Activates the specified plugin.
| Description | |
|---|---|
| Plugin identifier | Unique identifier of the plugin. You can locate this identifier on the Plugins page within the card of the desired plugin; identified with the name "ID". |
| Url | Url of the instance where the plugin should be activated. The field cannot be empty. The url is not taken from ServiceNow Parameters! |
| Credentials | The field cannot be empty. Credentials are not taken from ServiceNow Parameters! |
Rolls back the specified plugin to the previous installed version. If no prior version has been installed, the build step will fail.
Description of the fields is exactly the same as in the section SN: Activate plugin
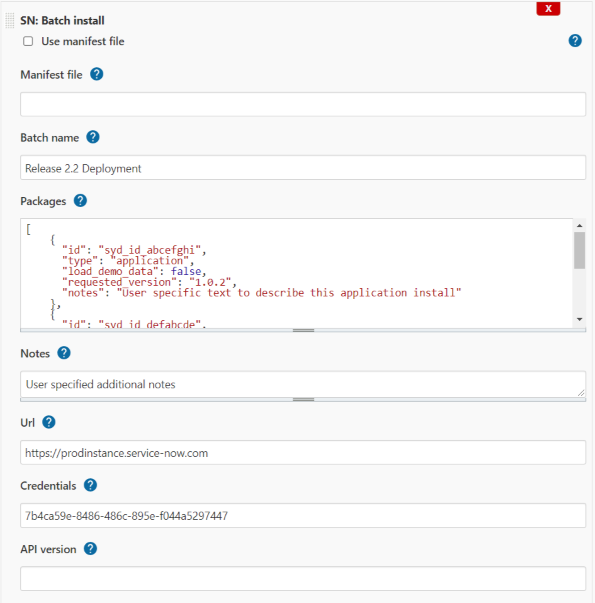
Installs two or more packages in a single specified batch.
For more info please visit following link.
| Description | |
|---|---|
| Url | Url of the instance where the batch should be executed. The field cannot be empty. |
| Credentials | The field cannot be empty. Credentials set up in Jenkins configuration. |
| Use manifest file | Specifies whether external manifest file should be used or the batch data will be provided here by UI fields. |
| Use manifest file | Manifest file where request payload (to CICD API) with all packages to install is specified in json format. One example can be found here: now_batch_manifest.json. Active when checkbox 'Manifest file' is selected. |
| Batch name | Name of the batch. Not necessary if manifest file is used. |
| Packages | All packages to be installed, according to the specification given in the documentation of CICD API. Not necessary if manifest file is used. |
| Notes | User specified additional notes. Not necessary if manifest file is used. |
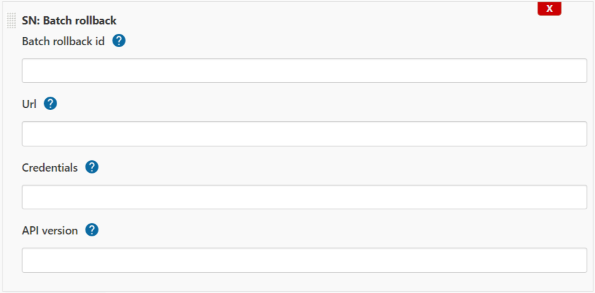
Rolls back all of the packages associated with a specific batch installation to their previous versions. This build step works in conjunction with the SN: Batch Install. The rollback id is provided in the return results of this build step (in console and stored in ServiceNow Parameters). When this build step is called, it rolls back all packages specified in the associated install; you cannot rollback individual packages. If there is no previous version, the endpoint uninstalls the associated package.
| Description | |
|---|---|
| Batch rollback id | Sys_id of the batch installation plan for which to rollback the installed packages to their previous versions. Batch Install step returns this unique id and stores it in ServiceNow Parameters. |
| Other parameters like described above. |
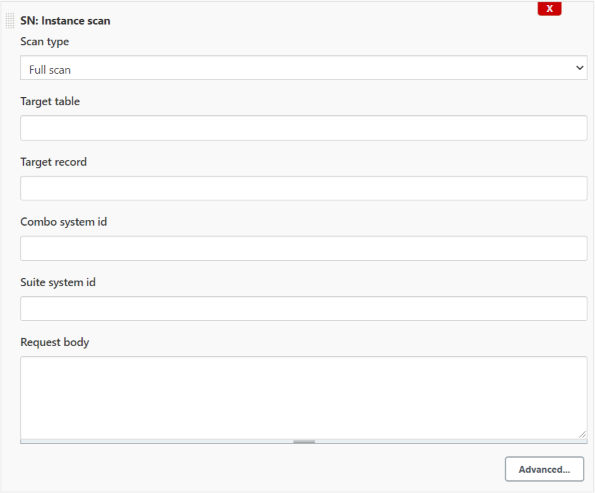
Scan ServiceNow instance choosing between 5 different scan types. The build step checks health of the instance.
There are following scan types:
- full scan (full health check)
- point scan (health check of a table 'Target table' and a record in the table 'Target record')
- scan with combo (health check where combo sys id is required)
- scan with suite on scoped apps (health check of scoped apps given in Request body in json format)
- scan with suite on update sets (health check of update set given in Request body in json format)
| Description | |
|---|---|
| Scan type | Type of the scan. |
| Target table | Target table name when 'point scan' was chosen. |
| Target record | Target record sys id when 'point scan' was chosen. |
| Combo system id | Combo sys id when 'scan with combo' was chosen. |
| Suite system id | Suite sys id when 'scan with suite on scoped apps / update sets' was chosen. |
| request body | Additional data used by 'scan with suite on scoped apps / update sets'. |
| Other parameters like described above. |
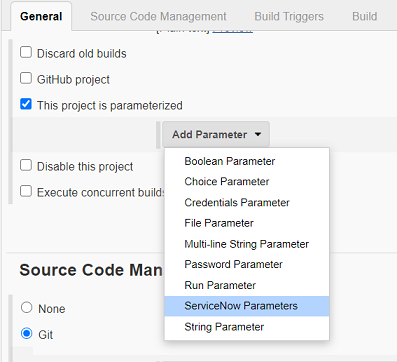
Together with the plugin comes additional parameter ServiceNow Parameters under the checkbox This project is parameterized in General section of the build configuration.
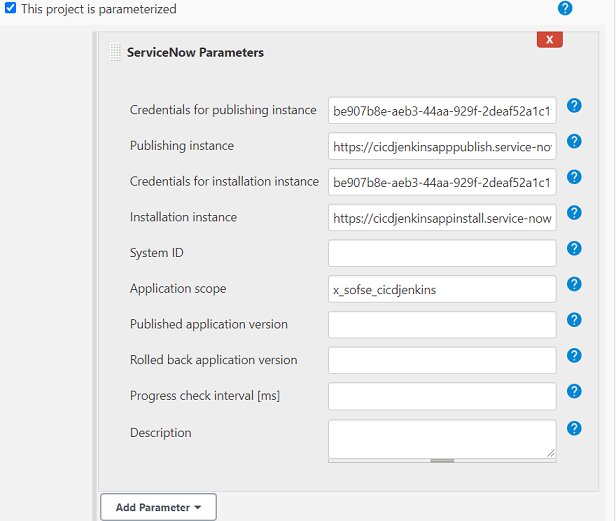
This new parameter or - better to say - set of configuration variables allows user to configure most of the steps (integrated with the platform NOW) in convenient way from one place. You can find below description of each field, that was implemented here:
| Description | |
|---|---|
| Credentials for publishing instance | Credentials ID configured in Jenkins and used to get access to the instance were an application will be or is already published. |
| Publishing instance | ServiceNow instance url where the application will be published to. |
| Credentials for installation instance | User name and password defined in global credentials (credentials ID is required here) used for the instance where the application will be installed. |
| Installation instance | ServiceNow instance url where the application will be installed. |
| System ID | The system id of the application for which to apply the changes. You can locate this value in the Sys ID field in the Custom Application [sys_app] table. |
| Application scope | The scope name of the application for which to apply the changes, such as x_aah_custom_app. You can locate this value in the scope field in the Custom Application [sys_app] table. |
| Published application version | Version number of published application (that will be also installed if appropriate build step will be used). Do not fill the field up if you want to get the number automatically (depends on the build step Publish application). |
| Rolled back application version | Version number of the application used by the step Roll back application. Do not fill this field up if the version should be obtained automatically. |
| Progress check interval | Time in milliseconds between one and another progress check set up for all build steps of ServiceNow. Leave it empty to use default value. |
All build steps delivered by ServiceNow except SN: Activate plugin and SN: Roll back plugin use some variables defined under ServiceNow Parameters.
System ID and Application scope are used by all SN build steps related to an application, only then when local parameters of those build steps are not configured (are blank).
Url and Credentials for publishing instance are used only by SN: Apply changes and SN: Publish application, if they do not have specified local adequate parameters.
Url and Credentials for installation instance are used only by SN: Install application, SN: Roll back application and SN: Run test suite with results, if they do not have specified local adequate parameters.
One thing is worth to mention. There are some dependencies between following 2 sets of build steps:
- application scope:
- batch scope:
In short using an example: when an application is published, and the new version is calculated automatically (Calculate next application version is checked in the publishing step), the published version of the application must be stored for the installation step. This stored variable will be used as information what version of the application should be installed. The field from ServiceNow Parameters - Published application version - is used for this purpose. It means, that in most cases the field will be empty and not used by a user. However, the field can be used if we would like to specify what exactly version should be used for publishing and/or installation (we do not have to combine these 2 steps together, they can be used separately in a build configuration).
Similar case concerns also steps regarding installation and rolling back of the application. When an application is installed, the installation step receives also information about previously installed version, so the Roll back application step can downgrade successfully the application if needed. That information is stored in the field Rolled back application version and can be used with provided value as described in previous case, if the user knows exactly what version should be there.
The behavior is similar to steps in batch scope, except the variable that is not exposed to the user.
There is also possibility to write pipeline scripts using integrated build steps. You can find keywords of all steps described above, together with configuration parameters. All names should be self-explanatory.
There is also Pipeline Syntax in Jenkins with Snippet Generator to make easy translation from UI configuration into scripting language.
All parameters are of type string, unless otherwise stated.
| Build step | Parameters |
|---|---|
snApplyChanges |
|
snPublishApp |
|
snInstallApp |
|
snRollbackApp |
|
snRunTestSuite |
|
snActivatePlugin |
|
snRollbackPlugin |
|
snBatchInstall |
|
snBatchRollback |
|
snInstanceScan |
|
ServiceNow Parameters can be also used in a pipeline scripting. They should be defined within parameters section and the parameter named as snParam. In this case first build always fails because with the first build ServiceNow Parameters are created.
Good practice is to create parameterized build with defined ServiceNow Parameters. The definition of these parameters can be kept in Jenkinsfile if we want to store history of changes in this area. Some examples of defined SN Parameters can be found in the paragraph Samples.
The parameter includes following arguments (names should be self-explanatory):
credentialsForPublishedAppinstanceForPublishedAppUrlcredentialsForInstalledAppinstanceForInstalledAppUrlsysIdappScopepublishedAppVersionrollbackAppVersionprogressCheckInterval
The section covers pipeline scripting with 3 examples using features like build steps and the parameter developed by ServiceNow. All examples can be used in Pipeline type job or as independent Jenkinsfile in a source control connected with NOW platform.
- Simple script with one step Apply changes under a stage called
preparation.
pipeline {
    agent any

    stages {
        stage('preparation') {
            steps {
                snApplyChanges url: "https://cicdjenkinsapppublish.service-now.com", credentialsId: "88dbbe69-0e00-4dd5-838b-2fbd8dfedeb4", appScope: "x_sofse_cicdjenkins"
            }
        }
    }
}
Link to the example.
- The same script with one step Apply changes but using ServiceNow Parameters defined in the block
parameters. Additionally, the content of the parametersnParamwill be displayed in console output. The content will be represented in json format.
pipeline {
    agent any

    parameters {
            snParam(credentialsForPublishedApp: "88dbbe69-0e00-4dd5-838b-2fbd8dfedeb4", instanceForPublishedAppUrl: "https://cicdjenkinsapppublish.service-now.com", appScope: "x_sofse_cicdjenkins")
    }

    stages {
        stage('preparation') {
            steps {
                echo "${params.snParam}" // for debugging

                snApplyChanges()
            }
        }
    }
}
Link to the example.
- Advanced pipeline script with simple but complete CI/CD process of publishing and installing an application with customization on NOW platform. The build was divided into 3 stages:
Build,InstallandDeployment. The last stage can be performed under certain condition.
In this case the build must be parameterized in order to configure ServiceNow Parameters (as explained in the section How to use).
pipeline {
    agent any
    environment {
        BRANCH = "${BRANCH_NAME}"
        APPSYSID = '00f35c601b2b9410fe0165f8bc4bcb06'
        CREDENTIALS = '7b4ca59e-8486-486c-895e-f044a5297447'
        DEVENV = 'https://devinstance.service-now.com/'
        TESTENV = 'https://testinstance.service-now.com/'
        PRODENV = 'https://prodinstance.service-now.com/'
        TESTSUITEID = 'b1ae55eedb541410874fccd8139619fb'
    }
    stages {
        stage('Build') {
            steps {
                snApplyChanges(appSysId: "${APPSYSID}", branchName: "${BRANCH}", url: "${DEVENV}", credentialsId: "${CREDENTIALS}")
                snPublishApp(credentialsId: "${CREDENTIALS}", url: "${DEVENV}", appSysId: "${APPSYSID}",
                        isAppCustomization: true, obtainVersionAutomatically: true, incrementBy: 2)
            }
        }
        stage('Install') {
            steps {
                snInstallApp(credentialsId: "${CREDENTIALS}", url: "${TESTENV}", appSysId: "${APPSYSID}", baseAppAutoUpgrade: false)
                snRunTestSuite(credentialsId: "${CREDENTIALS}", url: "${TESTENV}", testSuiteSysId: "${TESTSUITEID}", withResults: true)
            }
        }
        stage('Deploy to Prod') {
            when {
                branch 'master'
            }
            steps {
                snInstallApp(credentialsId: "${CREDENTIALS}", url: "${PRODENV}", appSysId: "${APPSYSID}", baseAppAutoUpgrade: false)
            }
        }
    }
}
Link to the example.
More examples can be found in the folder examples.
Integration tests using the CI/CD APIs are located in two classes: ServiceNowAPIClientIntegrationTest and SNStepsIntegrationTest. All of the tests have the annotation Ignore, because they are not reliable for daily testing and require credentials. Following steps should be done to activate integration tests:
- remove the annotation
Ignorefrom all tests you want to run - setup NOW's API credentials by setting up following environment variables
USERNAMEandPASSWORD(urls of appropriate instances are already configured in test classes, what can be also changed manually in the code). This setup can be done in two ways:- (1) creating pipeline scripting on private Jenkins instance with junit tests execution:
pipeline { agent any environment { USERNAME = 'api-username' PASSWORD = 'api-password' } tools { // Install the Maven version configured as "M3" and add it to the path. maven "M3" } stages { stage('Test') { steps { git url: 'https://github.com/jenkinsci/servicenow-cicd-plugin.git' // Run Maven on a Unix agent. sh "mvn -Dmaven.test.failure.ignore=true test" // To run Maven on a Windows agent, use // bat "mvn -Dmaven.test.failure.ignore=true test" } post { // If Maven was able to run the tests, even if some of the test // failed, record the test results and archive the jar file. success { junit '**/target/surefire-reports/TEST-*.xml' archiveArtifacts 'target/*.jar' } } } } }- (2) together with
buildPluginin Jenkinsfile (eg. on ci.jenkins.io)- create global credentials with user name and password on Jenkins instance
- uncomment lines in Jenkinsfile and replace the
credentialsIdvalue482fa2bf-73b5-489a-8f9e-62004e01f10bby the ID of newly created credentials
Known issues:
- Publishing an application does not make changes in linked repository as it is done directly from UI of NOW platform.
- Following step Roll back plugin should not be placed directly after Activate plugin, because finalizing the activation of a plugin happens also after the build step Activate plugin (although it was completed with success). Trying to roll it back may lead to unclear status of the plugin on specified instance. Generally the use case will not happen, because usually a plugin is activated once and nobody would like to deactivate it just after activation.
ServiceNow built this integration with the intent to help customers get started faster in adopting CI/CD APIs for DevOps workflows, but will not be providing formal support. This integration is therefore considered "use at your own risk", and will rely on the open-source community to help drive fixes and feature enhancements via Issues. Occasionally, ServiceNow may choose to contribute to the open-source project to help address the highest priority Issues, and will do our best to keep the integrations updated with the latest API changes shipped with family releases. This is a good opportunity for our customers and community developers to step up and help drive iteration and improvement on these open-source integrations for everyone's benefit.
Initially, ServiceNow product management and engineering representatives will own governance of these integrations to ensure consistency with roadmap direction. In the longer term, we hope that contributors from customers and our community developers will help to guide prioritization and maintenance of these integrations. At that point, this governance model can be updated to reflect a broader pool of contributors and maintainers.


