Retrieve and manage your Plastic SCM sources from Jenkins.
Configuration
External tool configuration
The Plastic SCM plugin for Jenkins requires a working cm
client to be present in the controller or agent machines. If it's not, the plugin provides a way for the machines to automatically download and install the client.
To configure the Plastic SCM tool in Jenkins, open the system configuration page "Manage Jenkins" and navigate to "Global Tool Configuration".
Scroll down to the "Plastic SCM" section. There will be a default entry called "Default". It will expect a cm
binary to be present in the controller or agents. If it's not, it will download it from plasticscm.com.
You can change the name to whatever you want. If there isn't any tool called "Default", the plugin will use the first one in the list.
The field "Path to Plastic SCM executable" can be either an executable name or a full path. If you specify just the name, the plugin will use the $PATH
environment variable to run it. Leaving this field empty will use the cm
default value.
You can optionally enable the Use .NET invariant globalization option if you're using the newer .NET Core CLI client in Linux machines or containers that don't have the ICU packages installed.
The "Install automatically" option is checked by default, and the plugin automatically provides an installer to download the cm
client bundle from plasticscm.com automatically. However, that installer will not run if it detects that the tool defines a valid cm
for the target machine. You can optionally override that by checking the "Ignore system tool" option.
This automatic installer will save the tool bundle contents under $JENKINS_ROOT/tools/plasticscm/$TOOL_NAME
.
At this point, the plugin is only capable of downloading the latest version available in the Plastic SCM website.
Job configuration
Freestyle projects
Scroll down to the Source Code Management section and select "Plastic SCM" (see screenshot below). You'll need to enter a valid selector, which will be used to check out the repository contents in every build. The "Poll SCM" trigger also uses that selector.
Every build will ensure that the Jenkins workspace contains a Plastic SCM before starting the cm update
operation. If you'd like to create the Plastic SCM workspace in a particular subdirectory under the Jenkins job workspace, you can specify one in the Directory field. This field is mandatory if you want to use multiple workspaces.
The Cleanup value will determine what to do with the Plastic SCM workspace before checking out the code. It has four possible values:
- Minimal cleanup will simply undo any changed files in the workspace directory and then run a workspace update. It's equivalent to enabling Use update in older versions.
- Standard cleanup will undo changed files and also remove any private files that might be present in the workspace directory. Ignored files aren't affected. This is the recommended setting.
- Full cleanup has the same behavior as Standard cleanup but removes ignored files as well.
- Delete workspace will remove the entire workspace contents and create a new one. Useful if you absolutely want to start every build from scratch. It might increase the build time if your workspace is big, though. It's equivalent to disabling Use update in older versions.
You can also define specific credentials to be used by Plastic SCM in the context of the job. You can select the target working mode, which can be one of these:
- Use system configuration
- Don't specify credentials for this job, rely on an existing
client.conf
file in the machine.
- Don't specify credentials for this job, rely on an existing
- User & password
- If your targeted Plastic SCM Server uses Plastic SCM user/password authentication, this is the option to choose.
- LDAP / Cloud
- The appropriate choice if your targeted Plastic SCM Server is a Plastic Cloud organization or it uses LDAP as authentication provider.
Then, for User & password and LDAP / Cloud you need to specify credentials using the Jenkins Credentials API.
Selector format
The selector accepts branches, changesets or labels. You can setup not only branches (which is the normal case), but labels as well as changesets in the selector.
Branch selector:
repository "myRepo@my.plasticscm.server.com:8087"
path "/"
smartbranch "/main/scm1773"
Changeset selector:
repository "myRepo@my.plasticscm.server.com:8087"
path "/"
smartbranch "/main/scm1773" changeset "7030383"
Label selector:
repository "myRepo@my.plasticscm.server.com:8087"
path "/"
label "1.0.32-preview_997"
Important! Don't forget to use the ssl://
prefix in the server name if your Plastic Server utilizes SSL. For instance, repository "myRepo@ssl://my.plasticscm.server.com:8088"
You can also use build parameters in the selector. Example: Let's say that you defined two build parameters in your project:
branchname
- default value (/main)repositoryname
- default value (default)
Then you can use those parameters in the Plastic SCM selector using the macro pattern $parameter_name
:
repository '$repositoryname'
path "/"
smartbranch '$branchname'
Multiple workspaces
The Plastic SCM plugin allows you to checkout multiple workspaces in a single Jenkins workspace. This can be useful if you need to fetch sources from two or more repositories in order to build your application.
To enable this feature, check the Use multiple workspaces box in the SCM configuration. You'll see a new button "Add workspace..." to append a new workspace to the list of additional workspaces. The configuration settings are identical to the root ones.
Poll on controller
The Plastic SCM supports polling for repository changes. Polling is normally done on the agent that performed the last build, but you can choose to run the polling directly on the controller instead. This puts more work on the controller, but it makes polling work reliably in situations where the agents come and go; for example, when agents are provisioned on-demand in a Kubernetes cluster.
Since polling on the controller will invoke cm
directly on the controller, the tool must have its configuration within the .plastic4
folder, just like on the agents.
Pipelines
If you use scripted pipelines or you want to specify the pipeline script directly in the job configuration, you can take advantage of the cm command inside the groovy script:
cm command syntax:
cm(
branch: '<full-branch-name>',
changeset: '<cset-number>', // optional
repository: '<rep-name>',
server: '<server-address>:<server-port>',
cleanup: '<cleanup-strategy>'
directory: '<subdirectory-name>' // optional
)
As you see, there's a one-to-one parameter mapping. To use multiple workspaces you simply need to add multiple cm
statements, paying attention to the value of the directory
parameter.
You only need to specify the changeset
parameter if you'd like all builds to target that changeset.
The available values for cleanup
are MINIMAL
, STANDARD
, FULL
and DELETE
.
In case you want to specify credentials, the available values for workingMode
are NONE
(default), UP
and LDAP
. You might need to specify a string value in
cm command examples:
cm(
branch: '/hotfix',
repository: 'assets-repo',
server: 'my.plasticscm.server.com:8087',
cleanup: 'DELETE',
directory: 'assets',
workingMode: 'UP',
credentialsId: 'my-credentials'
)
cm(
branch: '/dev',
changeset: '538',
repository: 'assets-repo',
server: 'my.plasticscm.server.com:8087',
cleanup: 'STANDARD',
)
Important! Don't forget to use the ssl://
prefix in the server name if your Plastic Server utilizes SSL. For instance, server: 'ssl://my.plasticscm.server.com:8088',
If you'd rather use declarative pipelines (selecting the Pipeline script from SCM option), you'll have to specify the Plastic SCM configuration just as you'd do for a freestyle project. Then, two new parameters will appear: Script path and Lightweight checkout.
The script path tells Jenkins where to find the pipeline script file. If you defined subdirectories (regardless of how many additional repositories you described) there are two possible scenarios:
- If Lightweight checkout is selected the file is checked-out from the repository alone and placed in the root path, so you just need to specify the relative path to the script file within the repository. e.g. "Jenkinsfile" (if Jenkinsfile is in the root of the repository)
- Alternatively, if you don't select Lightweight checkout you'll need to include the subdirectory in the Script path as the repository is downloaded entirely before looking for the script file. e.g. "code/Jenkinsfile" (if "code" specified in Directory field). See an example below:
Enabling lightweight checkout lets Jenkins retrieve the pipeline script file directly, without a full Plastic SCM update.
Build information
Summary
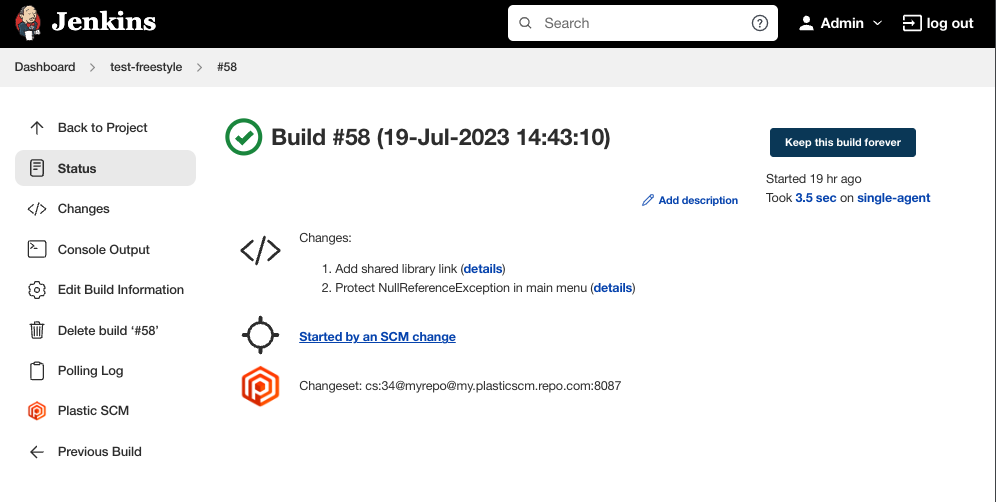
The build summary includes a reference to the Plastic SCM changeset spec that was built.
Changes list
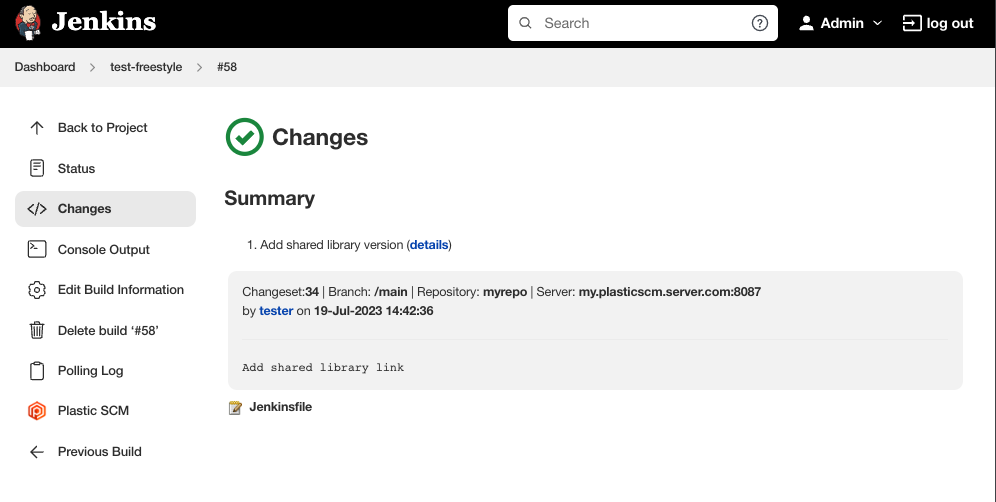
The changes page in each build will have details about each of the changesets that were included in the build, linked from the summary list.
Plastic SCM Build Data
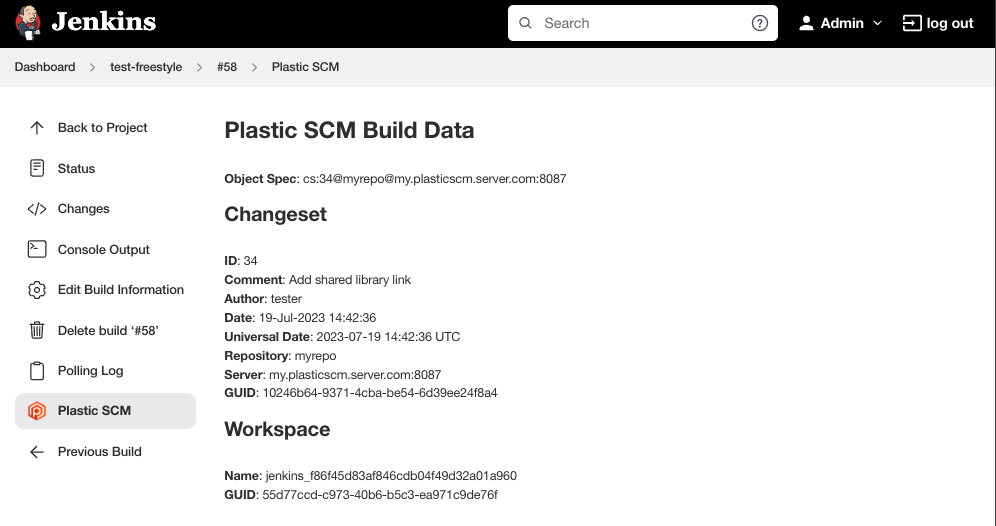
You'll find a link in the build page sidebar to display the Plastic SCM data for that build.
Environment variables
If the checkout operation succeeds, these environment variables will be populated with the appropriate values for the build:
PLASTICSCM_CHANGESET_ID
: Number of the currently built changesetPLASTICSCM_CHANGESET_GUID
: GUID of the currently built changesetPLASTICSCM_BRANCH
: Name of the branch in Plastic SCMPLASTICSCM_AUTHOR
: Name of the user who created the currently build changesetPLASTICSCM_REPSPEC
: The configured repository specification for the current build
Additional workspaces will include their position in the list, like this:
PLASTICSCM_1_CHANGESET_GUID
PLASTICSCM_5_AUTHOR
PLASTICSCM_9_CHANGESET_ID
- etc.
Pipelines
Please have in mind that running the cm
command in a pipeline script won't automatically set the environment variables above! This command, as do all VCS commands, returns a dictionary that contains the environment values set as expected.
To take advantage of that, you should do something like this:
pipeline {
agent any
environment {
PLASTICSCM_WORKSPACE_NAME = "${env.JOB_BASE_NAME}_${env.BUILD_NUMBER}"
PLASTICSCM_TARGET_SERVER = "192.168.1.73:8087"
PLASTICSCM_TARGET_REPOSITORY = "default"
}
stages {
stage('SCM Checkout') {
steps {
script {
def plasticVars = cm(
branch: "main",
changelog: true,
repository: env.PLASTICSCM_TARGET_REPOSITORY,
server: env.PLASTICSCM_TARGET_SERVER,
useUpdate: false
)
plasticVars.each {
key, value -> println("${key} = ${value}")
}
}
}
}
}
}
In the code above, the plasticVars
dictionary would only be available in the script
block inside the 'SCM Checkout' stage. If you'd like access it across different scripts, steps or stages, you can define the variable in the global scope:
def plasticVars
pipeline {
agent any
environment {
PLASTICSCM_WORKSPACE_NAME = "${env.JOB_BASE_NAME}_${env.BUILD_NUMBER}"
PLASTICSCM_TARGET_SERVER = "192.168.1.73:8087"
PLASTICSCM_TARGET_REPOSITORY = "default"
}
stages {
stage('SCM Checkout') {
steps {
script {
plasticVars = cm(
branch: "main",
changelog: true,
repository: env.PLASTICSCM_TARGET_REPOSITORY,
server: env.PLASTICSCM_TARGET_SERVER,
useUpdate: false
)
}
script {
plasticVars.each {
key, value -> println("${key} = ${value}")
}
}
}
}
}
}
Requirements
- Jenkins
2.60.3
or newer - Plastic SCM command line client
10.0.16.6112
or newer
Upgrading from 2.x to 3.x
The upgrade process is mostly seamless. You'll only need to review the configuration parameters of your jobs if you configured them to use multiple workspaces. Since the subdirectory name was inferred from the workspace name before and that parameter is now gone, the Subdirectory parameter (used now to specify the subdirectory name explicitly) will be empty. Builds might download all workspaces in the same directory!
Upgrading from 3.x to 4.x
There are not incompatibilities in configuration from version 3.x to version 4.x. The latter adds support in project/pipeline configurations to specify a Plastic SCM working mode and credentials.
By default, new or existing projects will use the default credentials for cm
as configured in the controller or agent machines. This means that upgrading will keep the same behaviour as you had in the previous version.
Development
Building the Plugin
To build the plugin you will need:
- Maven version
3.5
or newer - Java Development Kit (JDK) version
8
Run the following command to build the plugin:
mvn package
Contributing to the Plugin
New feature requests and bug fix proposals should be submitted as pull requests. Fork the repository. Make the desired changes in your forked copy. Submit a pull request to the master
branch.
Use the Jenkins SCM API coding style guide for new code.
Before submitting a pull request please check if your code passes code quality and style checks by running:
mvn verify
All pull requests will be evaluated by Jenkins CI.
Plugin information
This plugin is developed and maintained by Codice Software S.L., owner of the Plastic SCM product.
Visit us at https://www.plasticscm.com
You can meet the team here!
We really appreciate PR and contributions!
Feel the power of merging branches easier than ever with SemanticMerge!
Change log
You can find it here