- NeuVector Vulnerability Scanner Jenkins Plugin
- Description
- Notes
- Requirements
- Setup the configuration in Jenkins
- Setup K8s plugin in Jenkins
- Setup Pipeline to build large scale parallel scan
This is a Jenkins Plugin to do security vulnerabilities scanning on registries and local images with the NeuVector Scanner.
- It supports two scan modes. By default, it uses the
Controller & Scannermode.- Standalone mode, run the service inside the docker images
Controller & Scanner mode, run the service inside external controller
- Support running jenkins pod with K8s agent mode from 2.2+
- Support multi-controller endpoint from 2.4+
- Support api key verification from 2.5+, will has 2 mode to verify
Token: Disable the api key verification by checking theDisable API Key Verificationcheckbox, will use account and password to verifyAPI Key: Use an API key for verification. In this mode, the plugin will leverage large-scale parallel scanning.
-
For the
Controller & Scannermode, you need to install the NeuVector controller and scanner in the network. To scan the local image (the image on the Jenkins machine), theController & Scannerneeds to be installed on the node where the image exists. -
For the standalone mode, Docker must be installed on the same host with Jenkins. Also, add jenkins user to the docker group.
sudo usermod -aG docker jenkins -
If you run the Jenkins as a container, remember to mount a host directory
-v /var/jenkins_home:/var/jenkins_homeFor example,
docker run -p 8080:8080 -v /var/jenkins_home:/var/jenkins_home -v /var/run/docker.sock:/var/run/docker.sock -v $(which docker):$(which docker) --name=jenkins jenkins/jenkins:ltsIf you want to mount a host directory which is not
/var/jenkins_home, for example/home/neuvector/jenkins_home. Please remember to add an environment variableJENKINS_MOUNT_PATH='/home/neuvector/jenkins_home'For example,
-
docker CLI
docker run -p 8080:8080 -e JENKINS_MOUNT_PATH='/home/neuvector/jenkins_home' -v /home/neuvector/jenkins_home:/var/jenkins_home -v /var/run/docker.sock:/var/run/docker.sock -v $(which docker):$(which docker) --name=jenkins jenkins/jenkins:lts -
docker-compose.yml
    jenkins-node:
    image: jenkins/jenkins:lts
    container_name: jenkins-node
    user: root
    ports:
        - 8080:8080
        - 50000:50000
    volumes:
        - /home/neuvector/jenkins_home:/var/jenkins_home
        - /usr/bin/docker:/usr/bin/docker
        - /var/run/docker.sock:/var/run/docker.sock:ro
    environment:
        - JENKINS_MOUNT_PATH=/home/neuvector/jenkins_home
-
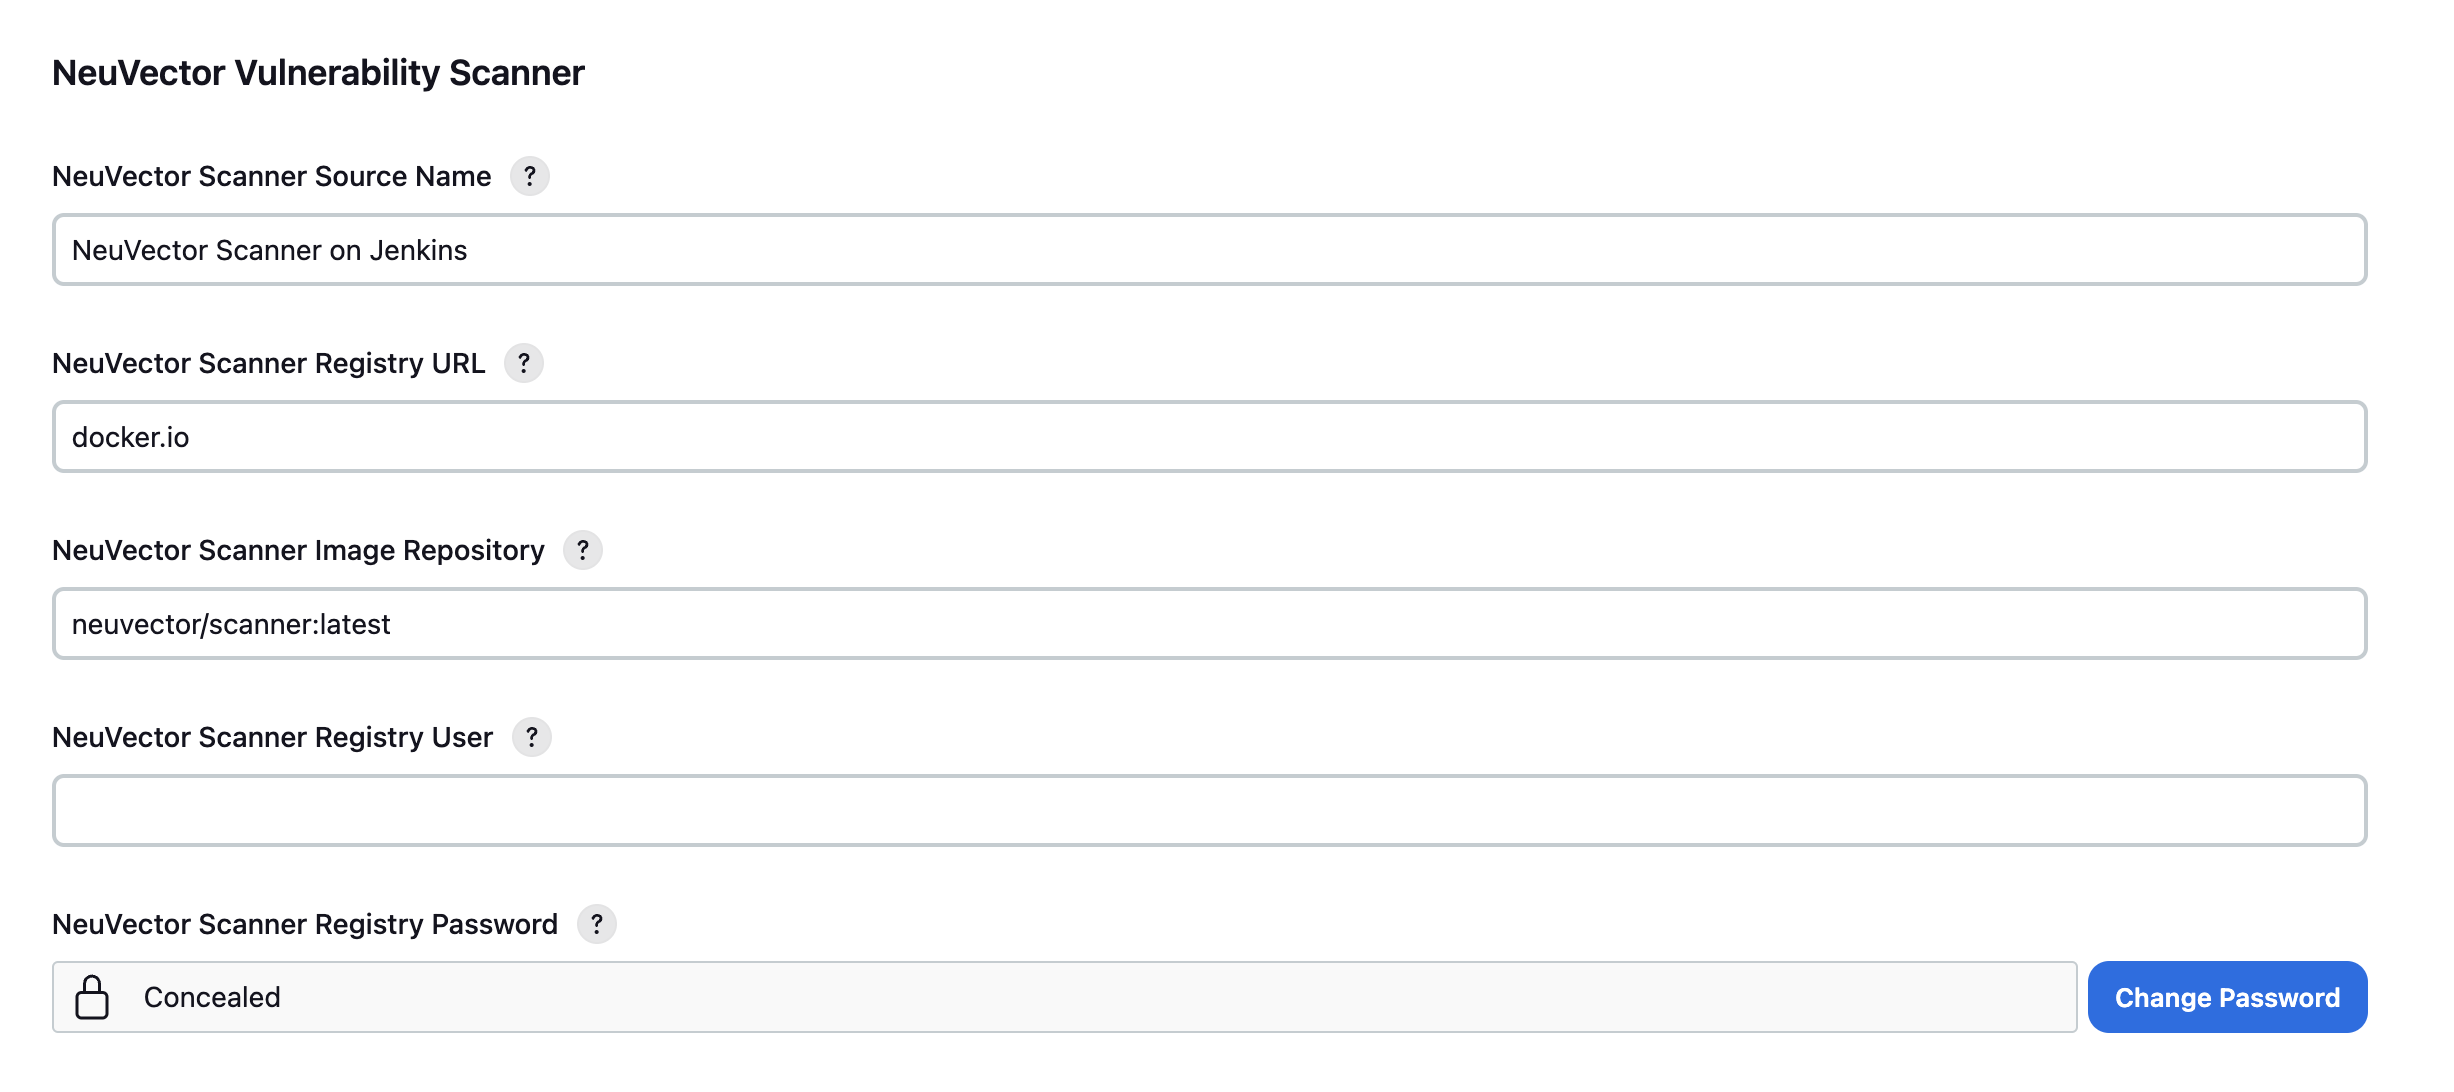
After installing the plugin, you will find the NeuVector Vulnerability Scanner section in the global configuration page (Jenkins UI > Manage Jenkins > Configure System), and the first section you will see is to configure Controller & Scanner, then is the Standalone section.
- Once you have done the following settings, you may click the
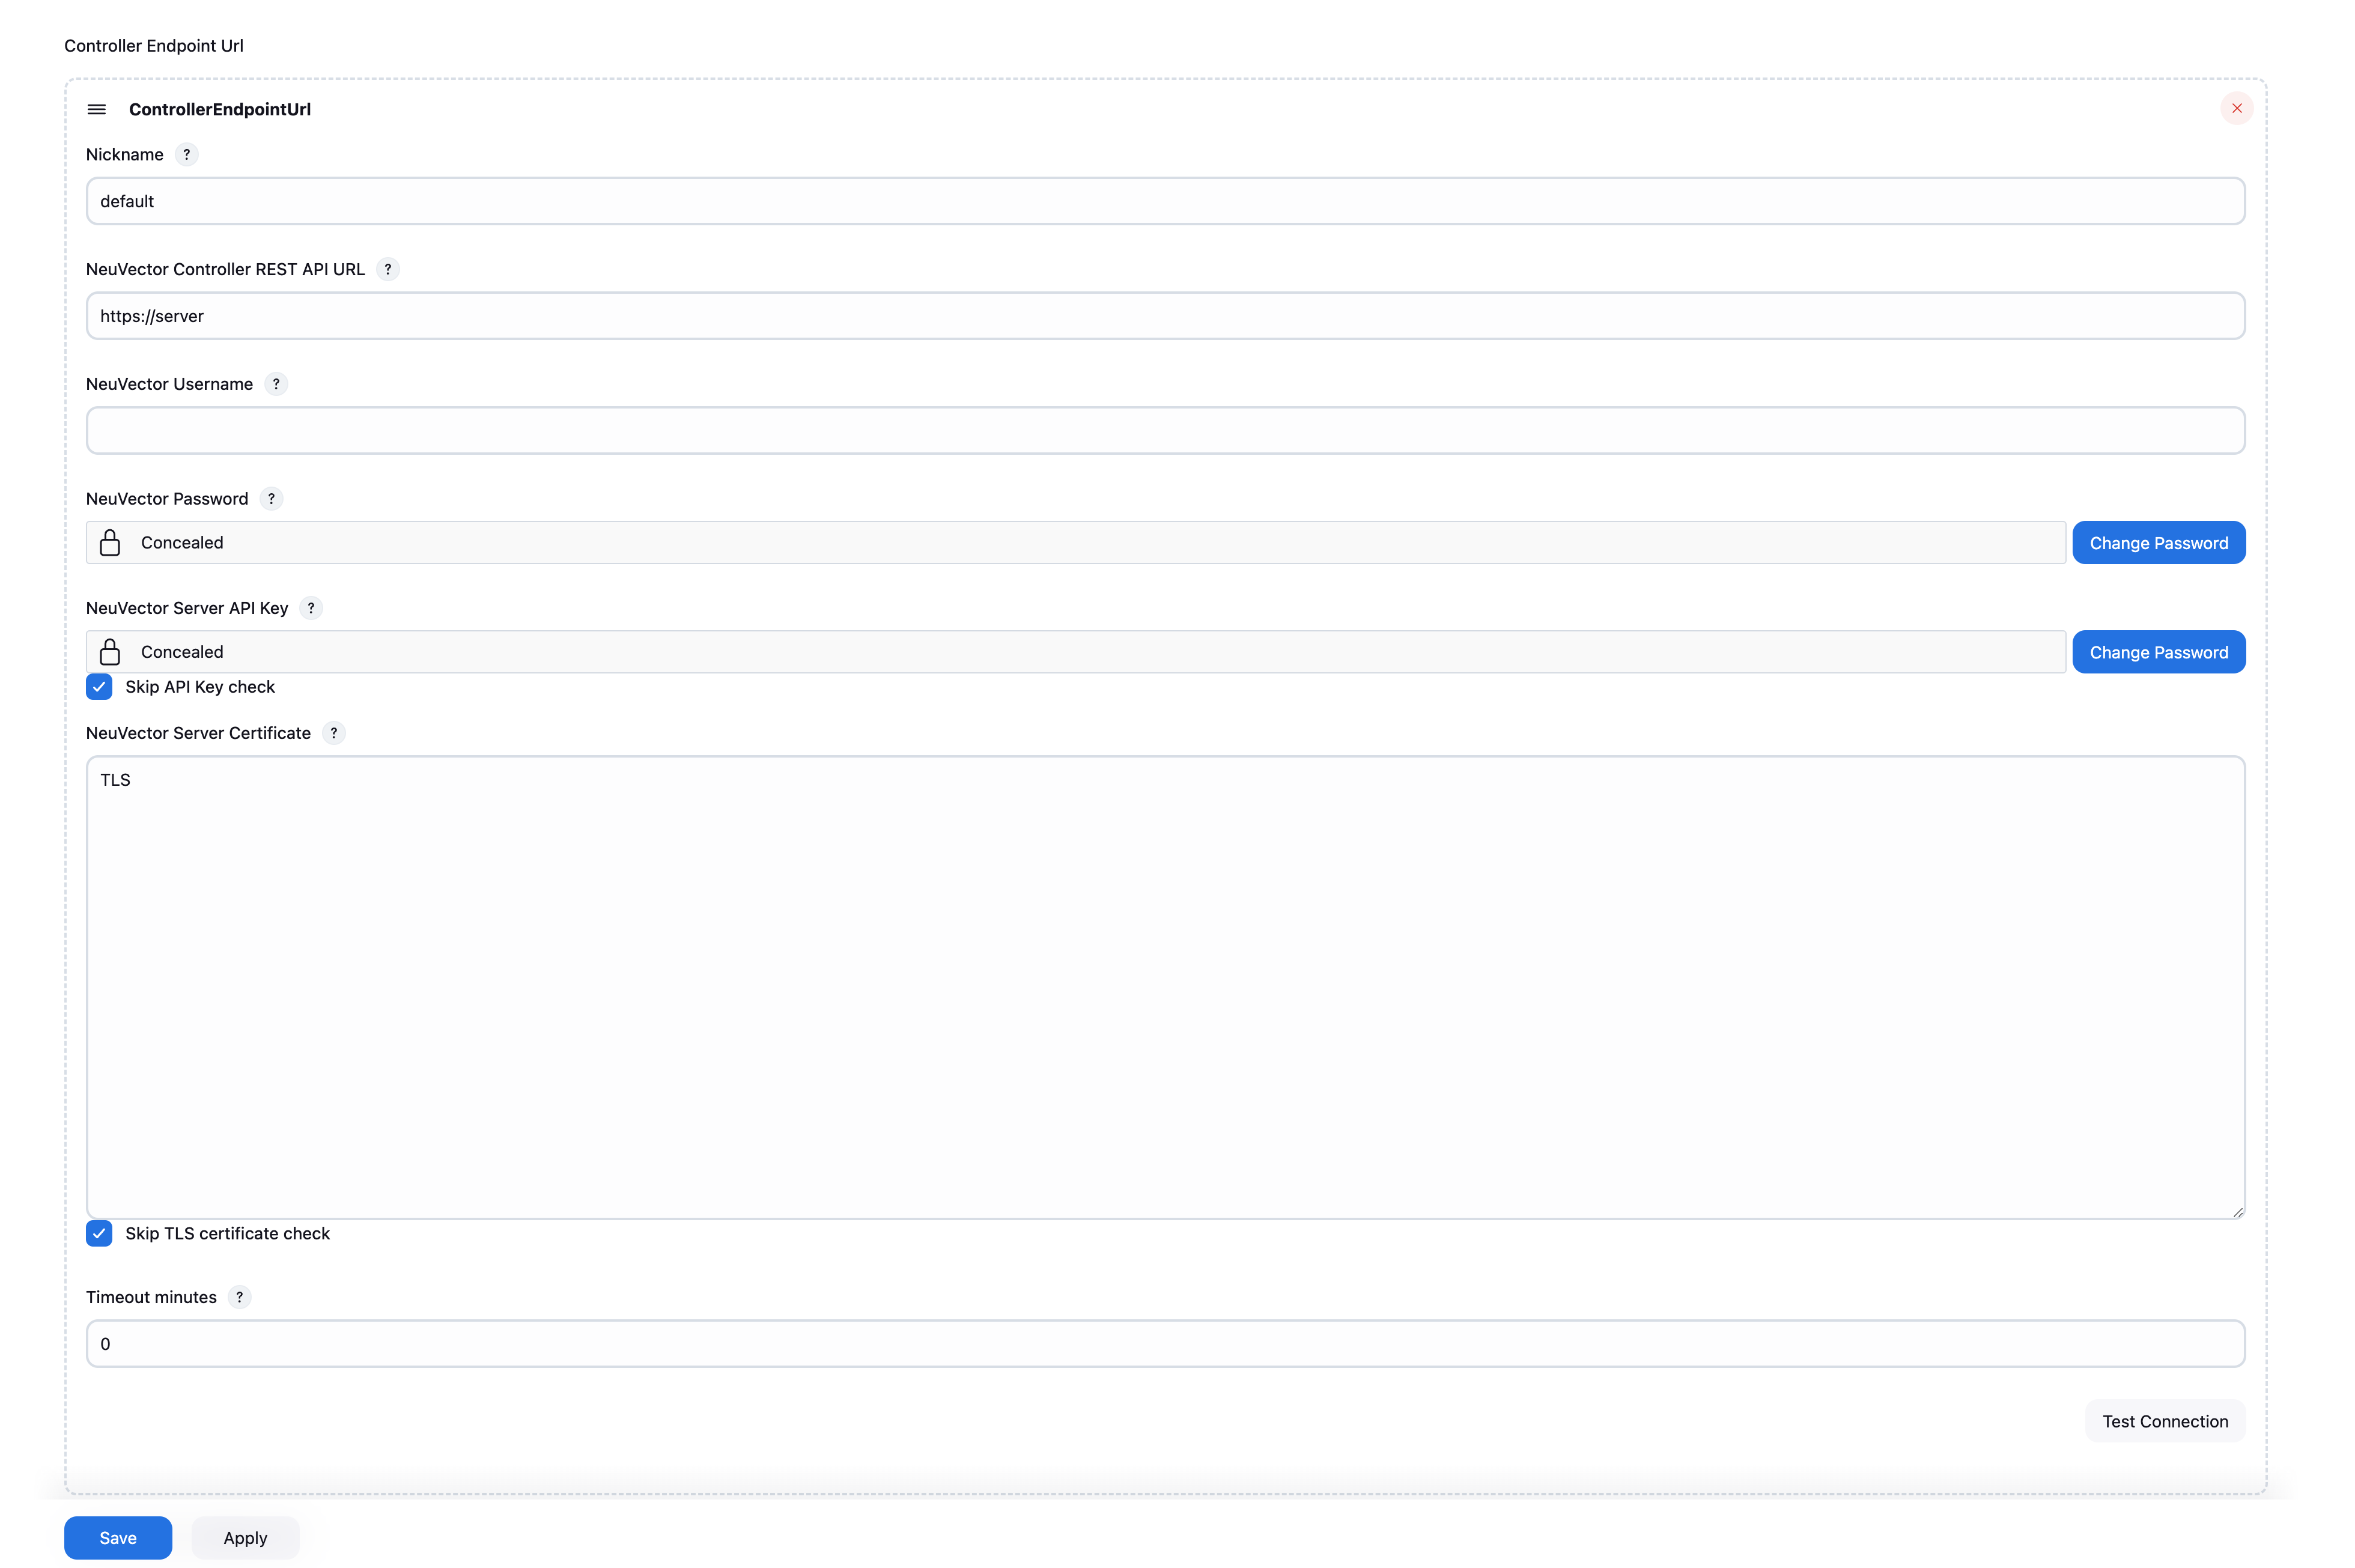
Test Connectionbutton to validate the values. It will showConnection Successor an error message. - Supports multi-controller mode, allowing users to set up multiple controllers as servers and select one when generating the pipeline. If no controller is selected, the one named "default" will be chosen automatically.
- The controller endpoint name must be unique. If a duplicate is detected, it will be automatically removed when the user clicks the save button.
- Enter values for the
Controller & Scannermode which includes the NeuVector Scanner source name, controller rest api url, username, and password. - TLS certificate check will check the consistency of between the certificate you provide in NeuVector Server Certificate and the server. Here is how we find the certificate in your server.
- Access into the pod of the expose cluster
- File location should
/etc/neuvector/certs/ssl-cert.pem - Copy the content and paste it here as the certificate.
- You can disable TLS check by by clicking
Skip TLS certificate check. - You can disable the api key verification by checking the
Disable API Key Verificationcheckbox.- Disable the api key verification uses account and password to verify
- Not disable the api key verification uses api key to verify
- The timeout minutes value will terminate the build step within the time entered. The default value of 0 means no timeout will occur
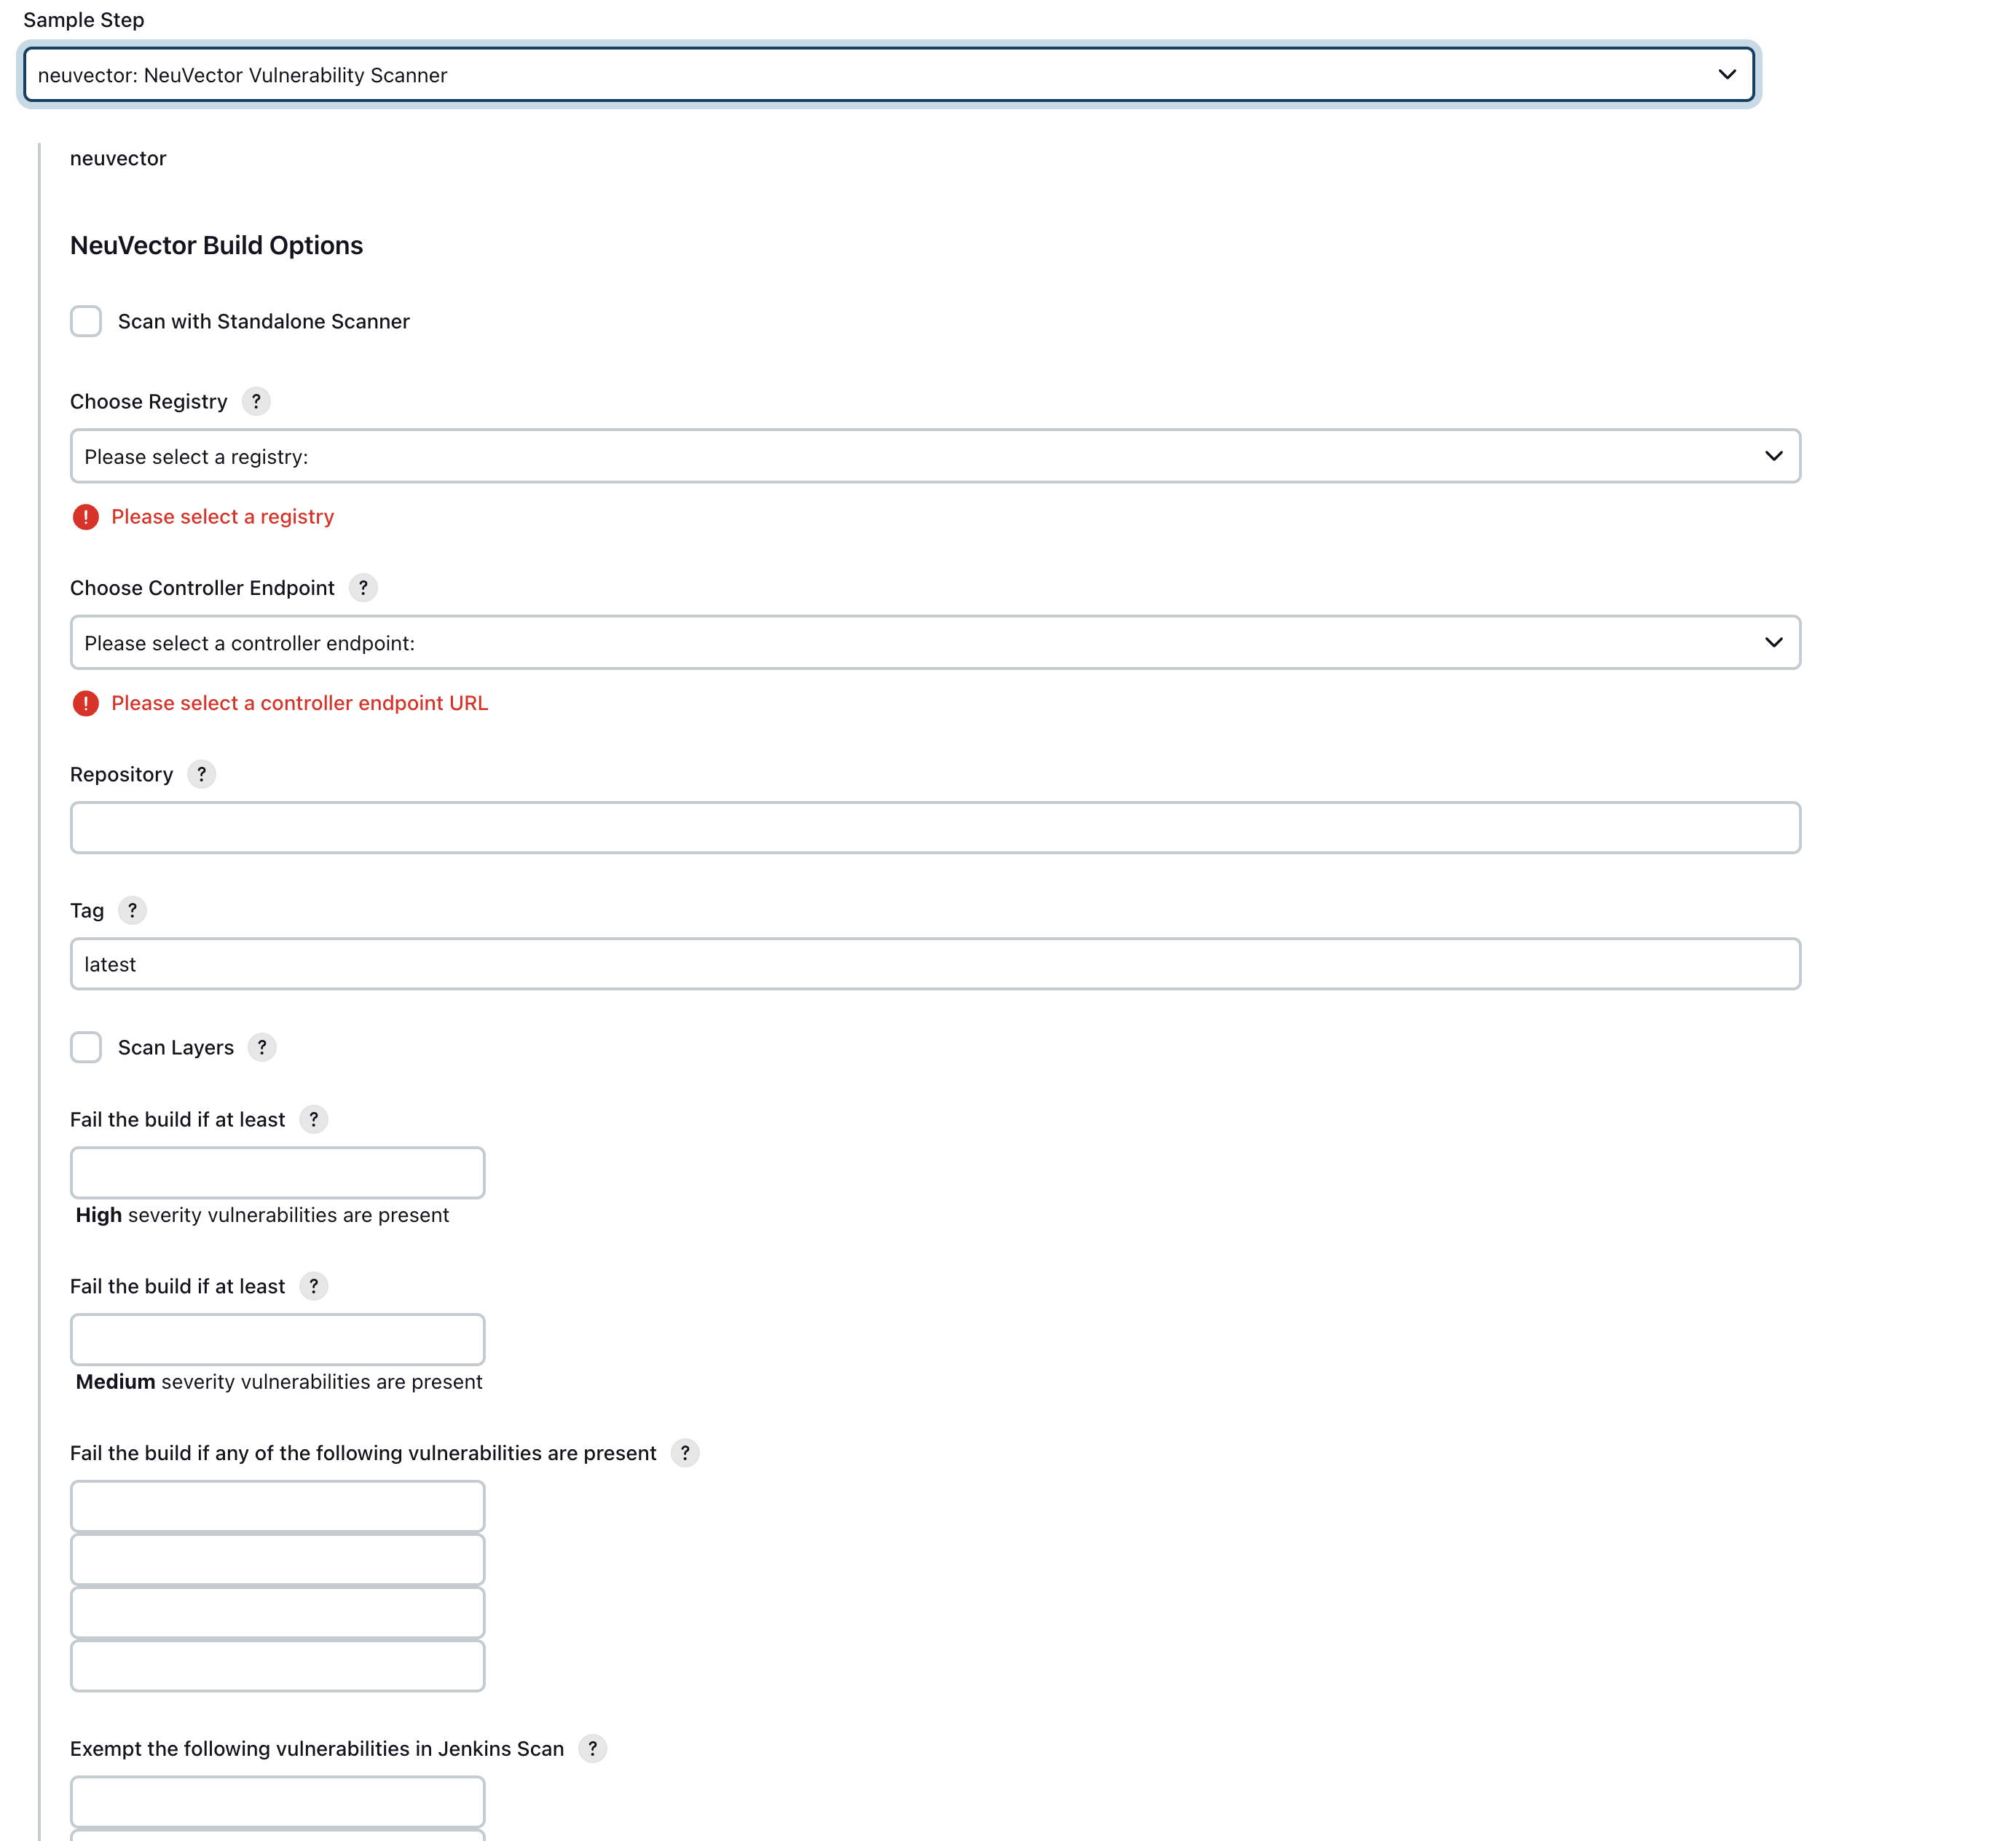
In your project configuration page, choose the NeuVector Vulnerability Scanner plugin from the drop down menu in the 'Add build step' / 'pipeline', these two have simiar configure pages. 
- Check the checkbox "Scan with Standalone scanner" if you want to do the scan in the standalone scanner mode. By default, it uses
Controller & Scannermode to do the scan. - Choose the controller endpoint you want to use if user select the controller mode, user can ignore it if select the standalone mode.
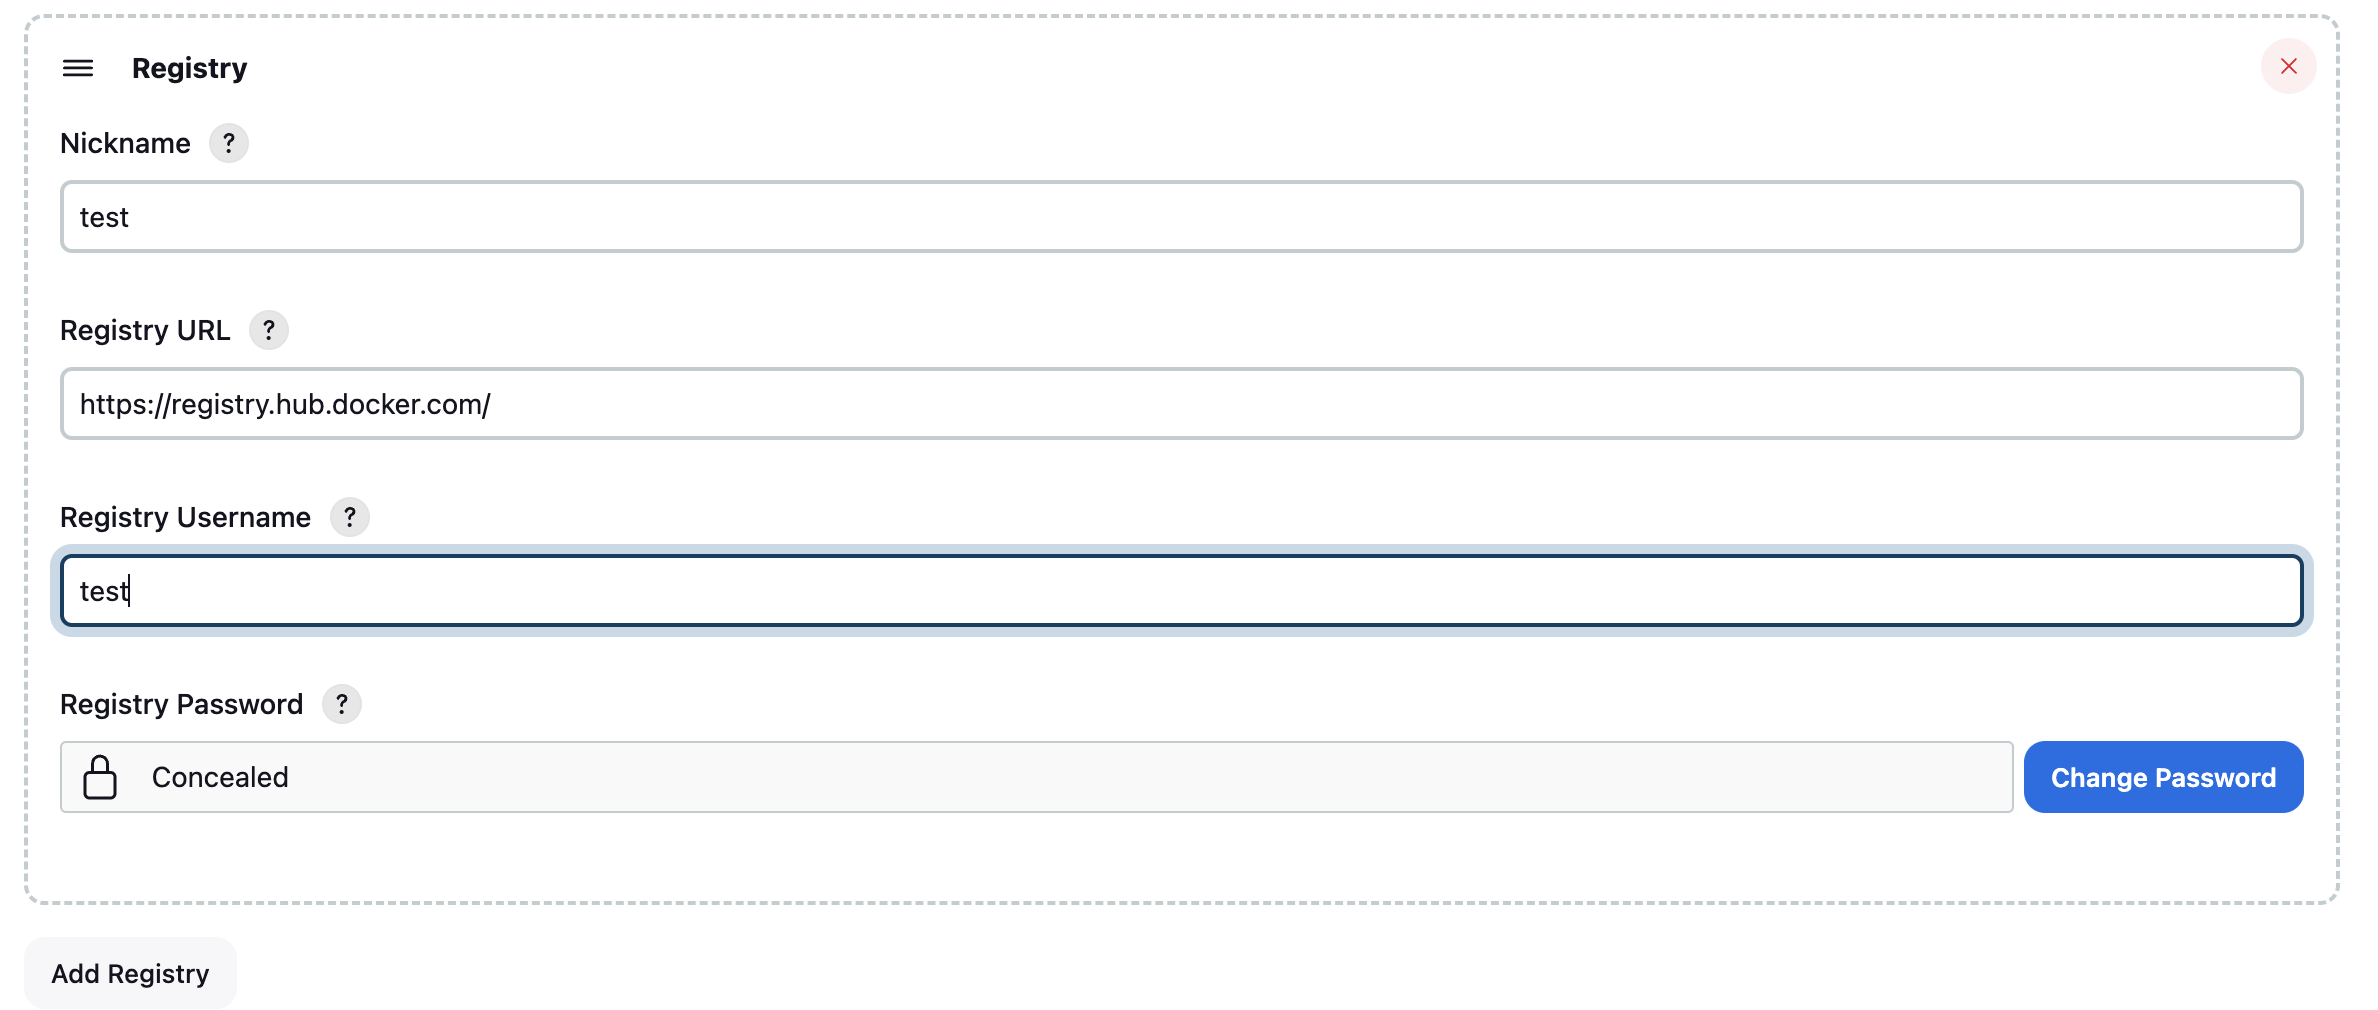
- Define the registry in the global config page and choose the registry name here. Enter the repository (image) name and tag name. You may choose Jenkins default environment variables for the repository or tag. e.g. $JOB_NAME, $BUILD_TAG, $BUILD_NUMBER.
- Enter the values for the number of high or medium, the vulnerability names that present to fail the build, the vulnerability names that are exempt from the scan. If you choose "Scan with Standalone", the scan timeout is 10 minutes by default.
- Finish the config, go back to the project page then click build. When the build finishes, a NeuVector report will be generated.
Here we provide an example pipeline from our testing machine.
pipeline {
    agent {
      // kubernetes represent the machine name.
      kubernetes {
        yaml '''
        apiVersion: v1
        kind: Pod
        spec:
          containers:
          - name: docker
            image: docker:dind
            command: ["/bin/sh", "-c"]
            args: ["dockerd & sleep infinity"]
            securityContext:
              privileged: true
              runAsUser: 0
          imagePullSecrets:
            - name: my-dockerhub-secret
        '''
      }
    }
    stages {
        stage('docker pull') {
            steps {
                // run the docker we declare above
                container('docker') {
                    script {
                        neuvector nameOfVulnerabilityToExemptFour: '', nameOfVulnerabilityToExemptOne: '', nameOfVulnerabilityToExemptThree: '', nameOfVulnerabilityToExemptTwo: '', nameOfVulnerabilityToFailFour: '', nameOfVulnerabilityToFailOne: '', nameOfVulnerabilityToFailThree: '', nameOfVulnerabilityToFailTwo: '', numberOfHighSeverityToFail: '', numberOfMediumSeverityToFail: '', controllerEndpointUrlSelection: 'your controller Endpoint', registrySelection: 'your registry', repository: 'your repo', scanTimeout: 10, standaloneScanner: true, tag: 'some tag', registrySelection: 'your choice'
                    }
                }
            }
        }
    }
}
Supports parallel scanning with NeuVector 5.4.3+ (up to 2000 concurrent scans). For earlier versions, maximum concurrent scans is 32.
pipeline {
    agent any
    environment {
        REPO_NAME = 'your repo'
        REGISTRY_SELECTION = 'your registry'
        CONTROLLER = 'your controller'
        MAX_CONCURRENT_SCANS = 32
    }
    stages {
        stage('Parallel Vulnerability Scanning') {
            steps {
                script {
                    // There is a limit of 250 tags per list (by Jenkins)
                    TAGS_LIST_PART1 = ["your tags"...]
                    TAGS_LIST_PART2 = ["your tags"...]
                    TAGS_LIST_PART3 = ["your tags"...]
                    TAGS_LIST_PART4 = ["your tags"...]
                    TAGS_LIST_PART5 = ["your tags"...]...
                    def allTags = TAGS_LIST_PART1 + TAGS_LIST_PART2 + TAGS_LIST_PART3 + TAGS_LIST_PART4 + TAGS_LIST_PART5
                    def batches = allTags.collate(MAX_CONCURRENT_SCANS.toInteger()) // Ensure MAX_CONCURRENT_SCANS is an integer
                    def batchCounter = 1                    for (batch in batches) {
                        stage("Batch ${batchCounter}") {
                            def scans = [:]
                            batch.each { tag ->
                                def currentTag = tag
                                scans["Scan ${currentTag}"] = {
                                    stage("Scan ${currentTag}") {
                                        neuvector(
                                            controllerEndpointUrlSelection: CONTROLLER,
                                            registrySelection: REGISTRY_SELECTION,
                                            repository: REPO_NAME,
                                            scanTimeout: 20,
                                            tag: "${currentTag}"
                                        )
                                        echo "Scan for tag ${currentTag} complete"
                                    }
                                }
                            }
                            parallel scans
                        }
                        batchCounter++
                    }
                }
            }
        }
    }
}
pipeline {
    agent any
    environment {
        REPO_NAME = 'your repo'
        REGISTRY_SELECTION = 'your registry'
        CONTROLLER = 'your controller'
    }
    stages {
        stage('Parallel Vulnerability Scanning') {
            steps {
                script {
                    // There is a limit of 250 tags per list (by Jenkins)
                    TAGS_LIST_PART1 = ["your tags"...]
                    TAGS_LIST_PART2 = ["your tags"...]
                    TAGS_LIST_PART3 = ["your tags"...]
                    TAGS_LIST_PART4 = ["your tags"...]
                    TAGS_LIST_PART5 = ["your tags"...]...
                    def allTags = TAGS_LIST_PART1 + TAGS_LIST_PART2 + TAGS_LIST_PART3 + TAGS_LIST_PART4 + TAGS_LIST_PART5

                    def scans = [:]

                    allTags.each { tag ->
                        def currentTag = tag
                        scans["Scan ${currentTag}"] = {
                            stage("Scan ${currentTag}") {
                                neuvector(
                                    controllerEndpointUrlSelection: CONTROLLER,
                                    registrySelection: REGISTRY_SELECTION,
                                    repository: REPO_NAME,
                                    scanTimeout: 20,
                                    tag: "${currentTag}"
                                )
                                echo "Scan for tag ${currentTag} complete"
                            }
                        }
                    }
                    parallel scans
                }
            }
        }
    }
}


