
![]()
![]()
- Overview
- Installing and configuring the plugin
- Configuring JFrog CLI as a Tool
- Using JFrog CLI in your pipeline jobs
- Using JFrog CLI in Freestyle jobs
- Using HTTP/s proxy
- Jenkins Configuration as Code
- Examples
- Contributions
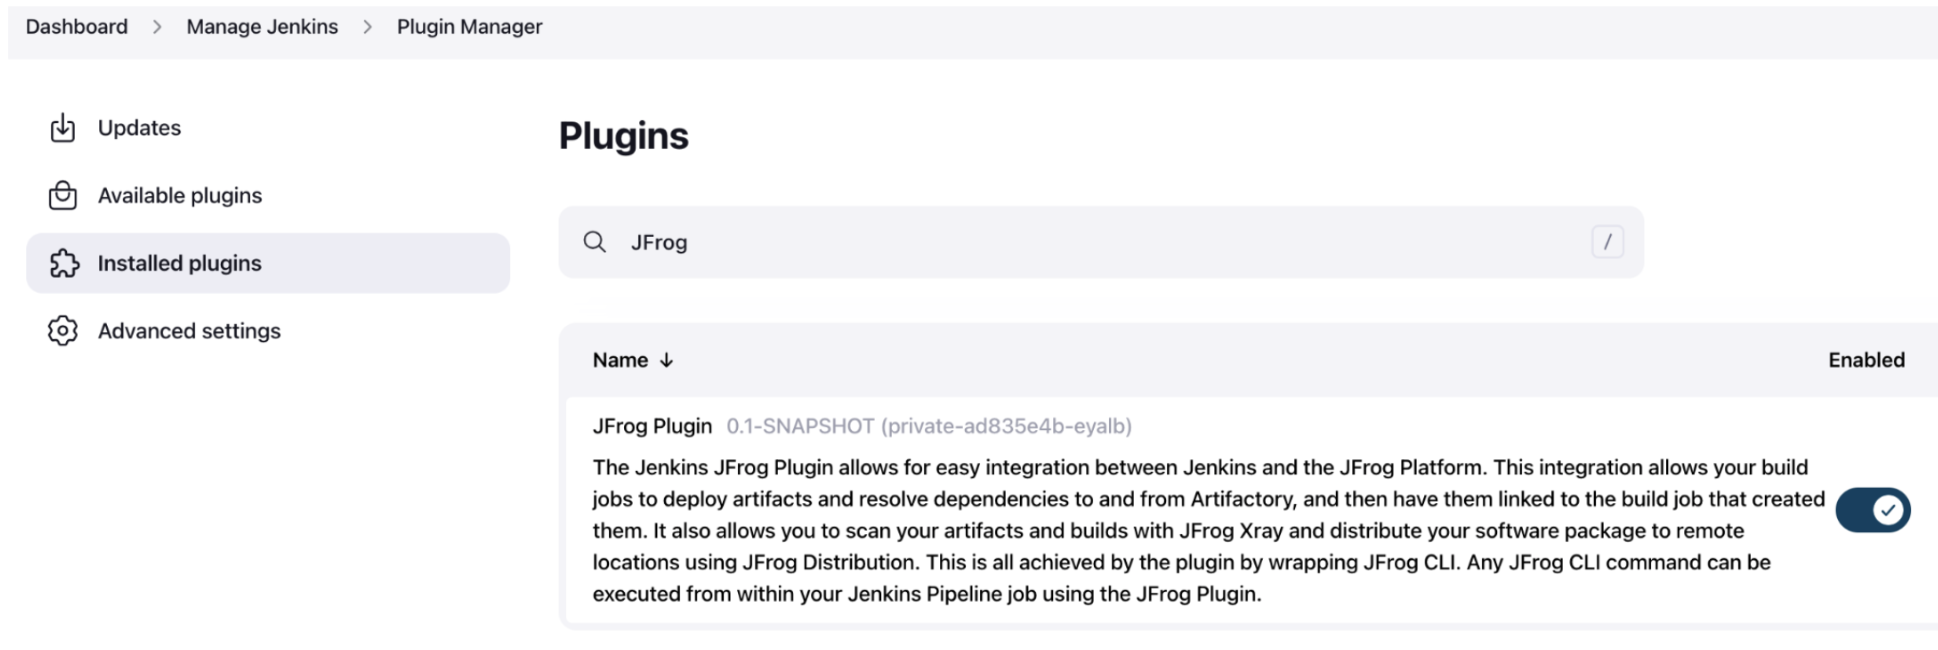
The Jenkins JFrog Plugin allows for easy integration between Jenkins and the JFrog Platform. This integration allows your build jobs to deploy artifacts and resolve dependencies to and from Artifactory, and then have them linked to the build job that created them. It also allows you to scan your artifacts and builds with JFrog Xray and distribute your software package to remote locations using JFrog Distribution. This is all achieved by the plugin by wrapping JFrog CLI. Any JFrog CLI command can be executed from within your Jenkins Pipeline job using the JFrog Plugin.
- Install the JFrog Plugin by going to Manage Jenkins | Manage Plugins.
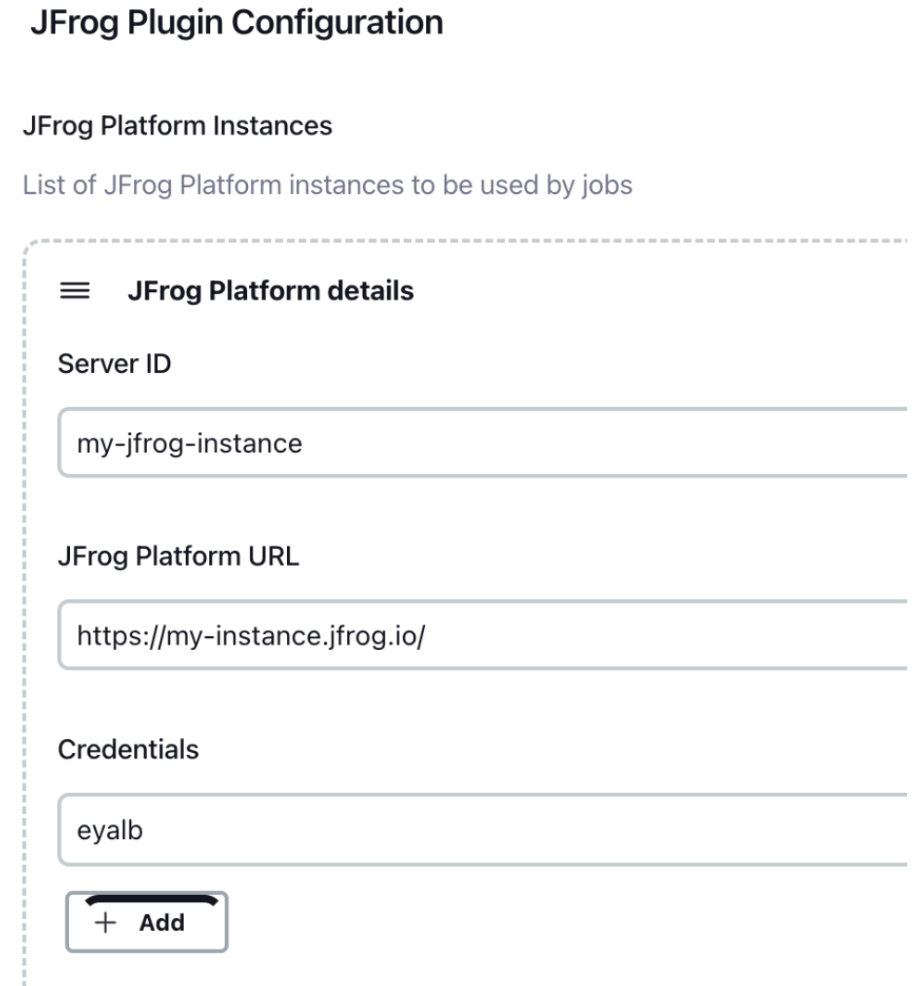
- Configure your JFrog Platform details by going to Manage Jenkins | Configure System.
- Configure JFrog CLI as a tool in Jenkins as described in the Configuring JFrog CLI as a tool section.


To use JFrog CLI in your pipelines jobs, you should configure it as a tool in Jenkins by going to Manage Jenkins | Global Tool Configuration. You can use one of the following installation options:
If your agent has access to the internet, you can set the installer to automatically download JFrog CLI from https://releases.jfrog.io as shown in the below screenshot.

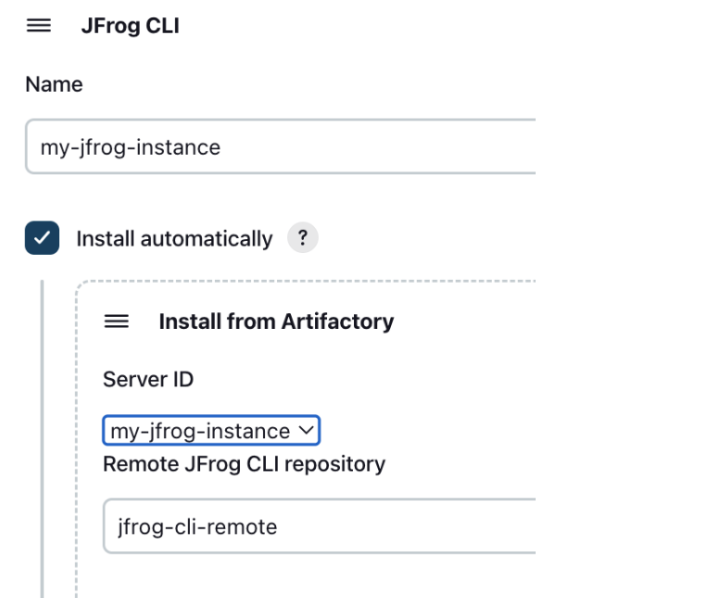
If your agent cannot access the internet, you can set the installer to automatically download JFrog CLI from the JFrog instance you configured in Manage Jenkins | Configure System as shown in the below screenshot. To set this up, follow these steps:
-
Create a generic remote repository in Artifactory for downloading JFrog CLI. You can name the repository jfrog-cli-remote. This is the name we'll be using here, but you can also choose a different name for the repository.
- In the Basic tab, set the repository URL to
https://releases.jfrog.io/artifactory/jfrog-cli/ - In the Advanced tab, uncheck the Store Artifacts Locally option.
- In the Basic tab, set the repository URL to
-
In Manage Jenkins | Global Tool Configuration select the Install from Artifactory option as shown in the screenshot below.

-
Set the Server ID of your JFrog instanced, which you configured in Manage Jenkins | Configure System. Also set jfrog-cli-remote as the name of the remote repository you created to download JFrog CLI from. If you used a different name for repository, set this name here.


Install JFrog CLI manually on your build agent, and then set the path to the directory which includes the jf executable, as shown in the below screenshot.

The plugin uses an intelligent installation strategy that handles various scenarios gracefully:
When JFrog CLI is not yet installed on an agent:
- The plugin acquires an installation lock to coordinate parallel pipeline steps
- If another step is already installing, subsequent steps wait (up to 5 minutes)
- This ensures reliable installation even with parallel pipeline execution
When an existing JFrog CLI installation is detected:
- The plugin checks if an upgrade is available (via SHA256 comparison)
- If an upgrade is needed and the binary is not in use, it's replaced with the new version
- If the binary is currently in use by another process (common on Windows with parallel steps):
- The upgrade is gracefully skipped
- The existing CLI version is used for the current build
- A warning is logged: "Upgrade skipped. Using existing version. Upgrade will be attempted in next build."
- The next build will automatically attempt the upgrade again
This behavior ensures:
- Build reliability: Builds don't fail due to file locking conflicts on Windows
- Automatic recovery: Upgrades are deferred, not lost
- Parallel step safety: Multiple parallel steps can safely use the CLI without conflicts
On Windows agents, file locking can occur when:
- Multiple parallel pipeline steps attempt to install/upgrade the CLI simultaneously
- Antivirus software scans the binary during installation
- The CLI is actively being executed by another step
The plugin handles these scenarios gracefully by:
- Using file-based locking for installation coordination
- Detecting Windows file locking errors
- Falling back to existing versions when upgrades can't proceed
To have your pipeline jobs run JFrog CLI commands, add the following to your pipeline script.
Step 1: Define JFrog CLI as a tool, by using the tool name you configured. For example, if you named the tool jfrog-cli, add the following to the script:
tools {
    jfrog 'jfrog-cli'
}
Scripted Pipeline
withEnv(["JFROG_BINARY_PATH=${tool 'jfrog-cli'}"]) {
    // The 'jf' tool is available in this scope.
}
Step 2: Use the jf step to execute any JFrog CLI command as follows:
// Upload all files in the target directory to the my-repo Artifactory repository.
jf 'rt u target/ my-repo/'
IMPORTANT: Notice the single quotes wrapping the command right after the jf step definition.
If the JFrog CLI command has arguments with white-spaces, you can provide the arguments as a list as follows:
jf(['mvn', 'clean', 'install', '-Ddeploy.testProperty=Property with space'])
When the above list syntax is used, the quotes required for the string syntax are replaced with quotes wrapping each item in the list as shown above. The above step is equivalent to the following shell command:

The list syntax also helps avoiding space and escaping problems, when some of those arguments use script variables.
The plugin automatically sets the following environment variables: JFROG_CLI_BUILD_NAME and JFROG_CLI_BUILD_NUMBER with Jenkins's job name and build number respectively. You therefore don't need to specify the build name and build number on any of the build related JFrog CLI commands. If you wish to change the default values, add the following code to your pipeline script:
environment {
    JFROG_CLI_BUILD_NAME = "my-build-name"
    JFROG_CLI_BUILD_NUMBER = "18"
}
The plugin by default tries to detect and set the password standard input. If you wish to change the default behaviour, add the following environment variable to your pipeline script: this adds flag as --password-stdin to the JFrog CLI commands. The primary reason for this environment variable is few plugins does not support stdin input, because it is a custom launcher. When a custom launcher is being used, the stdin we prepare in the plugin does not get passed to the custom launchers, for example docker launchers.
environment {
    JFROG_CLI_PASSWORD_STDIN_SUPPORT = "true"
}
If you have multiple JFrog Platform instances configured, you can use the –-server-id command option with the server ID you configured for the instance. For example:
jf 'rt u test-file my-repo –-server-id server-1'
jf 'rt u test-file my-repo –-server-id server-2'
Build-info is the metadata of a build. It includes all the details about the build broken down into segments that include version history, artifacts, project modules, dependencies, and everything that was required to create the build. In short, it is a snapshot of the components used to build your application, collected by the build agent. See below how you publish the build-info from your pipeline jobs. This section should be placed inside the job after the execution of the JFrog CLI commands used for the build.
stage('Publish build info') {
    steps {
        jf 'rt build-publish'
    }
}
When the job publishes the build-info to Artifactory, you can access it by clicking on the build-info icon, next to the job run.
The JFrog CLI commands output is returned as a string. To capture the output of JFrog CLI commands, wrap the JFrog CLI command in a script block:
script {
    String version = jf '-v'
    echo "JFrog CLI version output: $version"
}
Scripted Pipeline
String version = jf '-v'
echo "JFrog CLI version output: $version"

The Jenkins JFrog Plugin also supports Freestyle jobs through the "Run JFrog CLI" build step. This allows you to execute JFrog CLI commands without using Pipeline syntax.
To make JFrog CLI available to all build steps in your Freestyle job (including shell scripts), use the Build Environment wrapper:
- In your Freestyle job configuration, scroll to the Build Environment section
- Check "Set up JFrog CLI environment"
- Select your JFrog CLI installation from the dropdown
This sets the JFROG_BINARY_PATH environment variable for the entire build, making the jf command available to:
- All "Run JFrog CLI" build steps (without needing to select an installation in each step)
- Shell/Batch build steps
- Any other build steps that use the environment
Benefits:
- Configure the CLI installation once, use it everywhere
- Shell scripts can use
$JFROG_BINARY_PATH/jfor add it to PATH - Consistent environment across all build steps
Note: This Build Environment option is only available for Freestyle jobs, not Matrix jobs. Matrix jobs run across multiple nodes with potentially different environments. For Matrix jobs, use individual "Run JFrog CLI" build steps with an automatic installation configured (from releases.jfrog.io or Artifactory), which will download the CLI to each node as needed.
- Create a new Freestyle job or open an existing one
- In the Build section, click "Add build step"
- Select "Run JFrog CLI" from the dropdown menu
- Select JFrog CLI Installation from the dropdown (choose the installation you configured in Global Tool Configuration)
- Recommended: Select a configured installation (e.g., one set up with automatic download from releases.jfrog.io)
- If you select "(Use pre-installed JFrog CLI from system PATH)", the
jfcommand must already be manually installed and available in the PATH on your Jenkins agent. This option will fail if JFrog CLI is not pre-installed.
- Enter your JFrog CLI command in the "JFrog CLI Command" field (must start with
jforjfrog)
Command field:
jf rt u target/*.jar my-repo/libs-release-local/
This will upload all JAR files from the target directory to the specified Artifactory repository.
Upload artifacts:
jf rt u build/libs/*.jar my-repo/
Download artifacts:
jf rt dl my-repo/artifact.jar download/
Publish build-info:
jf rt bp
Ping Artifactory:
jf rt ping
Docker push:
jfrog docker push my-image:latest
Maven build with JFrog:
jfrog mvn clean install
The plugin automatically collects build information when you run JFrog CLI commands like jf rt upload, jf mvn, etc. To publish this collected build info to Artifactory, you have two options:
Add the "Publish JFrog Build Info" post-build action to automatically publish build info after your build completes:
- In your Freestyle job configuration, scroll to Post-build Actions
- Click "Add post-build action" and select "Publish JFrog Build Info"
- Select your JFrog CLI installation (or use the one from Build Environment wrapper)
- Optionally check "Publish only on success" to skip publishing on failed builds
This ensures build info is always published without needing to add an explicit jf rt bp command.
Add a "Run JFrog CLI" build step with the command:
jf rt bp
- Commands must start with either
jforjfrog(e.g.,jf rt pingorjfrog rt ping) - The plugin automatically sets
JFROG_CLI_BUILD_NAMEandJFROG_CLI_BUILD_NUMBERenvironment variables - Build info is automatically collected during
jf rt upload,jf mvn,jf gradle, etc. - Make sure JFrog CLI is configured as a tool in Jenkins (Manage Jenkins → Global Tool Configuration)
- The JFrog Platform instance must be configured in Jenkins (Manage Jenkins → Configure System)
If you're using a JFrog platform that's situated behind an HTTP/S proxy, you should set up your proxy configuration under Manage Jenkins > Manage Plugins > Advanced.
To exclude the JFrog platform from going through a configured proxy, provide your JFrog platform's host details in the No Proxy Host section. Notice that the JFrog CLI is typically downloaded from releases.jfrog.io. You may need to add that to your list as well.
To configure this plugin on Jenkins Configuration as Code, add the following sections to the jenkins.yaml:
- Configure connection details to the JFrog platform
unclassified:
  jFrogPlatformBuilder:
    jfrogInstances:
      - serverId: "acme"
        url: "https://acme.jfrog.io"
        artifactoryUrl: "https://acme.jfrog.io/artifactory"
        distributionUrl: "https://acme.jfrog.io/distribution"
        xrayUrl: "https://acme.jfrog.io/xray"
        credentialsConfig:
          credentialsId: "acme-secret-recipe"
- Add JFrog CLI tool using one of the following methods:
-
Automatic installation from release.jfrog.io:
tool:
  jfrog:
    installations:
    - name: "jfrog-cli"
      properties:
      - installSource:
          installers:
          - "releasesInstaller"
-
Automatic installation from Artifactory:
tool:
  jfrog:
    installations:
      - name: "jfrog-cli"
        properties:
          - installSource:
              installers:
                - artifactoryInstaller:
                    repository: "jfrog-cli-remote"
-
tool:
  jfrog:
    installations:
      - name: "jfrog-cli"
        home: "/path/to/jfrog/cli/dir/"
Uploading and downloading generic files
pipeline {
    agent any
    tools {
        jfrog 'jfrog-cli'
    }
    stages {
        stage('Testing') {
            steps {
                // Show the installed version of JFrog CLI.
                jf '-v'

                // Show the configured JFrog Platform instances.
                jf 'c show'

                // Ping Artifactory.
                jf 'rt ping'

                // Create a file and upload it to a repository named 'my-repo' in Artifactory
                sh 'touch test-file'
                jf 'rt u test-file my-repo/'

                // Publish the build-info to Artifactory.
                jf 'rt bp'

                // Download the test-file
                jf 'rt dl my-repo/test-file'
            }
        }
    }
}
Docker
- Populate 'DOCKER_REG_URL' with the Artifactory Docker registry, for example - 'acme.jfrog.io'.
- Use an agent with a running Docker daemon.
- To build the Docker image, install the "Docker Pipeline" on Jenkins.
pipeline {
    agent any
    tools {
        jfrog 'jfrog-cli'
    }
    environment {
        DOCKER_IMAGE_NAME = "$DOCKER_REG_URL/docker-local/hello-frog:1.0.0"
    }
    stages {
        stage('Clone') {
            steps {
                git branch: 'master', url: "https://github.com/jfrog/project-examples.git"
            }
        }

        stage('Build Docker image') {
            steps {
                script {
                    docker.build("$DOCKER_IMAGE_NAME", 'docker-oci-examples/docker-example')
                }
            }
        }

        stage('Scan and push image') {
            steps {
                dir('docker-oci-examples/docker-example/') {
                    // Scan Docker image for vulnerabilities
                    jf 'docker scan $DOCKER_IMAGE_NAME'

                    // Push image to Artifactory
                    jf 'docker push $DOCKER_IMAGE_NAME'
                }
            }
        }

        stage('Publish build info') {
            steps {
                jf 'rt build-publish'
            }
        }
    }
}
Maven
pipeline {
    agent any
    tools {
        jfrog 'jfrog-cli'
    }
    stages {
        stage('Clone') {
            steps {
                git branch: 'master', url: "https://github.com/jfrog/project-examples.git"
            }
        }

        stage('Exec Maven commands') {
            steps {
                dir('maven-examples/maven-example') {
                    // Configure Maven project's repositories
                    jf 'mvn-config --repo-resolve-releases libs-release --repo-resolve-snapshots libs-snapshots --repo-deploy-releases libs-release-local --repo-deploy-snapshots libs-snapshot-local'

                    // Install and publish project
                    jf 'mvn clean install'
                }
            }
        }

        stage('Publish build info') {
            steps {
                jf 'rt build-publish'
            }
        }
    }
}
Gradle
pipeline {
    agent any
    tools {
        jfrog 'jfrog-cli'
    }
    stages {
        stage('Clone') {
            steps {
                git branch: 'master', url: "https://github.com/jfrog/project-examples.git"
            }
        }

        stage('Exec Gradle commands') {
            steps {
                dir('gradle-examples/gradle-example-ci-server') {
                    // Configure Gradle project's repositories
                    jf 'gradle-config --repo-resolve libs-release --repo-deploy libs-release-local'

                    // Install and publish project
                    jf 'gradle clean artifactoryPublish'
                }
            }
        }

        stage('Publish build info') {
            steps {
                jf 'rt build-publish'
            }
        }
    }
}
npm
pipeline {
    agent any
    tools {
        jfrog 'jfrog-cli'
    }
    stages {
        stage('Clone') {
            steps {
                git branch: 'master', url: "https://github.com/jfrog/project-examples.git"
            }
        }

        stage('Exec npm commands') {
            steps {
                dir('npm-example') {
                    // Configure npm project's repositories
                    jf 'npm-config --repo-resolve npm-remote --repo-deploy npm-local'

                    // Install dependencies
                    jf 'npm install'

                    // Pack and deploy the npm package
                    jf 'npm publish'
                }
            }
        }

        stage('Publish build info') {
            steps {
                jf 'rt build-publish'
            }
        }
    }
}
Go
pipeline {
    agent any
    tools {
        jfrog 'jfrog-cli'
    }
    stages {
        stage('Clone') {
            steps {
                git branch: 'master', url: "https://github.com/jfrog/project-examples.git"
            }
        }

        stage('Exec Go commands') {
            steps {
                dir('golang-example/hello/') {
                    // Configure Go project's repositories
                    jf 'go-config --repo-resolve go-remote --repo-deploy go-local'

                    // Build the project with go and resolve the project dependencies from Artifactory
                    jf 'go build'

                    // Publish version v1.0.0 of the package to the go-local repository in Artifactory
                    jf 'go-publish v1.0.0'
                }
            }
        }

        stage('Publish build info') {
            steps {
                jf 'rt build-publish'
            }
        }
    }
}
These examples demonstrate only a fraction of the capabilities of JFrog CLI. Please refer to the JFrog CLI documentation for additional information.
We welcome pull requests from the community. To help us improve this project, please read our Contribution guide.