


Build and push your Docker based project to the docker registry, including private repos.
Features:
- Only a Dockerfile needed to build your project
- Publish to docker index/registry
- nocache option (for rebuild of all Dockerfile steps)
- publish option
- manage registry credentials for private and public repos
- tag the image built - use any Jenkins env. variables.
In versions 1.0+ the plugin uses docker-commons-plugin and the credentials plugin. When upgrading you need to add the credentials to each job that uses the plugin, the global fields are no longer used.
A Dockerfile is a convenient way to express build instructions. This plugin will use the Dockerfile in the workspace (possibly previously checked out from git) and will invoke docker build to create the Docker image. The result can be automatically uploaded to the Docker Registry or a private registry.
As the Beatles song, all you need is Dockerfile, and love. If you have a Dockerfile in the root of your project, then no further configuration is needed.
Firstly, ensure you have docker running (if you are running with a agent, ensure the agent can run docker) - and that Jenkins can run docker commands.
Setup a build of any type - with a CloudBees Docker Build and Publish build step. You can use the example under src/test/example to build a very simple busybox based image, and push it to acme/test.
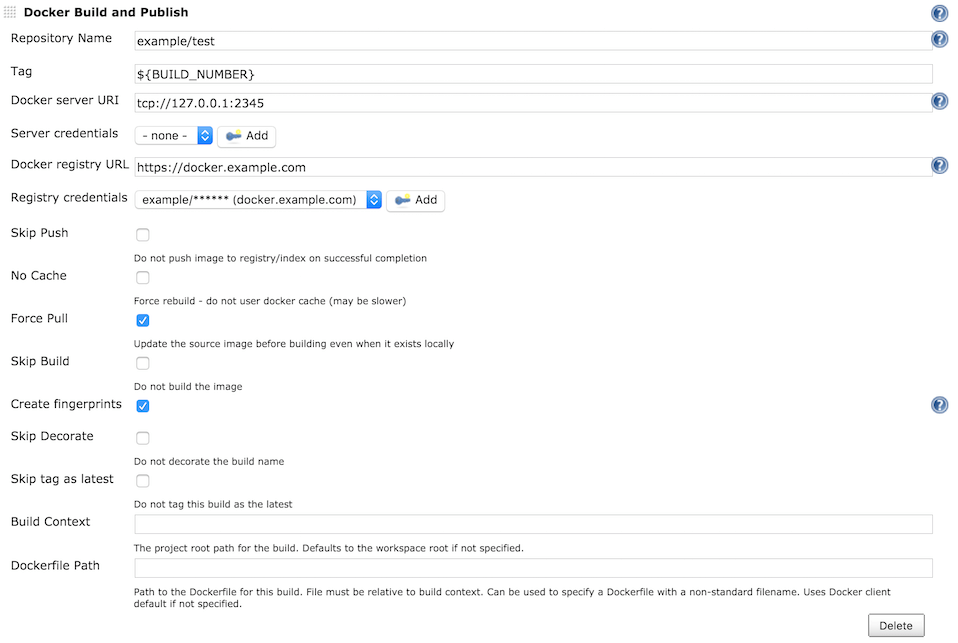
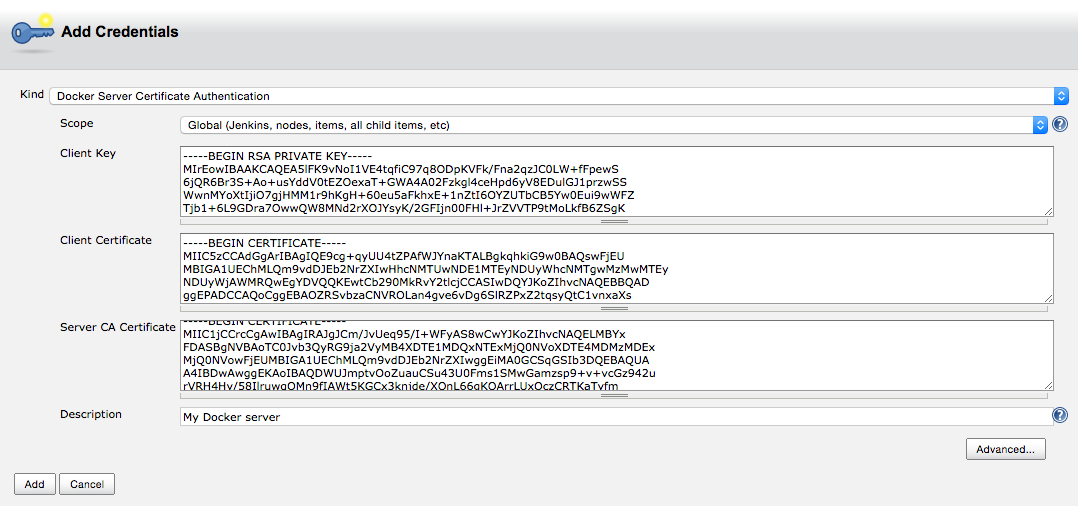
A remote Docker server can be configured providing its Docker server URI and creating a Docker Server Certificate Authentication credential containing the server certificates.
In order to push to a registry, set the Docker Registry URL and your credentials (username, password). By default these are used to access the Docker Registry at index.docker.io, but you can use private repositories. Credentials are needed in order to push (to public or private repos) - or need to build based on a private repo.
The usual Docker build caching mechanism applies - and you can choose to publish, or not, the resultant image, configured under Advanced options.
Builds will be decorated with the repository name (and tag) of the build images unless Skip Decorate is checked:
You can supply multiple tags for an image separated by commas. The latest tag is automatically applied to image - if you do not want this check the Do not tag this build as latest checkbox.
Defining your build as a Dockerfile means that it will run in a consistent linux environment, no matter where the build is run. You also end up with an image (in a repository, possibly pushed to a registry) that can then be deployed - the exact same image you built.
Dockerfiles can also help speed up builds. If there has been no change relative to a build instruction in the Dockerfile - then a cached version of that portion of the build can be used (this is a fundamental feature of docker)
Docker has some confusing terminology - quick refresher:
- Repository - collection of docker images and tags. You "push" a repository to a registry, and when you build an image, it gets added to a repository. By default this is the "latest" version (tag)
- Registry - a place you push docker images/repos to
- Push - deploy a docker repo (presumably with a new image) to a remote registry
- Image - a docker image is what you build from a Dockerfile - it gets added to a repo