Important: This plugin is being retired and will be out of support as of February 29, 2024. Azure CLI is the currently recommended way to integrate Jenkins with Azure services.
Credentials Binding and Az CLI is the recommended way to integrate with Azure services.
-
Make sure you have Az CLI installed, version 2.0.67 or higher.
-
Create a service principal using Az CLI:
az ad sp create-for-rbac
-
Make sure the Credentials plugin is installed and add a credential in Jenkins Credentials page.
Ensure that the credential kind is Username with password and enter the following items:
- Username - The appId of the service principal created.
- Password - The password of the service principal created.
- ID - Credential identifier such as AzureServicePrincipal
Sample Jenkinsfile (declarative pipeline)
pipeline {
    agent any

    environment {
        AZURE_SUBSCRIPTION_ID='99999999-9999-9999-9999-99999999'
        AZURE_TENANT_ID='99999999-9999-9999-9999-99999999'
        CONTAINER_REGISTRY='container registry name'
        RESOURCE_GROUP='resource group'
        REPO="repo name"
        IMAGE_NAME="image name"
        TAG="tag"
    }

    stages {
        stage('Example') {
            steps {
                withCredentials([usernamePassword(credentialsId: 'myAzureCredential', passwordVariable: 'AZURE_CLIENT_SECRET', usernameVariable: 'AZURE_CLIENT_ID')]) {
                            sh 'az login --service-principal -u $AZURE_CLIENT_ID -p $AZURE_CLIENT_SECRET -t $AZURE_TENANT_ID'
                            sh 'az account set -s $AZURE_SUBSCRIPTION_ID'
                            sh 'az acr login --name $CONTAINER_REGISTRY --resource-group $RESOURCE_GROUP'
                            sh 'az acr build --image $REPO/$IMAGE_NAME:$TAG --registry $CONTAINER_REGISTRY --file Dockerfile . '
                        }
            }
        }
    }
}
This plugin allows to queue an Azure Container Registry Quick Task.
Go to your Jenkins master, click 'Manage Jenkins' -> 'Manage Plugins' -> 'Available', then search Azure Container Registry Tasks Plugin and install the plugin.
This plugin requires your Azure Credential to auth your operation. You can refer Azure Credential Plugin to find what kind of autherization methods are supported.
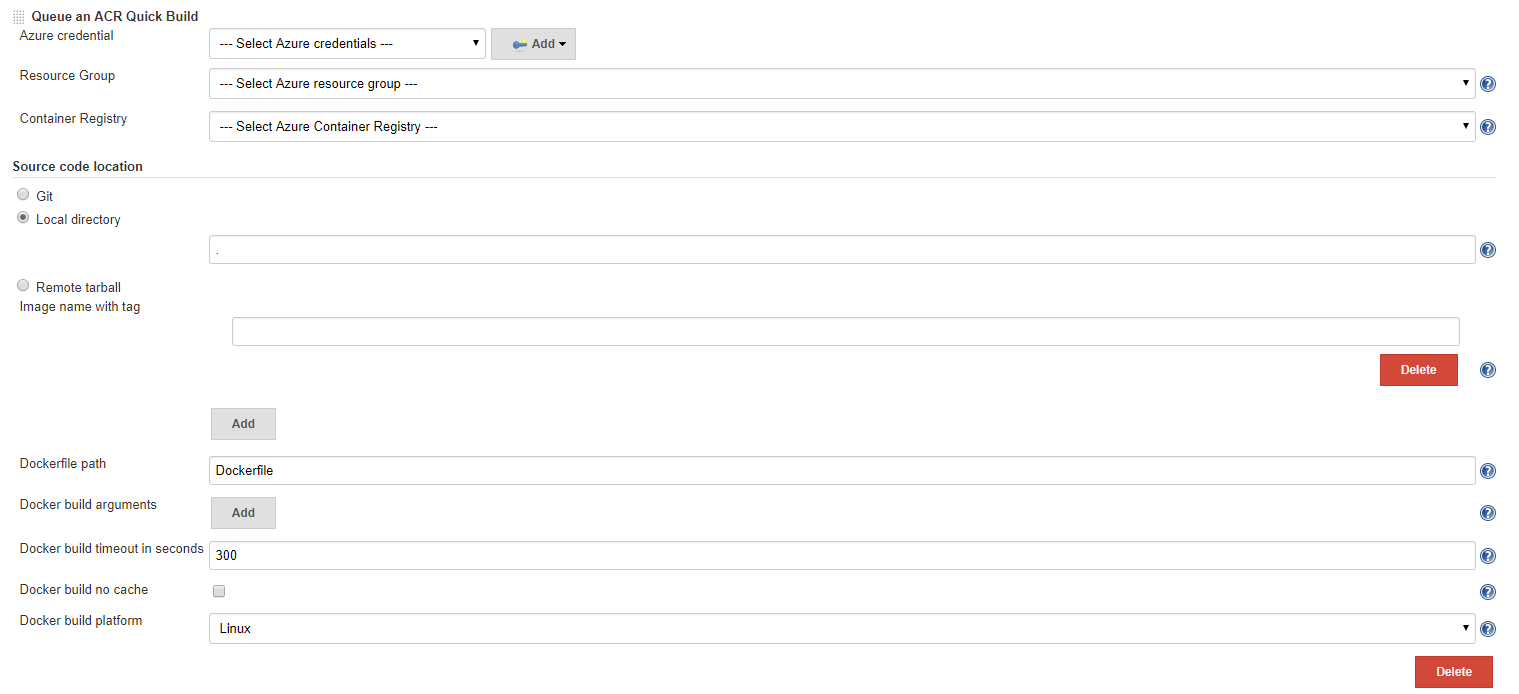
Go to your Jenkins job configure page. Tap "Add build step", add "Queue an ACR Quick Task". You will see the configuration.
-
Select your Azure credential ID which you already saved to your Jenkins server.
-
Select your Resource group which contains your Azure Container Registry.
-
Select your Azure Container Registry name, which will be used to build and host your docker image.
-
Under
Source code location, you can choosegit,local directoryandremote tarballas your docker build path asdocker build [PATH | URL | -].-
Git- If you want to directly build a docker image from a git repo, chooseGittype and enter the repository Url.The Url should use HTTP(S) protocol instead of SSH protocol. If your git repo is a private one, add the PAT in the URL, e.g. https://<github_token>@github.com/user/repo.git.
You can use
Refspecto specify a branch with branch name or a pull request in formatpull/<pr number>/head. Leave this field empty means the Azure Container Registry will build with default branch.Docker build pathhelps you set the docker build path. If you want to build your docker image under a sub-directory, add the relative path to the git repo's root path. Leave this field empty means the Azure Container Registry will build in the git repo's root path. -
Local directory- If you want to build a docker image with a local directory on your Jenkins server, chooseLocal directoryand input the path. This plugin will upload the directory to an Azure Storage Blob and send the URL to Azure Container Registry. -
Remote tarball- If you have already host your code as atar.gzfile on a web server, chooseRemote tarballand send the url directly to Azure Container Registry.
This plugin uses
Local directorywith value.as default. It will upload the code got fromSource Code Managementand processed by previous steps to Azure Storage Blob. -
-
After Azure Container Registry finishes docker build, it will execute docker push to push images to your registry. You need to specify the image name and optionally a tag under
Image name with taglist asdocker build -t [name:tag] PATH | URL | -. Leave this list empty, nothing will be pushed to your registry after docker build. -
Use
Dockerfile pathto specify the relative path of Dockerfile asdocker build -f [Dockerfile] PATH | URL | -. Default is<local directory path/git repo/remote tarball>/Dockerfile. -
Set docker build-time variables in
Docker build argumentslist asdocker build --build-arg [list] PATH | URL | - -
Enable your
docker build --no-cache PATH | URL | -flag by checking theDocker build no cache. -
You can specify the timeout option for your Azure Container Registry Build with
Docker build timeout in seconds. -
You can choose your docker build agent platform from
LinuxandWindowswithDocker build platform.
This plugin also supports Pipeline project. You can use Pipeline Syntax to generate pipeline script.
This project welcomes contributions and suggestions. Most contributions require you to agree to a Contributor License Agreement (CLA) declaring that you have the right to, and actually do, grant us the rights to use your contribution. For details, visit https://cla.microsoft.com.
When you submit a pull request, a CLA-bot will automatically determine whether you need to provide a CLA and decorate the PR appropriately (e.g., label, comment). Simply follow the instructions provided by the bot. You will only need to do this once across all repos using our CLA.
This project has adopted the Microsoft Open Source Code of Conduct. For more information see the Code of Conduct FAQ or contact opencode@microsoft.com with any additional questions or comments.
