The RPD Plugin integrates Jenkins with BMC Release Package and
Deployment (RPD) by adding two build and post-build actions to your
Jenkins build configuration,
which can be executed separately or combined sequentially:
- Create an instance
- Deploy an instance
Requirements
- RPD 4.4.00 and later
- Jenkins 1.639 and later
Dependencies
- Apache Maven 3.0.5 or later
To build this plugin from the source code, in the project root directory, run the following command:
shell
mvn package
This command will generate the .hpi file for you.
Local installation
- Run the mvn package command to generate /target/bmc-rpd.hpi.
- Remove the previous bmc-rpd.hpi file from $user.home/.jenkins/plugins/ and copy a new one into the same location.
- Restart Jenkins.
RPD Plugin Configuration
To configure the RPD Plugin:
- Go to Manage Jenkins > Configure System.
- In the BMC Release Package and Deployment Configuration section,
click Add, and provide the following information:
- Set as Default Server Profile: Select this option to set the
specified profile as the default one.
If you do not select the default profile, the first one will be selected by default. - Server Profile Name: Custom name for the RPD server profile.
- RPD Server URL: The URL that identifies the RPD Server on which processing will occur.
- RPD User Token: User token that will be used to authenticate
against RPD. For more information,
see https://docs.bmc.com/docs/display/rpd48/Creating+authentication+tokens.
- Set as Default Server Profile: Select this option to set the
specified profile as the default one.
- (Optional) To verify connection to the RPD server, click Test Connection.
- Click Save.
 {width="700"}
Job Configuration
To create a RPD instance:
- Click New Item to create a new job.
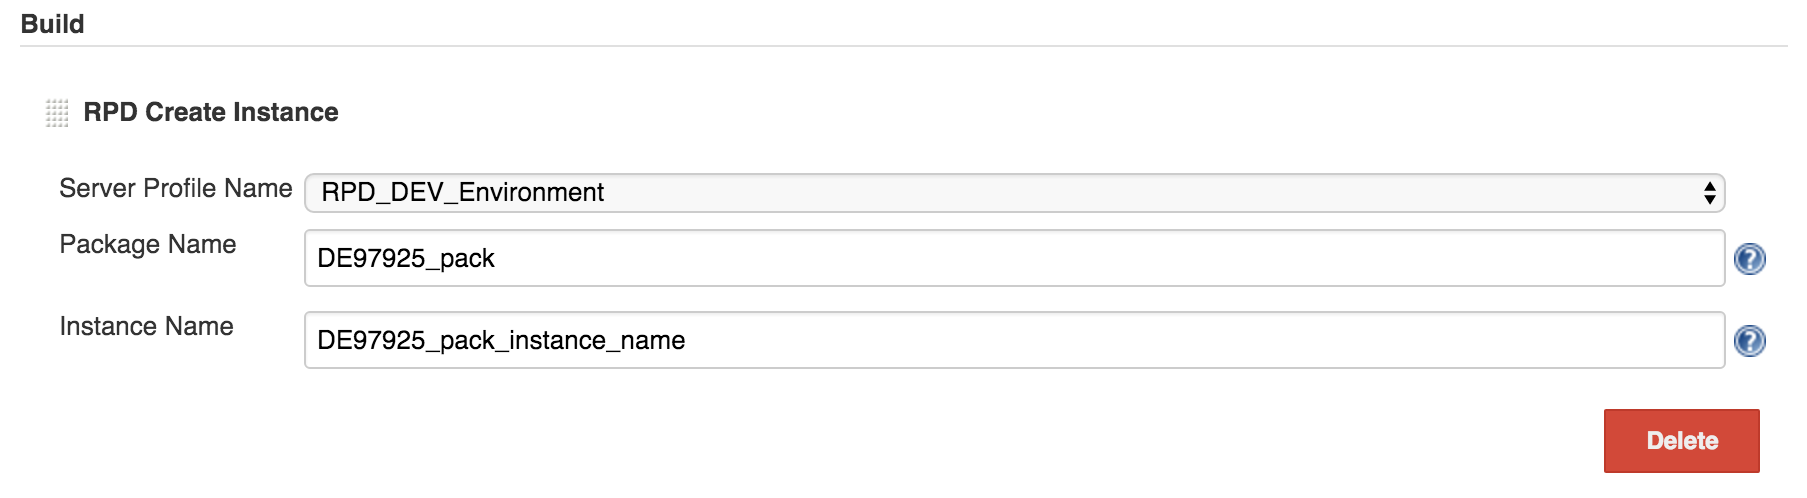
- In the Build section, from the Add build step list, select RPD Create Instance.
- In the RPD Create Instance section, provide the following
information:
- Server Profile Name: Custom name for the RPD server profile.
- Package Name: Name of the package where you want to create the RPD instance.
- Instance Name: (Optional) Custom name for the RPD instance
that you want to create.
If you do not specify an instance name, the name specified in RPD will be used.
- Click Save.
 {width="700"}
To deploy a RPD instance:
- Click New Item to create a new job.
- In the Build section, from the Add build step list, select RPD Deploy Instance.
- In the RPD Deploy Instance section, provide the following
information:
- Server Profile Name: Custom name for the RPD server profile.
- Package Name: Name of the package where you want to deploy the RPD instance.
- Instance Name: (Optional) Custom name for the RPD instance
that you want to deploy.
If you do not specify an instance name, the name specified in RPD will be used. - Route Name: Route where to deploy the RPD instance.
- Environment Name: Environment where to deploy the RPD instance.
- Click Save.
 {width="700"}
Job Configuration as a Post-build Action
To create a RPD instance:
- Click New Item to create a new job.
- In the Post-build Actions section, from the Add post-build action list, select RPD Create Instance.
- In the RPD Create Instance section, provide the following
information:
- Server Profile Name: Custom name for the RPD server profile.
- Package Name: Name of the package where you want to create the RPD instance.
- Instance Name: (Optional) Custom name for the RPD instance
that you want to create.
If you do not specify an instance name, the name specified in RPD will be used.
- Click Save.
 {width="700"}
To deploy a RPD instance:
- Click New Item to create a new job.
- In the Post-build Actions section, from the Add build step list, select RPD Deploy Instance.
- In the RPD Deploy Instance section, provide the following
information:
- Server Profile Name: Custom name for the RPD server profile.
- Package Name: Name of the package where you want to deploy the RPD instance.
- Instance Name: (Optional) Custom name for the RPD instance
that you want to deploy.
If you do not specify an instance name, the name specified in RPD will be used. - Route Name: Route where to deploy the RPD instance.
- Environment Name: Environment where to deploy the RPD instance.
- Click Save.
Note
For the post-build action, you can create and deploy only one instance.
 {width="700"}
Variables
When creating an instance, use the following custom variables:
- RPD_<Package name>_instance_name – allows using an instance name for the next deployment or in some kind of notifications.
- RPD_<Package name>_instance_id – allows using an instance name for the next deployment or in some kind of notifications.
Notes
• If you create an instance, deploy an instance, and specify the same
package name for both actions
but without a specified instance name, then the instance name will be
uploaded from RPD.
• If you create an instance with both package name and instance name
specified, deploy an instance with the same package name
but without a specified instance name, then RPD will deploy the
instance that you have just created.
You can also use standard Jenkins variables. To see the list of standard variables, go to Jenkins Set Environment Variables.
RPD Instance Logs
To see the RPD instance create and deploy logs:
Click Jenkins, select the necessary job, and click Console Output.
RPD Secure Connection
To install the certificate authority (CA):
- Go to the necessary URL, click the HTTPS certificate chain, and then click Certificate information.
- On the Details tab, click Copy to File…
- Install the CA by running the following command: keytool -import -alias example -keystore/path/to/cacerts -file example.der.
Note
Ensure that you are installing the CA on the same computer where Jenkins is installed.